|
|
LinkScan for Unix. Reference Manual |
![]()
![]()
Note: This Reference Manual is divided into multiple documents for ease and speed of navigation. However, the contents are also available as a single document suitable for searching and/or printing as the Single Document LinkScan Reference Manual.
![]()
LinkScan™ is an industrial-strength link checking and website management tool. It saves time and money by automating the quality assurance testing of virtually any website or web-based application.
LinkScan is built around applicable open systems standards. Hence it integrates easily with many other content development, management and testing applications as well as general purpose computer tools. It operates on all Microsoft Windows and Unix/Linux platforms and is professionally supported.
LinkScan users include Fortune 1000 companies such as Hewlett Packard, government agencies like NASA, as well as many smaller businesses.
New users will find that LinkScan is extremely simple to install, configure and use. And the more experienced user will appreciate the vast array of customization features built into the system. Together, these attributes make LinkScan ideal for:
Small and medium sized websites
LinkScan can be configured to scan simple websites in a few seconds. Yet it rapidly analyses the site and accurately identifies 100 different types of problem. Affordable licenses are available from as little as $750.
Large and very large websites
LinkScan offers unparalleled performance and scalability. It can handle massive sites with 2,000,000 and more web pages. One of the many performance features includes the ability to navigate a website via direct file system access to static documents thereby avoiding the latency and other overheads associated with network access. The LinkScan database incorporates features that enable different content managers and workgroups to selectively view the results of their data. Even to send reports and alarms via e-mail.
Complex sites with dynamic content
LinkScan incorporates many features specifically designed for sites containing complex dynamic content. That includes sites and applications built with tools such as Active Server Pages (ASP), Cold Fusion pages (CFM), Java Server Pages (JSP) and other high-end publishing systems such as those from Broadvision and Vignette.
LinkScan is available in five different editions all based upon the same core technology:
LinkScan Workstation is a single-user implementation designed for individual content developers in large enterprises, and for organizations having smaller websites with up to 500 unique documents. It will check an unlimited number of external links.
LinkScan Server is a multi-user implementation and includes LinkScan/Dispatch. LinkScan Server will analyze a single website of up to 5,000 unique documents and an unlimited number of external links. Reports may be viewed with web browsers and/or distributed via e-mail.
LinkScan ServerPro is a multi-user implementation and includes LinkScan/Dispatch. LinkScan ServerPro will analyze a single website of up to 15,000 unique documents and an unlimited number of external links. Reports may be viewed with web browsers and/or distributed via e-mail.
LinkScan Enterprise is the full multi-team product and it will scan up to 50,000 unique documents and an unlimited number of external links on up to ten physical computers that are owned or leased by you at one Location. If you wish to scan more than 10 computers, you will have to purchase one or more additional LinkScan Enterprise Licenses. You may buy licenses to scan as many unique documents as you wish and to scan multiple locations as described below.
Document Blocks (DocBlocks) - If you wish to scan more than 50,000 unique documents with a copy of LinkScan Enterprise, you must purchase addtional Document Blocks (DocBlocks) each of which allows you to scan and addtional 50,000 unique documents.
Location Blocks (LocBlocks) - If you wish to scan computers at more than one location, you must purchase new LinkScan Enterprise licenses for those locations or if you want to scan more locations using one copy of LinkScan Enterprise, you may purchase additional Location Blocks (LocBlocks).
LinkScan Unlimited - will scan an unlimited number of unique web pages (documents) on any number of physical computers that are owned or leased by you.
The above descriptions are not complete nor comprehensive. You must read the LinkScan License Agreement for a complete definition of the products and your other rights and obligations.
The steps involved in using LinkScan include:
Each of these steps is described in this Reference Manual. However, we recommend that new users get a fast start by jumping to one of the following pages:
![]()
This section introduces some important concepts and terms that are used throughout the remainder of this Reference Manual. These are:
![]()
LinkScan is able to scan multiple websites. You may also scan the same website multiple times with different configuration options. In each case, LinkScan creates a unique and corresponding LinkScan Database containing the results of the analysis. Together, the configuration files and database constitute a LinkScan Project.
Users/administrators are required to select a Project when scanning, if multiple projects are defined. And, users must select a Project when viewing the results.
Each LinkScan Project is stored within a subdirectory of the main LinkScan installation directory.
For addition information concerning Projects, how to create them and how to scan them, see Basic Scanning.
![]()
Within each Project, you may also configure multiple LinkScan Owners. Collections of HTML documents and other files are assigned between Owners in a variety of ways:
The LinkScan Owner concept enables individual content developers or workgroups to view results that pertain to their documents or areas of responsibility. LinkScan Owners are defined via the LinkScan Configuration Files, discussed below. By default, LinkScan will create and assign Owners as follows:
This enables users to browse the results selectively so that the reports are smaller and more relevant to their needs. They're also produced more rapidly.
![]()
LinkScan incorporates access controls that may be used to limit user access to LinkScan databases and results. These controls are not enabled by default.
When activated, users may be required to login to the LinkScan system used a pre-defined LinkScan Username and associated password. The Username will define the Projects and Owners that an individual user is permitted to access.
Those wishing to enable these access control features should see LinkScan Access Controls.
![]()
LinkScan supports three different scanning methods:
Network (HTTP) Scanning, which uses HTTP requests to check links on your site
File System Scanning, which bypasses the network when scanning internal links and reads the documents via direct access to your computers file system
Import Scanning which is used to import lists of documents or links for validation
Network HTTP scanning is generally the best mode to use for sites with a large amount of dynamic content: .jsp, .asp files, etc. The File System Scanning method mode enables tracking of "orphaned" files, files which aren't linked to currently, and is more appropriate for sites with limited dynamic content.
![]()
The LinkScan software, and this document, both maintain a strong distinction between Documents and Links.
A Link refers to a pointer to any arbitrary file or URL.
A Document refers to a file or URL that contains a number of Links.
Hence an HTML file is a Document containing Links. Dynamically generated web pages, PDF and Flash Files as well as Import Files may also be considered Documents since LinkScan can examine those files for the presence of Links. Images (such as .gif and .jpg files) are not considered documents.
References to sites other than the one being scanned (External Links) are not documents either, since LinkScan does not examine the content of those files for the presence of Links.
![]()
The LinkScan system is made up of a number of different file types:
In a basic LinkScan installation these files are organized within the following directory structure:
linkscan/ Contains all of the executable files including some diagnostics and utilities together with a number of configuration and control files including the linkscan.sys file and the Global Configuration File, linkscan.cfg (discussed below)
linkscan/docs/ Contains this documentation in HTML format together with a number of image files used by the LinkScan Menus and Reports. You may, optionally, move the contents of this directory to another location on your server if, for example, you do not wish to install the LinkScan directory under "www root"
linkscan/default/ Contains some additional configuration files including the Project Configuration File, linkscan.cfg.
linkscan/default/data/ This directory (and the subdirectories within it) are created during execution and contain the results of the scan; the LinkScan database.
linkscan/utils/ This directory contains a number of supporting utility programs.
linkscan/weblint/ This directory contains the weblint HTML syntax checking software.
![]()
LinkScan's operation is controlled by a number of different configuration files. When running LinkScan via the Windows Graphical User Interface, these files are somewhat invisible. However, they still control the execution of the program and you may find it useful to view the raw configuration files from time to time. On Unix systems, these files represent the primary method of configuring LinkScan. All of the files are formatted in plain ASCII text and may be viewed and modified using the editor of your choice (e.g. Windows Notepad, Unix vi, emacs, pico, nedit, et al).
The most important configuration files are:
linkscan.sys: This file (there is only one) resides in the main LinkScan directory. This file contains the basic information concerning LinkScan and your computer. That includes the LinkScan License details and information that controls how LinkScan interfaces with other systems and services on your computer.
linkscan.mas: This file (there is only one) resides in the main LinkScan directory. This file contains a simple list of the available LinkScan Projects.
linkscan.cfg: Multiple copies of this file may reside within a single LinkScan installation. One copy, known as the Global Configuration File, resides in the main LinkScan directory. An additional linkscan.cfg file, known as the Project Configuration File resides within each LinkScan Project subdirectory.
LinkScan always reads the Global Configuration File and the Project Configuration File (in that order). Hence it is important to understand how all of the commands are processed. Each command is defined as either single-valued or multi-valued; see the LinkScan Command Summary. Single-valued commands are overwritten each time they are read, so the last value read is the significant value. Multi-valued commands are cumulative; all are added to the list of values for that command. Note that in some cases, the order in which multi-valued commands are read may impact the manner in which they are subsequently processed (this is noted where appropriate).
This approach provides tremendous flexibility. It means you can establish Global Settings in the Global Configuration File that apply to all Projects. And you may override (single-valued) settings or supplement (multi-valued) settings with additional commands in the Project Configuration File(s); these being Project-specific.
Some additional configuration/control files are discussed elsewhere in this manual. They are used by LinkScan (i.e. do not delete them!) but it is rarely necessary for users to examine or modify them.
All of the configuration files include extensive comments. Comments are signified by the pound sign like this:
# This line contains only a comment

Realcommand = 1   # This comment could describe Realcommand
![]()
LinkScan incorporates a vast array of customization features many of which exploit the power of Perl Regular Expressions. For a description of Perl Regular Expressions on Unix systems, see man perlre. HTML versions are available at many locations including:
http://perldoc.perl.org/perlre.html
We also recommend the book Mastering Regular Expressions (a.k.a. the Owl Book) by Jeffrey E.F. Friedl, and published by O'Reilly [ISBN: 1-56592-257-3].
![]()
We make extensive reference to these terms in the customization sections of this manual and they are introduced here for your convenience.
Let us assume that we are scanning the website:
http://www.example.com/
An individual document within that website might be:
http://www.example.com/products/widget.html
LinkScan will refer to that page using its relative-path, which in this case, is:
products/widget.html
A relative-path-expression is a Perl Regular Expression that matches relative-path. For example, all of the following will match our widget page:
products/widget.html      # Also matches products/widgetXhtml
products/widget\.html$    # Does not match anything else
(|.*/)widget\.html$       # Matches widget.html in any directory
![]()
This section describes the pre-requisites for LinkScan and leads into step-by-step instructions for performing a new installation.
![]()
LinkScan is supported on a wide variety of platforms including:
We do not recommend Windows 95/98/ME for scanning large websites of more than 5000 documents. Although LinkScan has been tested on websites of significantly greater size, performance and stability will be much improved when running under operating systems with a true multi-processing implementation such as Windows NT/2000/XP/Vista or Linux/Unix.
Disk and memory requirement depend almost exclusively on the size and nature of the website(s) to be analyzed. However, the following guidelines are intended to assist users with their capacity planning needs:
Memory: We recommend 64 Mbytes of RAM (or more) for scanning websites up to 5,000 documents. 128 Mbytes is generally sufficient for sites of up to 50,000 documents. Some experimentation is generally essential when considering very large sites beyond 50,000 documents.
Disk Space: With a default configuration the LinkScan Database will require around 5 Mbytes of disk storage per 1000 documents scanned.
![]()
To successfully install and configure LinkScan on your computer you must have:
An appropriate version of Perl Version 5 installed on your computer. You may download a version suitable for your system via:
A copy of the LinkScan software and a LinkScan License Key. Both are available from:
![]()
We recommended that new users get a fast start by jumping to one of the following pages:
![]()
This section describes how to upgrade an existing LinkScan installation to LinkScan Version 12.3.
Users upgrading from LinkScan 9.x or earlier must perform a brand new installation into a clean (i.e. empty) directory.
Users upgrading from LinkScan 10.x or 11.x for Unix should carry out the following steps:
Extract linkscan.tar.gz into a temporary working directory.
Copy the LinkScan programs (*.pl) to the LinkScan directory.
Copy the additional new files (*.txt) to the LinkScan directory.
Copy the LinkScan CGI's (*.cgi) to the LinkScan directory.
Copy the SGML/ directory to the LinkScan directory.
If appropriate, copy the LinkScan CGI's (*.cgi) to the cgi-bin or equivalent directory.
Copy the documentation (./docs/*) to the LinkScan/docs/ directory.
Initiate a fresh scan of each Project to update the LinkScan databases.
![]()
This section describes how to create, configure and scan a LinkScan Project using the command line interface.
Before executing the LinkScan programs you must set the current working directory:
web:/> cd /usr/www/htdocs/linkscan/
web:/usr/www/htdocs/linkscan>
![]()
To create a new Project, simply execute the main LinkScan program (linkscan.pl) with the -newproject command line option:
web:/usr/www/htdocs/linkscan> perl linkscan.pl -newproject newproj

[...]

This Will Create the New LinkScan Project: newproj

The answers to the following questions are accepted verbatim without
validation. Please type carefully. <Control-C> to abort and start again.


Enter Homedir:
Enter Home URL: http://www.example.com/index.html
Enter Organization: My Department
Enter Project Description: My First Test
** Status: Project newproj Created Successfully
web:/usr/www/htdocs/linkscan>
![]()
To configure a Project, simply edit the appropriate Project configuration file using your editor of choice:
web:/usr/www/htdocs/linkscan> vi ./newproj/linkscan.cfg
Note that lines starting with a pound sign (#) are comments.
In the simple case of scanning a website using the normal Network (HTTP) Scanning Method, you would only need to configure Homeurl with the URL to the root of the website, and Homefile with the filename (relative to server root) of the starting page. Be sure to leave Homedir blank since this will force LinkScan to use Network (HTTP) Scanning.
[...]
Homedir =
Homeurl = http://www.example.com/
Mirrorurl =
Homefile = index.html
Projectdesc = My First Test
Organization = My Department
[...]
This will scan the entire site www.example.com from it's starting page, index.html. The Homeurl parameter should always be the "root" URL of the site being scanned. To specify scans for sub-level areas, add information the Homefile parameter. For example, using the same Homeurl as above, and setting:
Homefile = recommendations/external/index.html
would start the scan at:
http://www.example.com/recommendations/external/index.html
![]()
To scan a Project, simple execute the main LinkScan program. You may specify the Project on the command line as shown below. Otherwise LinkScan will prompt you to select from the available list of valid Projects.
web:/usr/www/htdocs/linkscan> perl linkscan.pl -project newproj

LinkScan Enterprise Version 12.3 Unix.

[...]

** Status: LinkScan is Starting Processes...
** Status: Started 3 Processes...
** Status: LinkScan is Scanning Internal Links...
Processing  URL:
Processing  URL: about.html
Processing  URL: linkscan/
Processing  URL: linkscan/dleval.cgi
Processing  URL: linkscan/order.cgi
Processing  URL: linkscan/support.html
[...]
You have now completed a scan of the website and LinkScan has created a Database for that Project. Next you will want to examine the findings by following the steps described in Viewing the Results.
![]()
Run the main LinkScan program with the -help option to see a short listing of the available command line switches:
web:/usr/www/htdocs/linkscan> perl linkscan.pl -help
LinkScan Version 12.3 Unix
Copyright 1997-2012 Electronic Software Publishing Corporation

USAGE: linkscan.pl  {-help} {-alllinks} {-fast} {-home pathname} {-http}
       {-newproject name} {-noexternal} {-noorphans} {-project name}
       {-quiet} {-remote URL} {-retest}

-help            Displays this message
-alllinks        Check all external links [Override: Maxgoodhours etc]
-fast            Use larger number of processes to speed testing
-home pathname   Specify starting page [Override: Homefile in linkscan.cfg]
-http            Use HTTP navigation [Equiv: Execute .* and -noorphans]
-newproject name Create a new LinkScan Project
-noexternal      Test internal links only [Default: Internal and External]
-noorphans       Disable checking for orphaned files
-project name    Select a LinkScan Project
-quiet           Reduce verbosity of progress/status messages
-remote URL      Specify Remote Site [Equiv: -http; Override: Homeurl/Homefile]
-retest          Repeat last test, rechecking only those links that failed
Detailed Help [Y/N]:n
![]()
Once a Project has been scanned and a database created, a wide range of different reports are available.
This document describes those reports and how to view them interactively using a simple web browser-based interface. Note that a batch command-line interface is also available. See Section 12 of this manual.
To view the reports interactively:
Users will need to point a web browser at the
LinkScan Main Menu which typically resides at:
http://your.server.name/linkscan/linkscan.cgi
or
http://your.server.name/cgi-bin/linkscan.cgi
The first time you access the results, you will be presented with the LinkScan Login and Preferences Menu. Simply click Login Now. No username is required unless you later decide to enable various LinkScan security features.
Once you have logged in, you will be presented with the LinkScan Main Menu.
You must select one of the individual Reports and submit the form by pressing Select Report.
A help page is available for each type of LinkScan Report. You may view the appropriate help page at any time by using the Help option on the context-sensitive LinkScan Toolbar. You may also use the [?] links on the LinkScan Main Menu, or the links provided in the summary table below.
The most frequently used reports have been organized in the left hand column; we suggest new users start there. Also, many of the reports incorporate hyperlinks to other reports. This means you can use a drill-down paradigm to view more detail associated with a specific problem or document. For example, some users may never explicitly select a LinkScan/QuickCheck Report. But they will likely view reports of that type by following the [Src] links from other reports.
Summary of Available Reports |
|
| Project Summary Report Summary statistics for the current project |
Summary of All Projects Report Summary statistics for all configured projects |
| Problem Documents Report List documents containing potential problems |
Selected Status Codes Report List errors of specific types |
| Document Detail Report List all/selected documents |
All Pages Linking To ... Report Find pages that link to... |
| Critical Errors Report List most critical errors |
Orphaned Files Report List orphaned files |
| Detailed Errors Report List all/selected errors |
External History Report View history of an external link |
| Changed Documents Report Compare two scans of the current project |
Redirections Report List a summary of redirections |
| Search Documents Report Ad hoc searching: document-centric |
System Configuration Report Display current LinkScan configuration settings |
| Search Links Report Ad hoc searching: link-centric |
LinkScan/QuickCheck View source code and detailed analysis of a document |
| SiteMap Report Display LinkScan SiteMap |
LinkScan/TapMap Display LinkScan TapMap |
The LinkScan Main Menu may include an Owner Selection Box. If enabled, this option will allow you to select a sub-set of the website to which subsequent reports will apply.
In a default configuration, the Owner Selection Box will include entries for each top-level directory scanned, in addition to the special entry "All". This will be the default selection and subsequent reports will apply to the entire website scanned.
Note however, that the LinkScan Administrator may configure and customize the manner in which Owners are created. Hence your installation may appear and behave somewhat differently from that described herein.
In many cases, when you submit the form by pressing Select Report you will be presented with a second menu of options. Initially, we suggest you accept the default options which have been carefully designed to produce excellent results in the vast majority of situations. However, to learn more, you may use the context-sensitive Help button on the LinkScan Toolbar at any time.
Each of the LinkScan Menus and Reports includes a common LinkScan Toolbar. It contains a number of links:
| Main Menu Preferences Advanced | Help Reference HowTo Card |
The Main Menu link will always return you to the LinkScan Main Menu.
The Preferences link will always take you to the LinkScan Login and Preferences Menu.
The Advanced link appears when appropriate and it will cause the current menu to be redrawn with additional options.
The Help link will display an appropriate section of the LinkScan Documentation depending upon the current context.
The Reference link will display the table of contents for the LinkScan Reference Manual.
The HowTo link will display a brief How To Guide with instructions for completing certain Common Tasks.
The Card link will display the LinkScan Quick Reference Card.
![]()
The following section describes each of the LinkScan Error and Status Codes. Each Status Code is assigned to one of six Severities:
| Symbol | Code | Severity | Explanation |
 |
0 | Unknown: | LinkScan has not tested or was unable to test this link |
 |
1 | Error: | LinkScan found a hard error on this link |
 |
2 | Possible Error: | There may be a problem with this link. It should be retested at a later time |
 |
3 | Warning: | LinkScan found something unusual about this link. Manual inspection highly recommended |
 |
4 | Advisory: | This link is probably ok, but manual inspection recommended |
 |
5 | No Error: | This is a good link |
The Severity associated with any specific Error or Status Code may be customized by the LinkScan Administrator through the use of the Statuscode option.
Status codes in the range 0-99 are generated exclusively by LinkScan and generally refer to the status of local links (HTML files, Non-HTML files, etc.).
Status codes in the range 100-699 are defined exclusively by the HyperText Transfer Protocol.
Status codes in the range 800-3099 are generated exclusively by LinkScan and generally refer to Networking Problems (Failed DNS lookups, failure to connect to a remote server or timeouts) as well as some other LinkScan detected warning or advisory messages.
![]()
No Status (0)Explanation: This object has not been tested.
Action: Inspect this link manually.
![]()
HTML File (1)Explanation: This HTML document was found OK.
Action: None required.
![]()
Error: Bad HTML File (2)Explanation: The Referring document is linked to an HTML file that does not exist on your server.
Action: Create/restore the missing file or correct the erroneous reference.
![]()
Non-HTML File (3)Explanation: This non-HTML file was found OK.
Action: None required.
![]()
Error: Bad non-HTML File (4)Explanation: The Referring document is linked to a non-HTML file that does not exist on your server.
Action: Create/restore the missing file or correct the erroneous reference.
![]()
Anchor (5)Explanation: The corresponding <a name=> tag was found OK.
Action: None required.
![]()
Error: Bad Anchor (6)Explanation: The Referring document is linked to a <a name=> tag that does not exist within the target document.
Action: Create/restore the missing tag or correct the erroneous reference.
![]()
Warning: Orphaned HTML File (7)Explanation: This HTML file cannot be reached (directly or indirectly) from your home page.
Action: Check whether this is intentional or an error.
![]()
Warning: Orphaned non-HTML File (8)Explanation: This non-HTML file cannot be reached (directly or indirectly) from your home page.
Action: Check whether this is intentional or an error.
![]()
Imagemap File (9)Explanation: This server-side Imagemap file was found OK.
Action: None required.
![]()
Error: Bad Imagemap File (10)Explanation: The Referring document is linked to a server side Imagemap file that does not exist on your server.
Action: Create/restore the missing file or correct the erroneous reference.
![]()
Valid Mailto Link (11)Explanation: This mailto: link appears valid based on an examination of the tag and E-mail address syntax.
Action: None required.
![]()
Possible Error: Invalid Mailto Link (12)Explanation: This mailto: link appears invalid based on an examination of the tag and E-mail address syntax.
Action: Inspect this link manually.
![]()
Warning: Missing / (13)Explanation: This link is almost certainly missing a trailing "/". LinkScan was able to validate the link by adding the "/".
Action: Add a "/" character to the end of the existing URL. This omission, although not normally fatal, may cause visitors that try to follow the link problems or delays.
![]()
Warning: Unprocessed SSI (14)Explanation: LinkScan identified but did not process this Server Side Include (SSI). If you are scanning the website via Network (HTTP) Access, your server failed to process the SSI and the served document may be incomplete!
Action: Inspect this Server Side Include manually.
![]()
PDF File (15)Explanation: This PDF document was found OK.
Action: None required.
![]()
Error: Bad PDF File (16)Explanation: The Referring document is linked to a PDF document that does not exist on your server.
Action: Create/restore the missing file or correct the erroneous reference.
![]()
Warning: No Closing /a (17)Explanation: LinkScan found a tag of the form <A HREF=...> with no corresponding </A> tag. This check is not enabled in a default configuration.
Action: Correct the markup. Mismatched tags may cause problems with some or all browsers. If very large numbers of these errors "clog" the LinkScan database, this check may be disabled via the Closeatag setting.
![]()
Error: Invalid Scheme (18)Explanation: This link uses a scheme that LinkScan did not recognize as valid. LinkScan validates various schemes (http:, https:, ftp:, ldap:, mailto:). It is aware of, but does not validate, other common schemes (e.g. gopher:, news:) and these are stored with No Status. This link uses an unknown scheme. It may caused by a typographical error.
Note: links using the file: scheme are always marked with an Invalid Scheme Error. The use of the file: scheme is rarely desirable (or intended) in published documents and generally indicates an oversight.
Action: Inspect/correct this link manually. In rare cases, when the use of the file: scheme is actually intended, use an Exclude or Substitute command to modify the LinkScan behavior as appropriate.
![]()
Advisory: No Alt/Height/Width (20)Explanation: The Referring document contains an IMG SRC tag without the ALT, HEIGHT and/or WIDTH attributes.
Action: Adjust the specified IMG SRC tag.
![]()
Flash File (21)Explanation: This Flash document was found OK.
Action: None required.
![]()
Error: Bad Flash File (22)Explanation: The Referring document is linked to a Flash document that does not exist on your server.
Action: Create/restore the missing file or correct the erroneous reference.
![]()
Text File (23)Explanation: This Text document was found OK.
Action: None required.
![]()
Error: Bad Text File (24)Explanation: The Referring document is linked to a Text document that does not exist on your server.
Action: Create/restore the missing file or correct the erroneous reference.
![]()
Javascript File (25)Explanation: This Javascript document was found OK.
Action: None required.
![]()
Error: Bad Javascript File (26)Explanation: The Referring document is linked to a Javascript document that does not exist on your server.
Action: Create/restore the missing file or correct the erroneous reference.
![]()
XML File (27)Explanation: This XML document was found OK.
Action: None required.
![]()
Error: Bad XML File (28)Explanation: The Referring document is linked to a XML document that does not exist on your server.
Action: Create/restore the missing file or correct the erroneous reference.
![]()
Error: HTML Syntax (99)Explanation: An HTML Syntax Error was found.
Action: Correct the HTML markup.
![]()
Continue (100)Explanation: This HTTP Status Code will not normally arise with LinkScan.
Action: Inspect this link manually.
![]()
Switching Protocols (101)Explanation: This HTTP Status Code will not normally arise with LinkScan.
Action: Inspect this link manually.
![]()
Good URL (200, 201, 202, 203, 205, 206)Explanation: LinkScan found a good (external) URL.
Action: None required.
![]()
Error: No Content (204)Explanation: An unusual error occurred.
Action: Inspect this link manually.
![]()
Error: Multiple Choices (300)Explanation: The target server requires a language selection before serving the applicable document.
Action: Add a command to the linkscan.cfg file such as:
Extraheader Accept-Language: en
![]()
Error: Moved Permanently (301)Explanation: This URL has moved permanently.
Action: Update this link as soon as possible. The redirection instruction may expire shortly, making it harder for you to find the new location.
![]()
Advisory: Moved Temporarily (302)Explanation: The URL of the page retrieved is different from the URL of the page requested. This is a design feature of the referenced server. According to the http specifications, you should continue using the existing URL. However, in our experience, such links should be inspected manually. Some servers report redirections to temporary URL's that are specific to the current user session. It would clearly be undesirable to modify your existing hyperlinks in these situations. But, other servers return a 302 Status Code when the URL has in fact been moved "permanently".
Action: Inspect this link manually.
![]()
Error: Network/Server Error (303, 304)Explanation: An unusual error occurred.
Action: Inspect this link manually.
![]()
Error: Use Proxy (305)Explanation: This link must be accessed via a proxy server.
Action: Inspect this link manually and contact your LinkScan Administrator.
![]()
Error: Unused (306)Explanation: This status code is no longer used and is reserved.
Action: Inspect this link manually and contact the Web Server Administrator.
![]()
Warning: Temporary Redirect (307)Explanation: This link is temporarily redirected.
Action: Inspect this link manually.
![]()
Error: Network/Server Error (400)Explanation: An unusual error occurred.
Action: Inspect this link manually.
![]()
Warning: Unauthorized (401)Explanation: The remote server reported that you are not authorized to access the requested object. You may be able to access it manually if you supply a valid username and password.
Action: Inspect this link manually.
![]()
Warning: Payment Required (402)Explanation: The remote server reported that you are not authorized to access the requested object. You may be able to access it manually if you supply a valid username and password.
Action: Inspect this link manually.
![]()
Error: Forbidden (403)Explanation: The remote server understood the request but refused to fulfill it. Supplying a username and password will not help.
Action: Inspect this link manually.
![]()
Error: Not Found (404)Explanation: The remote server reported that the requested object does not exist. This condition is probably (but not necessarily) permanent.
Action: Inspect the link manually. A very small number of servers report a "Not Found" error when there is, in fact, no problem. In some cases, the server may display a "Moved" message even though it did not supply a "Moved" header.
![]()
Error: Method Not Allowed (405)Explanation: An unusual error occurred.
Action: Inspect this link manually.
![]()
Error: Not Acceptable (406)Explanation: An unusual error occurred.
Action: Inspect this link manually.
![]()
Error: Proxy Authentication Required (407)Explanation: The Proxy Server requires authentication.
Action: Review the LinkScan Proxy Server configuration settings or contact your LinkScan Administrator.
![]()
Possible Error: Request Timed Out (408)Explanation: The Request timed out.
Action: Check the link manually. This URL is currently unavailable. LinkScan was not able to establish whether the situation is temporary or permanent. You may wish to probe the site using the standard ping and traceroute utilities.
![]()
Error: Conflict (409)Explanation: An unusual error occurred.
Action: Inspect this link manually.
![]()
Error: Gone (410)Explanation: The remote server reported that the requested object does not exist. The condition is permanent and no forwarding address is known.
Action: Inspect the link manually.
![]()
Error: Length Required (411)Explanation: An unusual error occurred.
Action: Inspect this link manually.
![]()
Error: Precondition Failed (412)Explanation: An unusual error occurred.
Action: Inspect this link manually.
![]()
Error: Request Entity Too Large (413)Explanation: An unusual error occurred.
Action: Inspect this link manually.
![]()
Error: Request URI Too Large (414)Explanation: An unusual error occurred.
Action: Inspect this link manually.
![]()
Error: Unsupported Media Type (415)Explanation: An unusual error occurred.
Action: Inspect this link manually.
![]()
Possible Error: Server Error (500)Explanation: An unusual error occurred.
Action: Inspect this link manually.
![]()
Possible Error: Not Implemented (501)Explanation: An unusual error occurred.
Action: Inspect this link manually.
![]()
Possible Error: Bad Gateway (502)Explanation: An unusual error occurred.
Action: Inspect this link manually.
![]()
Possible Error: Service Unavailable (503)Explanation: An unusual error occurred.
Action: Inspect this link manually.
![]()
Possible Error: Gateway Timed Out (504)Explanation: The connection to the remote server timed out.
Action: Check the link manually. This URL is currently unavailable. LinkScan was not able to establish whether the situation is temporary or permanent. You may wish to probe the site using the standard ping and traceroute utilities.
![]()
Possible Error: HTTP Version Not Supported (505)Explanation: An unusual error occurred.
Action: Inspect this link manually.
![]()
Possible Error: Network/Server Error (600, 601, 602, 603)Explanation: An unusual error occurred.
Action: Inspect this link manually.
![]()
Advisory: Skipped - Recently Test (800)Explanation: This link was skipped because it has been tested recently. See How to control the testing of external links.
Action: None required.
![]()
Possible Error: Skipped - Bad Server (801)Explanation: This link was skipped because an excessive number of other links to the same server appeared broken. The server is probably down, either temporarily or permanently. See How to control the testing of external links.
Action: Retest this link later and/or manually inspect the links to this server.
![]()
Advisory: Skipped - FTP Limit (802)Explanation: This link was skipped because the limit on the number of FTP links to any one server was exceeded. See How to control the testing of external links.
Action: Manually inspect this link and/or increase the Maxftp setting.
![]()
Advisory: Skipped - CGI Limit (803)Explanation: This link was skipped because the limit on the number times LinkScan checks the same CGI with different queries was exceeded. This avoids the possibility of LinkScan checking the same URL with a potentially infinite number of automatically generated query strings. See How to control clusters of links.
Action: Manually inspect this link and, if appropriate, increase the Maxcgi setting.
![]()
Possible Error: No DNS Entry (900)Explanation: LinkScan was unable to locate the requested server.
Action: Check the link manually. This server may no longer exist. Or, it is possible that the remote site's Domain Name Server (DNS) was temporarily unavailable at the time LinkScan tried to access it. You may wish to probe the site using the standard nslookup utility.
![]()
Possible Error: DNS Timeout (901)Explanation: LinkScan was unable to complete a DNS lookup.
Action: Check the link manually. This URL is currently unavailable. LinkScan was not able to establish whether the situation is temporary or permanent. You may wish to probe the site using the standard ping and traceroute utilities.
![]()
Possible Error: Connect Error (902)Explanation: LinkScan was unable to establish a TCP/IP connection to the remote server. Most likely, the remote server is currently rejecting connections.
Action: Check the link manually. This URL is currently unavailable. LinkScan was not able to establish whether the situation is temporary or permanent. You may wish to probe the site using the standard ping and traceroute utilities.
![]()
Possible Error: Connect Timeout (903)Explanation: A timeout arose while attempting to connect() to the remote server.
Action: Check the link manually. This URL is currently unavailable. LinkScan was not able to establish whether the situation is temporary or permanent. You may wish to probe the site using the standard ping and traceroute utilities.
![]()
Warning: Missing / (904)Explanation: This link is almost certainly missing a trailing "/". LinkScan was able to validate the link by adding the "/".
Action: Add a "/" character to the end of the existing URL. This omission, although not normally fatal, may cause visitors that try to follow the link problems or delays.
![]()
Warning: Probably OK (905)Explanation: The remote server did not supply a valid http header, but it did appear to serve up a valid HTML document.
Action: Inspect this link manually.
![]()
Warning: Contains an IP Address (906)Explanation: This link uses a numeric IP address. These addresses are much more likely to change than conventional server addresses referenced via the Domain Name Service (DNS).
Action: We recommend that you use a conventional URL if at all possible.
![]()
Error: Multiple Redirections (907)Explanation: This URL appeared to be subject to multiple redirections. LinkScan will follow up to five redirections. It then generates a 907 error rather than continue in a potentially infinite loop.
Action: We recommend that you inspect your server redirections (often defined in a .htaccess file).
![]()
Warning: Missing / (908)Explanation: This link is almost certainly missing a trailing "/". LinkScan was able to validate the link by adding the "/".
Action: Add a "/" character to the end of the existing URL. This omission may cause significant problems for some users that access the web via proxy servers.
![]()
Error: Disconnected (909)Explanation: This error typically results when a remote server disconnects a TCP/IP connection prematurely.
Action: Inspect this link manually. If problems persist, please contact LinkScan Technical Support at Contact Us.
![]()
Warning: Location Not Absolute (910)Explanation: The server attempted to redirect the request to a different URL using an HTTP "Location" header but failed to supply an absolute URL as required by the HTTP specifications.
Action: Check the HTTP server configuration files and/or any CGI scripts that generate HTTP "Location" headers and ensure they transmit an absolute URL on redirections.
![]()
Error: Unsafe Character (911)Explanation: This link contains an 'unsafe' character; probably a control character or a non-encoded space (spaces in URL's should be written as "%20"). Different browsers will interpret this link differently.
Links written with a leading query... <A HREF="?Something"> will also be flagged with a 911 Error. Although strictly legal, we have found that different browsers process the tag in a wildly inconsistent manner. Include some or all of the pathname to avoid this problem and eliminate the error.
Action: We recommend that you inspect and correct this link.
![]()
Advisory: SSL Server Path Not Checked (912)Explanation: LinkScan was able to establish a TCP/IP connection to the specified port (Default: 443) on the specified server. LinkScan does not natively support SSL/HTTPS on Unix platforms and did not validate the pathname portion of the URL.
Action: We recommend that you inspect this link manually using a browser with SSL support if you wish to validate the complete URL.
![]()
Advisory: Simulated Redirect (913)Explanation: LinkScan processed a Redirect directive in the linkscan.cfg file.
Action: Check this link manually.
![]()
Warning: Meta Redirect (914)Explanation: LinkScan detected a redirection specified using a <META HTTP-EQUIV REFRESH> tag.
Action: This construct is not supported by all clients. We recommend that you at least insert a regular hyperlink in this document that will be visible by someone viewing the page.
![]()
Warning: Meta Loc not Absolute (915)Explanation: LinkScan detected a redirection specified using a <META HTTP-EQUIV REFRESH> tag. Furthermore, the target location was specified using a relative URL.
Action: This construct is not supported by all clients. We recommend that you specify the REFRESH using an Absolute URL and insert a regular hyperlink in this document that will be visible by someone viewing the page.
![]()
Advisory: LDAP Server Query Not Checked (916)Explanation: LinkScan was able to establish a TCP/IP connection to the specified port (Default: 389) on the specified server. LinkScan does not natively support LDAP and did not validate the query portion of the URL.
Action: We recommend that you inspect this link manually using a browser with LDAP support if you wish to validate the complete URL.
![]()
Error: No Headers Seen (917)Explanation: LinkScan connected to the remote server but did not receive any HTTP response headers.
Action: We recommend that you inspect this link manually.
![]()
Possible Error: Timeout Header (930)Explanation: A timeout arose after LinkScan connected established a connection to the remove server and during the exchange of HTTP Request and Response Headers.
Action: Check the link manually. This URL is currently unavailable. LinkScan was not able to establish whether the situation is temporary or permanent. You may wish to probe the site using the standard ping and traceroute utilities.
![]()
Possible Error: Timeout Body (931)Explanation: A timeout arose after LinkScan connected established a connection and exchanged HTTP Request and Response Headers but during the transmission of the document body. Typically this arises when LinkScan attempts to download a very large document (e.g. multi-MegaByte PDF file) over a limited bandwidth connection.
Action: Check the link manually.
![]()
Possible Error: Timeout Unknown (932)Explanation: A timeout arose but no other details are available.
Action: Check the link manually.
![]()
Warning: Body Truncated (933)Explanation: LinkScan downloaded an incomplete document body because the size exceeded the Maxdownload parameter.
Action: Check the link manually.
![]()
Error: Error Creating Socket (990)Explanation: LinkScan was not able to create a socket (network connection) while testing this link. This indicates an internal problem with LinkScan and/or your operating system.
Action: Contact LinkScan Technical Support at Contact Us.
![]()
Error: SSL Error (991)Explanation: The Windows Internet Library was not able to access this URL. The remote server may have an invalid or unrecognized security certificate.
Action: Inspect this link manually.
![]()
Error: Post Data Not Found (992)Explanation: A data file referenced by a LinkScan multipart POST command was not found.
Action: Correct the POST command and/or supply the missing data.
![]()
Error: Unknown (999)Explanation: LinkScan was not able to establish the status of this link. This error tends to arise with approximately 0.1 percent of servers on the Web. Generally, the remote server is completely non-compliant with the http specifications or refused to accept TCP/IP connections from your current IP address.
Action: Inspect this link manually.
![]()
Error: FTP Error (1000)Explanation: LinkScan failed to receive a satisfactory response from this FTP server. The error description reflects the actual message returned by the FTP server.
Action: Inspect this link manually.
![]()
Error: Bad Syntax (2000)Explanation: This mailto tag appears to contain an e-mail address with an invalid syntax.
Action: Inspect this link manually.
![]()
Error: SMTP No Such User (2001)Explanation: This mailto tag appears to refer to an invalid address. The SMTP server associated with this address reported that it did not recognize the username.
Action: Inspect this link manually.
![]()
Warning: SMTP Mailbox Full (2002)Explanation: This mailto tag appears to point at a valid e-mail address. The SMTP server associated with that address reported the mailbox was full.
Action: Inspect this link manually.
![]()
Possible Error: SMTP Failure (2003)Explanation: This mailto address is suspect. LinkScan was unable to obtain a satisfactory response from the SMTP server associated with that address.
Action: Inspect this link manually.
![]()
Error: Errordoc Match (3000)Explanation: This link resulting in a redirection to a URL matching the user-specified Errordoc pattern (probably a custom error page).
Action: Inspect this link manually.
![]()
Error: Errorbody Match (3001)Explanation: This document contained a string matching the user-specified Errorbody pattern. The document probably contains a human-readable error message even though the document was served with a 200 OK HTTP status code.
Action: Inspect this link manually.
![]()
Error: Profiler Match (3002)Explanation: This document contained a string matching the user-specified Profiler pattern.
Action: Inspect this link manually.
![]()
The following example is provided to assist those users who wish to run LinkScan as a cron job. The crontab system is a standard Unix utility that enables jobs to be executed automatically according to some regular schedule. On most Unix systems, see man crontab or man 5 crontab for help.
Save any existing configured cron jobs to a file (for example, cron.job) using the following shell command:
crontab -l > cron.job
Edit the file cron.job and append an additional entry for LinkScan containing something like:
40 8 * * 0,1,2,3,4,5,6 /usr/linkscan/linkscan.cron
This will execute /usr/linkscan/linkscan.cron at 08:40am each day. Adjust the pathname to linkscan.cron accordingly.
Submit this to the crontab system with the following shell command:
crontab cron.job
You can check that it's been scheduled with:
crontab -l
Edit the linkscan.cron file -- the following example file is automatically installed in the LinkScan directory:
#!/bin/sh

# Set current working directory
cd /usr/linkscan/

# Execute LinkScan
/usr/local/bin/perl linkscan.pl -project proja
/usr/local/bin/perl linkscan.pl -project projb

# Execute LinkScan/Dispatch (if required)
/usr/local/bin/perl dispatch.pl -project proja -options

# Execute command line reports (if required)
# Must set environnment variable for these
# setenv linkscan linkscan
export linkscan=linkscan
/usr/local/bin/perl linkscan.cgi -project proja -options
See the following for a summary of the available command line switches/options:
Please note the following points:
You must set execute permissions on this file -- chmod 755 linkscan.cron
You must explicitly set the current working directory to the LinkScan directory before executing LinkScan.
You must specify the Project name on the command line to prevent LinkScan from prompting the (absent) user to select a Project.
crontabs are normally executed with minimal path/environment settings so you may need to initialize some things explicitly that are normally handled by your .login, .profile, .cshrc files. That is why the above example includes the full pathname to the perl executable since it is not safe to assume that /usr/local/bin/ has been included in the crontab PATH.
You must run set the environment variable linkscan before executing linkscan.cgi via the shell or a script.
![]()
LinkScan incorporates the ability to examine the files on your local hard drive and interpret them in a manner very similar to a web server. This capability has two major applications:
It can dramatically accelerate the scanning of large numbers of static HTML documents.
It enables the identification of Orphaned Files.
Configuration is inherently significantly more complex when compared to normal HTTP Scanning. In particular, you must configure the following items:
If you do not configure the File System Pathnames, LinkScan will automatically use HTTP Scanning. It will also disable the Orphaned File checking.
If you wish to enable Orphaned File checking and use HTTP Scanning, you must configure the File System Pathnames to enable orphan checking. Then, simply set Http = 1.
This is best illustrated by example:
![]()
# Map the server root
# http://www.example.com/index.html  <==> /usr/www/htdocs/index.html

Homeurl = http://www.example.com/
Homedir = /usr/www/htdocs/
Homefile = index.html

# http://www.example.com/cgi-bin/    <==> /usr/www/cgi-bin/
# http://www.example.com/~username/  <==> /home/username/public_html/

Alias cgi-bin/ /usr/www/cgi-bin/
Alias ~([^/]+)/ /home/$1/public_html/

# Hide hidden files and directories from the Orphans Report

Noorphans (\.|.*/\.)

# The following are significant (but default) settings

Execute cgi-bin/             # Test cgi-bin/ via HTTP
Execute (?i).*\.(cgi|asp)$   # Test .cgi and .asp files via HTTP

Htmlfiles = html, shtml, htm
Mapfiles = map
Pdffiles =
Flashfiles = swf
Defaultpages = index.html, index.shtml, index.htm, home.html, home.shtml, home.htm

Indexoptions = 0             # Disallow directory listings
Expandssi = 1                # Expand Server Side Includes
Autohttp = 0                 # Disable automatic HTTP retry
Maxdirlevels = 10            # Don't explore file system beyond 10 levels
On Unix systems only, the Alias directive supports the special !HOME expression:
Alias ~([^/]+)(/|$) !HOME/public_html/
A reference to ~someuser/ will be Aliased to !HOME/public_html/. Then, !HOME will be replaced by the someuser's Home Directory which is determined via a lookup of /etc/passwd.
![]()
In some cases, the file system directories containing the web site may reside on a physically different computer from LinkScan. In these cases, LinkScan will support Network File System pathnames (subject to any locally imposed security controls).
In other cases, the file system of the remote system may not be visible via the network, quite possibly for security reasons. LinkScan will be unable to scan the remote computer using the File System Scanning Method. You must use HTTP Scanning.
However, it is still possible to enable Orphaned File checking. In summary, you will need to execute a small, self-contained Perl program on the remote computer. It will assemble a "picture" of the file system and save it as a simple ASCII file. That file may be transferred to the LinkScan computer using FTP (or any other more secure technique) and used to perform the orphan analysis in lieu of direct access to the remote server.
Fully configure the selected Project as if your were using File System Scanning on your local machine. However, when setting the pathname to the root of the target webserver, (and any associated Aliases) use the pathname conventions applicable to the remote server.
In the Project configuration file, force LinkScan to use normal HTTP Scanning by setting:
Http = 1
Set the Orphanfile setting in the Project configuration file to the full pathname of a file on your local computer. For example:
Orphanfile = /usr/linkscan/someproject/orphans.list
Transfer the following files to the remote server:
/usr/linkscan/lsfind.pl
/usr/linkscan/someproject/linkscan.cfg
On the remote server, execute the lsfind.pl program:
perl lsfind.pl orphans.list
Transfer the orphans.list file back to the LinkScan machine.
Initiate a scan of the target website in the normal manner. LinkScan will use the orphans.list file from the remote server in lieu of scanning the file system on the local server.
![]()
The LinkScan Import function may be used to:
Validate a list of Links exported from some arbitrary data source (e.g. a database management system).
Validate a list of Documents (e.g. an arbitrary sub-set of pages from a web site) and all the links contained within them. This might include the most critical/popular pages perhaps extracted from an HTTP logfile analysis program. This could also represent an arbitrary user session including a sequence of form submissions with specific data values. Such sequences may be easily captured with the LinkScan Recorder.
When processing a list of Links each URL is checked in turn and its status stored in the LinkScan database. When processing a list of Documents, each document and every link within that document is checked and its status stored.
The import function offers enormous flexibility. To use this feature, carry out the following steps:
Prepare the Import File
LinkScan will import a simple ASCII file of the following format:
URL ... one or more tab characters ... URL-Description
URL's may be absolute, or relative to the Home URL for the current server. The URL-Description is imported and carried through to the LinkScan Reports for identification purposes. You may use any ASCII string, for example a database record number.
Import files may also include URL's using the extended LinkScan conventions for form submissions (GET, POST and Multi-Part POST). See How to Submit Forms.
An alternative field separator may be specified by including a special command as the first line of the file:
## \s+
The command starts with '##' in column one followed by a Perl expression that specifies the field delimiter. In the example above, '\s+' means one or more whitespace characters (tab or space).
Lines with a '#' in column one, and blank lines, are ignored as comments.
To use the Import Function, open the linkscan.cfg file for the appropriate Project, and edit the Importfile setting. Supply the full pathname to the prepared ASCII import file. For example:
Importfile = /usr/home/linkscan/importfiles/test.txt
Then select the import mode by changing the Import setting. Valid values are:
Import = 0 Import mode disabled
Import = 1 Import a list of links
Import = 2 Import a list of documents
Import = 3 Import a list of documents with caching disabled
When using Import Documents LinkScan will by default check each document listed in the Import file but it will not follow those links and scan the entire site. Optionally, you may set Maxclicks and force LinkScan to execute a deeper scan. e.g. with Maxclicks = 3, LinkScan will check the Import File, the documents listed in the Import File, and the children (but not the grandchildren) of those documents.
Special Considerations
LinkScan de-duplicates the list of links within an Import Document list. This means that LinkScan will validate each unique URL within the list only one time.
However, you may force LinkScan to process an Import Sequence so that the same URL or document is checked more than once. This may be achieved by adjusting the URL's to make them appear unique. Note that this also provides a means by which to differentiate the test results for each step. Simply edit the URL's to make them unique by adding dummy name-value pairs to the query string of the URL's:
http://www.example.com/cookie_sensitive?dummyseq=1
[...]
http://www.example.com/set_cookie
[...]
http://www.example.com/cookie_sensitive?dummyseq=2
If the URL's already include a query string, simply append the additional parameter to the existing query and change:
http://www.example.com/foo?name=value
to:
http://www.example.com/foo?name=value&dummyseq=1
Normally, LinkScan maintains the status of each link in a cache while it scans a site. This dramatically improves performance since LinkScan does not need to re-check commonly used images and other components over and over. However, it may also be undesirable with some stateful sequences. For example, if the same URL produces a completely different result before and after a cookie is set.
In those situations, you may use a special option (Import = 3) which will force LinkScan to flush its cache after each imported document has been validated.
![]()
LinkScan incorporates many powerful customization features described below.
Hint: We strongly recommend that you read Essential LinkScan Concepts before studying this section of the Reference Manual.
![]()
You may use any combination of the following commands to include or exclude specific areas of the target website.
Exclude relative-path-expression
Exclude absolute-url-expression
Nofollow relative-path-expression
Onlyfollow relative-path-expression
Onlyinclude relative-path-expression
Maxlevels depth
Maxclicks depth
Exclude: The Exclude command may be used to completely ignore specific links. You may supply a relative-path-expression to exclude Internal Links, or an absolute-url-expression to exclude External Links.
Nofollow: The Nofollow command may be used to provide even finer control over LinkScan's behavior. When LinkScan encounters a link matching a Nofollow command, it will validate the link (and check for any <a name = ... > tags if appropriate). However, it will not test any links that lead from the target document.
For greater flexibility and completeness, the Onlyinclude and Onlyfollow commands are also supported.
Onlyinclude: is logically equivalent to "Exclude everything except".
Onlyfollow: is logically equivalent to "Nofollow everything except".
Maxlevels: A command such as Maxlevels = 3 will limit the depth of the scan to three directory levels under server root.
Maxclicks: A command such as Maxclicks = 3 will limit the depth of the scan based on the number of clicks from the start of the scan. In order to more closely model the real user experience, LinkScan does not include clicks that result from following framesets or redirections.
The following rules of precedence apply when using multiple commands in combination:
Example 1:

Exclude http://www.domain.com/
Exclude test/
All links to "http://www.domain.com/" and all files in the local "test/" subdirectory will be ignored by LinkScan.
Example 2:

Nofollow user2/
LinkScan will check the links to files in the "user2/" directory, but it will not examine the content of any documents within the "user2/" directory or test any of the links contained within them.
Example 3:

Onlyfollow user1/
LinkScan will check the documents in the local "user1/" subdirectory and test the links to files in other local directories. However, LinkScan will not examine the content of any documents that lie outside of the local "user1/" directory or test any of the links contained within them.
On websites that incorporate a high proportion of dynamic content it may not be productive to test any or all scripts with large number of query parameters or other variations. Controls are provided.
Maxcgi: The maximum number of times any single URL should
be probed with different query parameters. This prevents LinkScan from
trying to validate a CGI script or dynamic page with a potentially
infinite number of query parameters.
[Default: Maxcgi = 100 ]
Taglimit: The Taglimit command may be used to provide even finer control over the number of times clusters of URL's are probed. Syntax and example:
Syntax:

Taglimit relative-path-expression maxnumber

Example:

Taglimit scripts/DatabaseLookup.asp 20
LinkScan will only attempt to parse 20 documents matching the pattern "scripts/DatabaseLookup.asp". Any further links matching the specified pattern will be completely ignored.
![]()
Many websites include some form of access control or user authentication features. These are:
In the case of HTTP or NTLM Authentication, when a user attempts to access a protected area, their browser will present a challenge in the form of a pop-up dialog box that requires a username and password to be entered. In the case of cookie-based arrangements, the user is normally required to login by filling out an HTML form and submitting it.
For sites that require HTTP Authentication, you must configure LinkScan with an appropriate Auth command:
Syntax:

Auth server-name "realm-name" username password

Examples:

Auth www.example.com "" guestuser xxxxxx
Auth app.example.com "Controlled Access" guestuser xxxxxx
You must include a realm-name (enclosed in double-quotes) but it may be empty. In that case, LinkScan will use the configured username and password for any realm on the target server. This is the recommended approach unless your server uses multiple realms with different access control rules for different portions of the website.
Some Intranet websites utilize the proprietary and undocumented Microsoft NTLM protocol to authenticate users. LinkScan (on Windows systems only) may be configured to scan such sites.
Note: This may result in other minor artifacts in the results of the scan since LinkScan will use the Microsoft Windows implementation of the HTTP protocol versus the (stricter) native LinkScan implementation.
HTTP access to some sites is controlled via authentication schemes requiring Cookies.
LinkScan will automatically accept and return all valid cookies received during the course of a scan. However, to gain access to the site, you may need to configure LinkScan to ensure that the appropriate cookies are set. This may be achieved by one of two techniques:
The submissions of a login form may be configured using the Extrahome command (described in the next section). However, you may optionally initialize LinkScan's collection of stored cookies (aka Cookie Jar) with one or more permanent Cookies by using the Cookie command:
Syntax:

Cookie server-name cookiename=cookievalue

Example:

Cookie www.elsop.com LinkScan=cookie_value;

Note: Do not enter space characters around the '=' character
The server-name is the name of the server to be tested. For security reasons and in compliance with the applicable standards, LinkScan will only send the cookie when the specified server-name exactly matches the hostname portion of the requested URL. In this context, server names and their corresponding IP addresses are considered to be different (consistent with all major browsers). The cookie names and values must be reverse engineered from your server code or "discovered" via your browser by enabling the "Prompt before accepting cookies" or examination of stored cookies on disk.
Hint 1: Sites with especially complex schemes (multiple levels of access control, subscription expirations etc.) might consider configuring their server and/or scripts to recognize a "super-user-cookie" specifically for testing purposes. This approach may also be used to trigger test points within server-based scripts and greatly improve the meaningful testability of complex dynamic content.
Hint 2: HTTP Authentication and Cookie related transactions are logged by LinkScan during the course of the scan. You may examine the following file to view the log: .../LinkScan/Projectname/data/linkscan.red
![]()
You may configure LinkScan to examine additional documents that would not normally be found during the scan and might otherwise be reported as orphaned files. The same technique may be used to submit forms on your website with specific data values for testing purposes. This is achieved with the Extrahome command:
Syntax:

Extrahome relative-path-expression

Examples

Extrahome somedir/staticdoc.html
Extrahome cgi-bin/getscript.cgi?Var1=aaa&Var2=bbb
The second example above includes a query string and is therefore equivalent to a FORM submission using the GET method. In addition, LinkScan includes support for special conventions that allow users to specify FORM submission operations using the POST method, including the Multi-Part POST, frequently used to upload files from a client to the server.
Examples:

Extrahome cgi-bin/postscript.cgi??Name=Malcolm%20Hoar&Password=secret

Extrahome upload.cgi???(postedfile;C:\LinkScan10\post\test.jpg;image/jpeg)

Extrahome upload.cgi???Name1=Val1&(postedfile;/usr/home/test/test.jpg;image/jpeg)&Name2=Val2
The '??' convention is used to designate a POST operation.
The '???' convention is used to designate a Multi-Part POST operation.
The name-value pairs are delimited using the '&' character, in the normal manner.
The query strings must not contain any space characters; they must be percent-encoded according to the standard conventions.
The option to POST the contents of a client-side data file uses three parameters delimited with semi-colons and wrapped within in parentheses:
Hint: Use the LinkScan Recorder to automatically capture the correctly constructed URL's.
Hint 2: When using the Extrahome command to submit a login form to provide access to a site, you may also need to configure LinkScan so that it doesn't immediately "click" any LOGOUT button which would invalidate the newly created session.
![]()
LinkScan may be configured to interpret the contents of drop-down lists as links to other pages. The HTML specification does not define a standard method for indicating that a drop-down list contains hyperlinks (as opposed to regular data). Hence LinkScan needs some other "cue" and may be triggered by pattern matching of attributes within the SELECT tag. Consider, for example, the following:
<select name="URLLIST">
<option value="/products/" Selected> Relative URL to Products
<option value="http://www.mydomain.com/services/"> Absolute URL to Services
</select>
To instruct LinkScan to treat the contents of the drop-down list as URL's, use the following command:
Selecturl URLLIST
LinkScan will examine all SELECT tags and look for a Regular Expression match on the NAME attribute. If the match is successful (URLLIST in this example) LinkScan will treat each OPTION tag within the list as a hyperlink and validate it accordingly.
LinkScan includes the ability to validate links contained within JavaScript code. A relatively simple pattern matching technique is used -- LinkScan does not contain a full JavaScript interpreter. This means that LinkScan may "miss" some links or find "false positive errors" especially if the code creates the hyperlink references dynamically at run-time. The following Scriptmatch and Scriptnomatch commands give excellent results in most cases. However, you can customize the matching rules by changing these expressions and/or adding new ones.
Scriptmatch = (\w+://\S+|\S+/$|\S+\?\S+|\S+\.([a-z]{2,3}|[js]?html?|Z)$)
Scriptnomatch = .*([\(\)\[\]\{\}\']|document\.\S+|\.(src|com)$)
Some JavaScript constructs may still produce false errors. You may force LinkScan to ignore complete script blocks that match a specified pattern. For example:
Scriptexclude function\s+ZoomWindow
The above command will force LinkScan to ignore script blocks that contain a definition for the ZoomWindow function.
![]()
Many websites are constructed with special user-friendly error pages, sometimes known as "custom-404 documents". Some servers will deliver the error document directly whereas others may force a redirection to a specific error document. In either case, an issue arises if your server delivers the error document with a 200 OK response code. LinkScan (or any other link checker) would not be able to detect the error condition.
A similar issue arises with some dynamically generated documents. For example, a Java applet may encounter a run-time error condition after it has already sent a 200 OK response code to the client.
Hence LinkScan supports two special commands that may be used to detect such conditions and force a 404 Not Found error, regardless of the HTTP response code produced by the server/application. The first is used with servers that force a redirection by pattern matching on the HTTP Location: header. The second operates by pattern matches on the document bodies.
Syntax:

Errordoc pattern
Errorbody pattern

Examples:

Errordoc special/notfound\.html
Errorbody (?i).*runtime\serror
In the Errordoc example, LinkScan will report as 404 Not Found any URL that is redirected to http://your.server/special/notfound.html. In the Errorbody example, LinkScan will report as 404 any document that contains the string runtime error in the document body. Note the (?i) makes the pattern match case-insensitive.
Hint: The Errorbody pattern match is carried out on the entire document, including comments. Developers might consider including a standard error string within comment tags that may be used to trigger the Errorbody match.
![]()
One of the most powerful (and complex) customization features of LinkScan concerns the real-time manipulation of links during the course of the scan. This is typically used to control the testing of sites with complex dynamic content. The basic commands available are:
Sessionmatch expression
Substitute relative-path-expression expression
Substituteraw relative-path-expression expression
Substitutescript relative-path-expression expression
The Sessionmatch command is used to manipulate Session numbers. The Substitute command is used to perform transformations on resolved links. The Substituteraw is used to perform transformations on unresolved links (i.e. the raw contents of a tag or tag attribute). The Substitutescript is used to perform transformations of blocks of JavaScript code.
We shall consider a number of examples which may be adapted according to your specific needs.
Consider a site that produces links such as:
http://www.example.com/page1.asp
http://www.example.com/page1.asp?Print
It is entirely possible that page1.asp has been designed in such a manner that it delivers the same basic content with minor variations in formatting depending upon the presence or absence of the Print query string. One might configure LinkScan with:
Substitute (.*\.asp)\?Print $1
Whenever LinkScan encounters a link matching the specified pattern it will make the substitution indicated before it tries to validate or follow that link. In this example, a link to:
http://www.example.com/page1.asp?Print
will immediately be transformed to:
http://www.example.com/page1.asp
Note, however, this is not the same as Excluding links which contain the Print query string; that would cause LinkScan to simply ignore the link. In this case, LinkScan will process the link but transform it on-the-fly during the scan.
Next we will consider a significantly more complex scenario.
Sessionmatch .*&token=([^&]+)
Substitute (.*&token=)[^&]*(.*)$ $1!S$2
In this case, we use the special Sessionmatch command to capture and save the first value of the query parameter token that LinkScan sees. This is most likely some kind of session number assigned by the target server immediately following the submission of a login form. The Substitute command then instructs LinkScan to replace all subsequent values of token with the saved value (represented by the special parameter !S).
In this scenario, LinkScan ensures that the value of token can never change during the course of the scan from the originally assigned value.
Next we'll consider a JSP site that produces URL's with the following structure:
http://www.example.com/content?A=123&B=456&C=789&D=XYZ
It may not be productive or efficient for LinkScan to scan all of the pages using every combination and permutation of values for the parameters A, B, C, D... etc.. We can control that by manipulating the individual name-value pairs during the scan. For example:
Substitute (content\.jsp\?.*)&B=[^&](.*) $1&B=456$2
Substitute (content\.jsp\?.*)&C=[^&](.*) $1$2
Taglimit content\.jsp\?.*&D= 20
The first command fixes the value of B=456. Whatever value the parameter B takes on during the scan, LinkScan will force the value back to 456. The second command deletes any references to the C parameter from every link that it finds. We have also included the third Taglimit command; this will cause LinkScan to completely ignore the twenty-first and subsequent links that include a D parameter. In other words, in this case, we only want to test a representative sample (20) of links that include a D parameter.
For our next example, we shall consider a site that generates pages containing some links with the following structure:
http://www.example.com/cgi-bin/GenerateFrame?Referer=abc&Link=http%3A%2F%2Fwww.yahoo.com%2F
Rather than linking directly to Yahoo!, this page links to a script that generates a frameset that includes the referenced page. In a default configuration, LinkScan will happily follow the link, validating the frameset and the ultimate link to Yahoo!. However, it may not be productive to do that for potentially thousands of links. Furthermore, in the (extremely unlikely) event that the link to http://www.yahoo.com/ was broken, the error would appear in one of the GenerateFrame documents and not the original referring document. In order to repair that link, one would have to backtrack through the frameset to locate the original source of the trouble.
Hence we can apply more Substitute magic:
Substitute cgi-bin/GenerateFrame.*&Link=([^&]+).* !U$1
This command will extract the value of the Link= parameter, and the special !U token instructs LinkScan that the string needs to be un-encoded. So the original link:
http://www.example.com/cgi-bin/GenerateFrame?Referer=abc&Link=http%3A%2F%2Fwww.yahoo.com%2F
is transformed on-the-fly to:
http%3A%2F%2Fwww.yahoo.com%2F
and then decoded to:
http://www.yahoo.com/
And this means LinkScan can validate the link to Yahoo! directly without checking the GenerateFrame script many, many times. Furthermore, any errors will be flagged against the original document (and not one or more steps removed).
For our final example, we include for illustration the complete configuration for a real-world large and very complex dynamic site:
# Set the CGI limit to be very large
# Include all file types on the Map

Maxcgi = 10000
Mapinclude .*

# Force &A=B and insert it immediately after the '?'

Substitute (cgi-bin.*[&\?])A=[^&=]*&*(.*) $1$2
Substitute (cgi-bin.*\?)(.*) $1A=B&$2

# Discard null and undefined values

Substitute (cgi-bin.*)&B=(null|undefined)(.*) $1$3
Substitute (cgi-bin.*)&C=(null|undefined)(.*) $1$3
Substitute (cgi-bin.*)&D=(null|undefined)(.*) $1$3
Substitute (cgi-bin.*)&R=(null|undefined)(.*) $1$3

# For 'category', take the &C= if present, otherwise the &B=

Substitute (cgi-bin/bv/scripts/category.*\?A=B).*?(&C=[^&=]*).* $1$2
Substitute (cgi-bin/bv/scripts/category.*\?A=B).*?(&B=[^&=]*).* $1$2

# For 'content', take the &D= or &R= if present (call it &D=). Otherwise take the &B=

Substitute (cgi-bin/bv/scripts/content.*\?A=B).*?&[DR]=([^&=]*).* $1&D=$2
Substitute (cgi-bin/bv/scripts/content.*\?A=B).*?(&B=[^&=]*).* $1$2

# For 'frame', take the &D= or &R= if present (call it &D=). Otherwise take the &B=

Substitute (cgi-bin/bv/scripts/frame.*\?A=B).*?&[DR]=([^&=]*).* $1&D=$2
Substitute (cgi-bin/bv/scripts/frame.*\?A=B).*?(&B=[^&=]*).* $1$2

# For 'mailing...', take the &R=

Substitute (cgi-bin/bv/scripts/mailing.*\?A=B).*?(&R=[^&=]*).* $1$2

# For 'contact', take the &B=, &C= and &Comments

Substitute (cgi-bin/bv/scripts/contact.*\?A=B).*?(&B=[^&=]*).*?(&C=[^&=]*).*?(&Comments=[^&=]*).* $1$2$3$4

# Mark redirects to Error page as 404
# Mark documents containing 'Error Code:' as 404

Errordoc cgi-bin/bv/scripts/error.jsp
Errorbody Error\s+Code:[^\n<]*

# Hide some frequent arising errors

Noforms = 1
Exclude images/arrow.gif
Next we will consider a reference to a JavaScript function:
<a href="javascript:MyFunction(4,5,6);">
The following Substitutescript command:
Substitutescript .*:MyFunction\((\d+),(\d+),(\d+)\) '/somepage.jsp?Par1=$1&Par2=$2&Par3=$3'
will transform the function call into the following link which will then be validated/processed by LinkScan.
/somepage.jsp?Par1=4&Par2=5&Par3=6
The Substitute commands may be used to modify existing links on-the-fly. However, a variation of this, the Insertlink command, may be used to insert additional links into specified documents in order to achieve a specific test coverage. Again, it is best illustrated by example:
Insertlink .*complex\.jsp\?.*SPVAR= -
Insertlink (.*complex\.jsp\?.*) /$1&ALTMODE=1 +
As each document is scanned, LinkScan will process all Insertlink commands (in the order specified). The URL of the scanned document is matched against the first parameter of each Insertlink command. In the case of the first example above, a link to:
complex.jsp?VAR=1&SPVAR=2
will match the expression and LinkScan will abort all Insertlink processing for this document (signified by the minus character).
However, a link to:
complex.jsp?VAR=1
does not match the expression. Processing will continue to the second command. This does match the expression and LinkScan will insert a link into this document (signified by the plus character). Hence, when LinkScan processes:
complex.jsp?VAR=1
It will insert into that document, the following link:
complex.jsp?VAR=1&ALTMODE=1
Hint: Clearly, the Substitute command requires a good working knowledge of Perl Regular Expressions. If you need assistance, the LinkScan engineers will be happy to help. Please write to Contact Us describing in as much detail as possible, the transformations you are seeking to achieve.
![]()
Most web browsers advertise their identity by including a User-Agent header with every request that they make. LinkScan also sends a User-Agent header. For example, the versions of Netscape Navigator, Microsoft Internet Explorer and LinkScan installed on the writers computer send, respectively:
User-Agent: Mozilla/4.08 [en] (WinNT; I ;Nav)
User-Agent: Mozilla/4.0 (compatible; MSIE 5.5; Windows NT 5.0)
User-Agent: LinkScan Enterprise/12.3 Windows
Some websites are constructed in a manner that is browser sensitive. They may, for example, deliver customized pages depending on the users browser type. Hence LinkScan may be customized to emulate different browser types using the Extraheader command:
Syntax:

Extraheader literal-header-string

Example:

Extraheader User-Agent: Mozilla/4.0 (compatible; MSIE 5.5; Windows NT 5.0)
In this example, LinkScan will advertise itself as Microsoft Internet Explorer version 5.5 running under Windows 2000.
In fact, the Extraheader command may be used to add any arbitrary HTTP headers to every request that LinkScan sends. A common application involves those servers which look for a language preference in the HTTP headers in order to deliver pages in the appropriate language. For example, the following command instructs LinkScan to include an English Language preference header with each request:
Extraheader Accept-Language: en
![]()
Sometimes a single website may contain links such as:
http://www.example.com/
http://www2.example.com/
Where www.example.com and www2.example.com resolve to the same host IP address. However, LinkScan would consider www2.example.com to be an External Link and not part of the www.example.com Project. Hence the Hostalias command may be used to assign more than one name to the current server. Syntax and example:
Syntax:

Hostalias from-server-url to-server-url

Example:

Hostalias http://www2.example.com/  http://www.example.com/
A similar issue arises when scanning development or staging servers. For example, you may wish to scan the site:
http://staging.example.com/
but the site may contain one or more absolute links to http://www.example.com/. In this case, you can use the Mirrorurl command.
Syntax:

Mirrorurl absolute-url

Example:

Homeurl = http://www.example.com/
Mirrorurl = http://staging.example.com/
In this case, LinkScan will resolve all links as if it were scanning http://www.example.com/. However, all actual HTTP requests will be directed to http://staging.example.com/. This provides a convenient mechanism for scanning development and staging copies of a production website.
![]()
You may define the ownership of any given document or file in one of several ways. Ownership directives are evaluated in the order specified with the last match taking precedence. Note that the file ownership attribute is case sensitive.
By the Unix File System ownership attribute. Note: this is not supported on Windows systems
By the Defaultowner command. The syntax for the Defaultowner command is:
Defaultowner owner-name
By pattern matching with one or more Owner commands. The syntax for the Owner command is:
Owner relative-path-expression owner-name
OR
Ownerq relative-path-expression owner-name
The Owner command operates on the pathname portion of the URL and does not process any query string (following a "?" character). The Ownerq command operates on the entire URL including any query string.
LinkScan also supports a special variation of the Owner command. This will automatically assign every file an owner-name based on the name of the directory in which it resides. The syntax is:
Owner *integer
The default setting (Owner *1) will assign each document to an Owner based on the top-level directory name (i.e. under "www root"). A setting of Owner *2 will cause LinkScan to assign Ownership based on the first two directory names. For example:
http://www.example.com/first/second/third/index.html
Will be assigned to the Owner first_second.
By using preexisting META tags in your HTML documents. For example, if your existing documents already contain tags of the form:
<METa name="S11CONTENT_OWNER" CONTENT="Malcolm Hoar">
You may set the Owner to 'Malcolm Hoar' by configuring a suitable pattern. e.g.:
Ownertags = ^meta\s+name\s*=\s*"content_owner"\s+content\s*=\s*"([^"]+)
Finally, once an Owner has been assigned to the file or document, you may manipulate the Owner string with a simple pattern substitution:
Owneralias .*?([a-zA-Z0-9]+)[\s\.\)]*$ \L$1
This example would take the string 'Malcolm Hoar' and convert the ownership to 'hoar'. This technique may be used to deal with synonyms such as 'M. Hoar.', 'Malcolm C Hoar '.
Example:

Defaultowner elsop         # Set default
Owner *1                   # Assign Owner based on top level dir ...
Owner wrc/humor/ humor     # But, make this subdir look like top-level
Owner .*\.cgi$ webmaster   # And give all *.cgi files to webmaster
When using LinkScan Dispatch to create reports for delivery by Electronic mail, you may define associations between Owners and Addresses with the Mailalias command. The syntax is:
Mailalias expression list-of-addresses
list-of-addresses may be a comma separated list of addressees if you wish to distribute the report to multiple recipients. Use Mailalias owner-name null to skip a specific Owner.
Example:

Defaultowner elsop         # Set default
Owner *1                   # Assign Owner based on top level dir ...
Owner wrc/humor/ humor     # But, make this subdir look like top-level
Owner .*\.cgi$ webmaster   # And give all *.cgi files to webmaster

Mailalias elsop            [email protected], [email protected]
Mailalias links            [email protected]
Mailalias linkscan         [email protected]
Mailalias wrc              [email protected]
Mailalias humor            [email protected]
Mailalias test             null
If no Mailaliases are defined, Dispatch will address the reports to Ownername @ Mailhost
![]()
Facilities are provided to extract additional data from each document scanned, store those data in the LinkScan database and create various reports. The additional data collected are typically collected from the META tags in each HTML document.
Supported commands are provided for data extraction, substitution/manipulation and formatting:
# Userdata [123] match-expression expression
# Userdatafmt [123] [DHLTX] integer[LRC] caption
# D=date; H=hot links; L=link; T=truncate to format; X=normal
# Userdatasub [123] expression expression
The following example illustrates the use of these commands to extract and process an employee badge number from document META tags:
Userdata 1 (?i)<meta\s[^>]*employee\s*=\s*"\s*(#?\d+)\s*" $1
Userdatasub 1 #?(\d+) $1
Userdatafmt 1 X 6R Badge-Number
In the above example, we use the first of the three available userdata fields. The first command extracts the badge number from the document META tag. The second command performs a substitution on the matched data to remove an optional pound symbol from the badge number. The third command defines the formatting attributes; X defines a simple text field; 6R specifies a six-character, right-adjusted layout and Badge-Number defines a simple caption.
During the course of the scan, the employee badge numbers are extracted from each document and stored in the LinkScan database. In fact, the userdata fields are stored in a separate file:
PATH-TO-LINKSCAN/Project-name/data/linkscan.usr
This means that it is relatively simple to post-process the data before creating reports. For example, in this case, one might translate the badge numbers to employee names via a lookup on an employee database. The linkscan.usr file is a simple ASCII file with <Control-G> field delimiters.
The final data may be searched/viewed using the Search Documents Report and/or Changed Document Report.
![]()
LinkScan includes the capability to maintain a History File containing the date/time tested and status of all external links. This feature may be enabled and controlled via various settings in linkscan.sys.
A Site History Report, available from the main LinkScan Reports Menu, may be used to examine the historic behavior of doubtful links.
Once enabled, the LinkScan History file may be used to avoid testing links to remote servers with an excessive frequency. Appropriate use of the following controls will help ensure that you do not impose unnecessary loads on the network or the remote servers your links access. This feature enables you to be a responsible user of the network. But equally important, it can significantly speed up the testing of large projects. Note: The Site History Feature must be enabled (Maxhist > 0) for these settings to be effective:
Masterhist: Normally, LinkScan will maintain a History
file on a per-Project basis. Enabling this feature will force LinkScan
to maintain a single History file (in the LinkScan directory) for
all Projects. Concurrency control is provided to ensure that the
file is not damaged when scanning two or more Projects simultaneously.
[Default: Masterhist = 0 (Disabled) ]
Maxhist: The maximum number of entries maintained in the History
File for each external link.
[Default: Maxhist = 0 (Disabled) ]
Maxgoodhours: The maximum number of hours between attempts to
retest good external links. The scanning of URL's that have been checked
within the specified period is skipped and the LinkScan Reports display
the Status Code from the prior test.
[Default: Maxgoodhours = 0 (Disabled) ]
Maxbadhours: The maximum number of hours between attempts
to retest bad external links. The scanning of URL's that have been checked
within the specified period is skipped and the LinkScan Reports display
the Status Code from the prior test.
[Default: Maxbadhours = (Disabled) ]
In addition, the following options are available via linkscan.cfg
Noexternal: Disable the checking of all External links.
[Default: Noexternal = 0 (Disabled) ]
Fetchext: Fetch the document bodies when checking External
links. Enabling this option incurs a significant performance and
bandwidth overhead. Typically, it is only used in conjunction with
the LinkScan Profiler which will enable
Fetchext automatically when required.
[Default: Fetchext = 0 (Disabled) ]
Followext: Follow all HTTP redirections.
[Default: Followext = 1 (Enabled) ]
Maxdns: Limit the total number of failed DNS lookups performed
on a given hostname. After more than Maxdns failed lookups on the same
host, all subsequent links to that host are assumed to be bad. This
avoids excessive numbers of timeout trying to resolve the same hostname.
[Default: Maxdns = 3 ]
Retryext: When enabled, LinkScan will track all External links
that appear to fail due to network related errors (e.g. DNS, connect and
timeout errors). These links will be retested at the end of the scan.
This tends to reduce the number of transient errors reported but the scan
may require a little more time to complete.
[Default: Retryext = 0 (Disabled) ]
Showredirext: Enable this option when you want LinkScan to
warn/report on redirections and store the status of the final
(redirected) link.
[Default: Showredirext = 0 (Disabled) ]
You may also control the number of hits per server with the following commands in linkscan.sys.
Maxservertries: The maximum number of links that should be
tested on any given server when that server is apparently "dead".
Once this limit is exceeded, all other links to that server are skipped
and assigned an URL Skipped - Bad Server
(801) Status Code.
[Default: Maxservertries = 25 ]
Maxftp: The maximum number of links to any single FTP server
that should be validated. Once this limit is exceeded, all other FTP
links to that server are skipped and assigned a
URL Skipped - FTP Limit (802) Status Code.
[Default: Maxftp = 25 ]
FTPUser and FTPPass: Define the username and password that
LinkScan will use when validating links to FTP sites.
[Default: FTPUser = anonymous; FTPPass = [email protected] ]
In a default configuration, LinkScan performs a simple syntax check on mailto: links. Active checking of mailto: links may be configured -- LinkScan uses our Mailvet™ technology to contact the mail servers associated with the specified address and attempts to establish the validity of the address without actually sending a message. To enable this feature:
On some systems, Net::DNS may not correctly identify the default name servers from your operating system configuration. If you encounter difficulties, please run the following test script:
perl ./utils/dns.pl
You may also configure DNS name server addresses in linkscan.sys by adding an entry such as:
Nameservers = 10.10.10.10, 10.10.10.20
![]()
This section deals with a few other miscellaneous commands:
Autoencspace: By default, LinkScan will flag an error
if it finds a link containing an unencoded space character. With
Autoencspace = 1, LinkScan will automatically perform the
encoding for you, mirroring the behavior of Microsoft Internet
Explorer. We do not recommend the use of this option (since it masks
real errors in the HTML documents) but it has been provided in response
to user requests.
[Default: Autoencspace = 0 ]
Closeatag: By default, LinkScan will flag an error
if it finds an <A HREF=...> tag without a matching
</A> tag. Set Closeatag = 0 if you wish to
disable this feature.
[Default: Closeatag = 1 ]
Collectmeta: When Collectmeta = 1 LinkScan will
save all of the <META...> tags it sees during the course
of a scan to the file: linkscan/project_name/data/linkscan.met
[Default: Collectmeta = 0 ]
Noforms: By default, LinkScan will attempt to test
every link within each <FORM ACTION=...> tag. This
may result in large numbers of 500 Server Error messages.
In general, this indicates that the target link has inadequate
error checking on the parameters supplied with the GET or POST,
since LinkScan is unable to supply any data values without
further customization (see How to submit
forms). Set Noforms = 1 to prevent LinkScan from
checking those forms with empty data values.
[Default: Noforms = 0 ]
Imgtags: Set Imgtags = AHW if you want
LinkScan to flag errors on all <IMG SRC=...> tags
that do not have Alt, Height and Width
attributes. Imgtags = A will check for Alt
attributes only.
[Default: Imgtags = (disabled) ]
Flashfiles and Pdffiles: These parameters are
generally most significant when using File System Scanning.
They define the file extensions associated with these file
types. However, when set to blank or empty values, they do
affect the behavior of LinkScan with Network (HTTP) Scanning
and LinkScan will treat such documents like images and will
not look for or check links in these documents. Note
that Pdffiles is disabled by default. Set Pdffiles = pdf
to enable PDF file checking with Network (HTTP) Scanning.
[Default: Flashfiles = swf, Pdffiles = ]
Mimetypes: These commands are only applicable when using Network (HTTP) Scanning. They instruct LinkScan to scan additional document types based on their MIME (Content-type) header. For example:
Mimetypes application/x-javascript J
Instructs LinkScan to parse all documents with a Content-Type header of application/x-javascript and to interpret those documents as JavaScript. The codes H, H, J and S are currently supported and will enable the appropriate interpreter as follows:
D = PDF
H = HTML
J = JavaScript,
S = Shockwave/Flash
Unsafechar: Defines characters that are unsafe
to use in a URL. Do not escape/encode the characters
in the list.
[Default: Unsafechar = <>`"\ ]
![]()
This Section covers:
![]()
You may change the appearance of the LinkScan Menus and Reports by creating one or more of the following header/footer files in the LinkScan installation directory:
The link*.* files are used when interactive reports are displayed or static reports are written to disk. The mail*.* files are used when the report is automatically sent via e-mail. The *.html files are used for HTML formatted reports and the *.txt files for plain ASCII text reports.
The *.html files may contain any valid HTML and they will be inserted at the top and bottom of each Menu and Report, respectively. The files linkhead.html and mailhead.html should include at least the following tags:
<html><head>
<title>Your title here</title>
</head><body><nobr>
There is no need to close out the <body> or <html> tags in linkfoot.html or mailfoot.html. LinkScan will always insert a Copyright notice and version stamp after the main body of the report and close out the document with </body></html>.
![]()
If the following optional directives are specified in linkscan.cfg, LinkScan will add [Edit] hyperlinks at various points throughout the reports:
Editlink = http://foo/bar.cgi?Url=!URL&Cap=!CAP&Status=!STAT
Editdoc  = http://foo/bar.cgi?Url=!URL&Cap=!CAP&Status=!STAT
The linking URL is constructed from the Editlink and Editdoc settings. Those settings may include the optional tokens !URL, !CAP or !STAT.
These tokens are replaced with %encoded strings containing:
In the case of Internal links (same scheme/host/port as Homeurl) the URL is relative. e.g.
http://foo/bar.cgi?Url=resume.html&Cap=My%20Resume&Status=200
In the case of External links, the URL is absolute. e.g.
http://foo/bar.cgi?Url=http://www.example.com/xyz%3F123&Cap=External=&Status=404
![]()
A user viewing any LinkScan report with a browser may send a copy of that report to any valid e-mail address.
To enable this feature, you must:
Set Mailto = 1 in linkscan.sys
Configure the LinkScan to Email Interface.
![]()
LinkScan incorporates features that enable the automatic generation of customized, publication quality tables of contents for your Projects. Two types of Maps may be created:
When creating Maps based on Link Order, the presence of cross-links may distort the structure of the report in ways which you find undesirable. Therefore, LinkScan incorporates features that enable you to "manipulate" or override the LinkScan algorithm.
You may customize the structure and content of the SiteMap/TapMap with the following commands in the linkscan.cfg configuration files. Note the the Mapmove command only affects Maps based on Link Order (not the Maps based on Directory Structure).
Mapdefaulttitle [ string ] [ !PATH | !FILE ] [ string ]
Mapinclude relative-path-expression
Maphide relative-path-expression
Maptitle relative-path, Alternative Title
Mapmove relative-path, relative-path, position, [Alternative Title]
By default, all HTML type files are included on the SiteMap/TapMap. The Mapinclude and Maphide commands may be used to modify this behavior as illustrated in the following example:
Examples:

Mapdefaulttitle Pathname: !PATH; Filename: !FILE
Mapinclude .*
Maphide (?i).*\.(gif|jpg)$
Maphide first-doc.html#Top
Maptitle second-doc.html, An Alternative Title for second-doc.html
Mapmove third-doc.html, index.html, 5, Alternative Title
The above example will:
Note that the Mapinclude and Maphide commands accept Regular Expressions. The Mapdefaulttitle, Maptitle and Mapmove commands require exact values.
![]()
Each link validated by LinkScan is assigned a specific LinkScan Error or Status Code. And, every Status Code is associated with a Severity. You may customize the Severity associated with any Status Code by using the Statuscode command. The command syntax is:
Statuscode statuscode, severitycode
The following Severity codes are valid:
| Symbol | Code | Severity | Explanation |
| |
0 | Unknown: | LinkScan has not tested or was unable to test this link |
| |
1 | Error: | LinkScan found a hard error on this link |
| |
2 | Possible Error: | There may be a problem with this link. It should be retested at a later time |
| |
3 | Warning: | LinkScan found something unusual about this link. Manual inspection highly recommended |
| |
4 | Advisory: | This link is probably ok, but manual inspection recommended |
| |
5 | No Error: | This is a good link |
Examples:

Statuscode = 301,3    # 301 (Moved Permanently) from Error to Warning
Statuscode = 7,4      #   7 (Orphaned HTML File) to Advisory
Statuscode = 8,4      #   8 (Orphaned non-HTML File) to Advisory
The above commands will downgrade all 301 status codes from Errors to Warnings, and all Orphaned Files from Warnings to Advisories.
![]()
Command line reports are provided to address the following requirements:
To enable command line reporting, you must create an environment variable called linkscan and set it to any non-null value. Depending on your system/shell the command is:
Unix users may wish to add the appropriate command to their .login or .cshrc files so that the environment variable is automatically initialized at each login.
When LinkScan Reports are generated via the normal browser-based interface, users select the type and style of report by completing and submitting normal HTML forms. Other techniques are required in order to make these selections from the command line interface and several options are provided:
You may specify your selections in a configuration file. An example file with sensible defaults -- linkscan.rep -- is placed in each Project directory automatically.
You may also select a specific report using the interactive browser-based interface and copy/paste the URL to the command line interface (since your selections are already embedded within the name-value pairs on the query string).
Simply execute the program linkscan.cgi and it will prompt you for some or all of the following parameters:
Alternatively, you may specify any or all of these parameters on the command line, as shown by the -help switch:
web:/usr/local/www/data/linkscan> perl linkscan.cgi -help

LinkScan Version 12.3
Copyright 1997-2012 Electronic Software Publishing Corporation

USAGE: linkscan  {-help} {-type type} {-project name} {-owner owner}
                 {-repfile file} {-query string} {-outfile path}
                 {-tty} {-mailto address} {-format n}

-help            Displays this message
-type type       Select report type
-project name    Specify a LinkScan Project
-owner owner     Specify a LinkScan Owner
-repfile file    Specify a filename with the reporting options
-query string    Specify all options in the form of an encoded URL
-outfile path    Specify an output filename
-tty             Output to terminal
-mailto address  Send report to email address
-format n        1=Full HTML; 2=HTML; 3=Plain; 4=text

Detailed Help [Y/N]:
Where the parameter to -type is one of:
Examples:

perl linkscan.cgi -type d -project default -outfile myreport.html

perl linkscan.cgi -query
Also see the Sections of this Manual covering LinkScan Dispatch and LinkScan QuickCheck. Note there is no command-line interface to LinkScan TapMap due to its interactive nature.
![]()
LinkScan Enterprise and LinkScan Unlimited incorporate the additional option to scan multiple hosts (or virtual hosts) within a single LinkScan Project. The following parameters must be configured in linkscan.cfg for each host:
Host1.URL    = http://www.example.com/
Host1.Short  = www:
Each host must be configured with a one or two digit number in the range 1 to 99. In this context, '1' and '01' are considered to be equivalent.
The URL setting specifies the URL of a specific host. The Short setting specifies an abbreviated form of the URL which is used to save real-estate on the various LinkScan Reports.
In addition, the following per-host parameters are optional:
Host1.Mirror = http://dev.example.com/
Host1.Nocase = 1
Host1.Path   = /usr/vhosts/devex/
The Path setting sets the File System root for this host. The Mirror setting specifies an alternate URL to be used for all HTTP requests. All tags are resolved using the URL setting but any physical HTTP requests are directed to the host specified by the Mirror setting (typically a development/staging server). The Nocase setting may be set to a positive integer to indicate that the specified host uses case insensitive pathnames (i.e. index.html and INDEX.HTML are considered identical).
In addition, when operating in multi-host mode, all of the LinkScan commands that normally include host-relative expressions, must be modified to use Absolute URLs. For example:
Exclude serverlogs/
Should be specified as:
Exclude http://www.example.com/serverlogs/
We can put all of this together with the following example:
# Hostalias -- maps all https: references back to http:
# Extrahome -- submits login form (?? selects POST method)
# Exclude   -- prevents premature logout
# Maxcgi    -- large value to test many query strings

Homeurl = http://www.example.com/
Host1.URL = http://www.example.com/
Host1.Short = www:
Host2.URL = http://app.example.com/
Host2.Short = app:

Hostalias https://www.example.com http://www.example.com
Hostalias https://app.example.com http://app.example.com
Extrahome = http://app.example.com/login??username=xxx&password=yyy
Exclude .*LOGOFF
Maxcgi = 5000
The behavior of the Owner *N command is automatically modified when scanning multiple hosts within a single Project. Ownership is assigned based on the Short name for that host and the top level directory name within that host. Hence, the document:
http://www.example.com/somedir/somefile.html
is assigned to Owner www:somedir.
![]()
Technical Support is available via e-mail from Electronic Software Publishing Corporation at mailto:[email protected].
Also see the Support Section of our website at:
When contacting the LinkScan engineers, please try and provide as much of the following information as you can:
![]()
![]()
[Not available in LinkScan Workstation]
LinkScan Dispatch may be used to create specific reports for each Owner in a Project. The reports may be formatted in either plain text or HTML. They may be saved to disk as static files or dispatched via electronic mail to selected addresses. Before using LinkScan Dispatch you must:
Configure the LinkScan to Email Interface if you wish to distribute any reports via email.
Ensure that you have appropriate document Ownership rules defined. Note that, in a default configuration, LinkScan will create and assign Owners based on the top-level directory names immediately beneath the website root. See also How to assign documents to Owners.
Ensure that you have configured Mailhost in linkscan.cfg. Note that, by default, e-mail reports are sent to Owner@Mailhost. Use the Mailalias command to map specific Owners to specific e-mail addresses. See How to assign documents to Owners.
Successfully complete a scan of the selected website.
Execute dispatch.pl to create the LinkScan Dispatch reports.
Note that LinkScan Dispatch supports the following command line options:
web:/usr/www/htdocs/linkscan> perl dispatch.pl -help

LinkScan/Dispatch Version 12.3
Copyright 1997-2012 Electronic Software Publishing Corporation

USAGE: dispatch [{-help}] | [{-mail} {-test} {-project name}]
                [-type x {-repfile file} {-outfile file} {-format n}]

-help            Displays this message
-mail            Mails report to user versus storing in saved file
-project name    Specify project name
-test            Send mail to STDOUT -- no mail is sent
-type [xeskdbco] Select report type
-repfile file    Specify a filename with the reporting options
-outfile file    Output filename
-format n        1=Full HTML; 2=HTML; 3=Plain; 4=text
Report Types:
-type x = Project Summary Report
-type e = Problem Documents Report
-type s = Document Detail Report
-type k = Critical Errors Report
-type d = Detailed Errors Report
-type b = Changed Documents Report
-type c = Selected Status Codes Report
-type o = Orphaned Files Report

Detailed Help [Y/N]:
perl dispatch.pl -project myproj -type k -format 4 -mail
In the example above, Dispatch will create a Critical Errors Report for each Owner within Project myproj and deliver them via e-mail in TEXT format.
The following style of command-line options is also support for compatibility with pre-9.0 versions of LinkScan/Dispatch.
perl dispatch.pl -project myproj -errors 4 -mail
In the example above, Dispatch will create a Detailed Report for each Owner within Project myproj and deliver them via e-mail in TEXT format.
![]()
When creating Dispatch Reports in plain text format, the following files are automatically inserted into the header and footer of each report:
mailhead.txt
mailfoot.txt
When creating Dispatch Reports in HTML format, the following files are automatically inserted into the header and footer of each report:
mailhead.html
mailfoot.html
![]()
LinkScan is shipped with a Microsoft Excel spreadsheet including some macros. This may be used to import portions of the LinkScan database into Excel for further analysis. The macros are compatible with the following versions of Microsoft Excel:
Open the following file (or a copy of this file if you want to preserve a clean master version) in Microsoft Excel:
Excel 97: C:\LinkScan10\utils\LinkScan97.xls
Excel 2000 or later: C:\LinkScan10\utils\LinkScan.xls
Select the Control Sheet and, if necessary, adjust the value of Cell C2. This Cell must contain the pathname to your LinkScan installation folder (e.g. C:\LinkScan10\).
Select the first cell of an empty worksheet. Note that the LinkScan Import Macro always places the imported data starting at the currently selected cell of the current worksheet. Note that the Import Macro will not permit you to import data into the Control Sheet.
Execute the macro LinkScanImport:
Tools | Macro | Macros... | LinkScanImport | Run
You may also bind this macro to an Excel Function Key, Menu Item and/or Toolbar.
The LinkScan Macro will display a dialog that allows you to select a LinkScan Project and an Import Function:
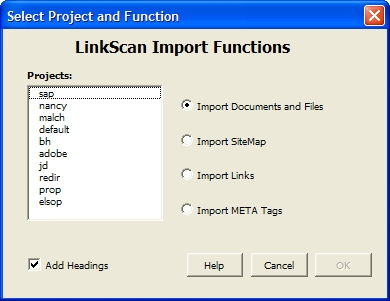
Depending on the Import Function selected, you may be presented with further options. Following confirmation, the selected data will be imported and you may use the full range of Excel features to manipulate the data.
Note that the Control Sheet of the LinkScan.xls workbook is reserved. This spreadsheet is used to control the LinkScan macros. For each Import Function, the sheet defines:
You may modify the Control Sheet to customize the column order and headings etc. However, care is required, since the macro performs very limited validation on those data values.
![]()
[Not available in LinkScan Workstation]
The LinkScan Profiler may be used to help identify pages that contain or link to "inappropriate" [1] content. The Profiler operates on a rule-based scoring system.
The profile.txt file in the main LinkScan directory defines the actual rules and associated scores. The default profile.txt file contains some minimal profiling criteria based on the Platform for Internet Content Selection (PICS) standard. Under this standard, many sites include self-ratings in their web pages via META tags. The LinkScan Profiler specifically supports the RASC, ICRA and SafeSurf implementations. See the following References.
A much more comprehensive set of rules is available
free of charge from Elsop. Since this implementation
of the profile.txt file includes a significant amount
of profane and offensive language, it is distributed
separately once we receive satisfactory evidence of
age verification and a waiver. To obtain a copy of this
file, please send e-mail such as:
To: [email protected]
From: [email protected]
Subject: Profiler Request

Please send me a copy of the LinkScan Profiler rules.
I confirm that:

1. I am over 21 years old.

2. I understand that the LinkScan Profiler rules
   contain a significant quantity of profane and
   offensive language including explicit sexual
   depictions.

3. I understand and agree that the LinkScan Profiler
   rules are subject to the same License Agreement
   and restrictions of use as LinkScan itself.

4. I confirm that I will use the LinkScan Profiler
   rules only in conjunction with LinkScan and in
   accordance with the LinkScan License Agreement.
   I shall not re-distribute the Profiler rules to
   any other person or organization.
The message must be sent from a verifiable corporate Email address. Mail sent via semi-anonymous services such as yahoo.com, MSN and AOL is not acceptable. If necessary, we will contact you to make alternative arrangements but Elsop will not supply the LinkScan Profiler files until we are satisfied that the request is made by an adult and is legitimate.
In a typical configuration, you will need to add the following commands to the Project linkscan.cfg file. On Windows systems they are available via the Advanced Tab of the Project Planning Property Sheet:
Profiler = 2
Profilerlog = 1
Profilermax = 200
The Profiler command enables the LinkScan Profiler. Valid options are:
The Profilerlog command enables a detailed trace indicating exactly what profiling rules were triggered. The log is maintained in the file:
.../LinkScan/Projectname/data/linkscan.red
The Profilermax command sets the trigger threshold for the LinkScan Profiler. The default and recommended setting is 200. Reduce this to 100 to make the Profiler even more sensitive. Increase the value to 300 or more to reduce the sensitivity.
Note: When enabled, the Profiler will force the following settings:
Fetchext = 1
Followext = 1
The Followext command instructs LinkScan to follow redirections when validating the external links. This is the default setting. The Fetchext command instructs LinkScan to fetch the body of a document referenced via an external link. Normally, LinkScan seeks to validate external links without retrieving the document bodies. This enables LinkScan to profile the content but note this will significantly increase the amount of bandwidth and processing required.
Initially, we recommend you complete a full scan with the settings shown above (at the top of this document) and manually review the linkscan.red log file. We think you will find this informative. More importantly, you will be able to decide what threshold to use for subsequent check-ups and whether you want to enable/disable/modify any of the existing rules. Some users may want to whitelist all .gov sites for example.
At the end of the day, only you can decide what links are appropriate for your site and consistent with your editorial policies. Material that may be entirely appropriate for a current affairs website may also be highly undesirable for a site specifically intended for younger children.
Hence you may want/need to review the active rules in the profile.txt file.
When LinkScan is operated behind a Proxy Server or Firewall that implements content-based access control policies, then you need to be aware that your proxy/firewall will likely prevent LinkScan from accessing the site. In this case, you will need to implement a Profiler rule which will enable LinkScan to detect the fact that access was denied. The Bess proxy system is widely used by many schools and some Internet Service Providers. When access is denied, the Bess system typically adds a special HTTP header: Pragma: BESSBLOCK The SonicWALL systems typically replace an offending page with a page that includes the phrase "Blocked By SonicWALL". The following header (H) and body (B) rules will detect those conditions:
H BESS-01    2000   pragma: bessblock
B SWALL-01   2000   blocked by sonicwall
![]()
![]()
I shall not today attempt further to define the kinds of material I understand to be embraced within that shorthand description; and perhaps I could never succeed in intelligibly doing so. But I know it when I see it...
With apologies to:
Mr. Justice Stewart
United States Supreme Court
JACOBELLIS v. OHIO, 378 U.S. 184 (1964)
![]()
LinkScan QuickCheck serves two functions:
It is invoked automatically via hyperlinks from some of the other LinkScan Reports to display a highly detailed report for a single document.
It may be invoked directly from the main LinkScan Reports Menu and used to check (or recheck) an single document or link.
Each QuickCheck Report includes several items of information that are transparently integrated:
QuickCheck has a strong affinity for the LinkScan database. If the data are available in the database associated with the currently selected Project, QuickCheck will seek to ascertain the status of each link using the database and the status found during the last full scan. If this is not available, or the requested document lies outside the scope of the current Project, QuickCheck will perform a full link analysis on that document in real-time.
If QuickCheck has pulled the link status data from the database, the user may force a fresh, real-time scan of that document. This is useful when, for example, you want to recheck a single document after making changes to it. Simply use the Recheck Now option included on each Report.
![]()
By default, LinkScan QuickCheck will invoke the Weblint program to check for any HTML syntax errors. Weblint validates against the HTML 3.2 specifications.
QuickCheck includes a mechanism that permits integration with other HTML validators and the OpenSP program in particular. The OpenSP program permits validation against any SGML Document Type Definition (DTD). For more on OpenSP, see http://sourceforge.net/projects/openjade/.
LinkScan for Windows includes a copy of the OpenSP program together with a small number of DTD's including HTML 3.2, HTML 4.01 and XHTML 1.0. Unix users must download the OpenSP source code from the above URL and compile it. Additional DTD's are available from many public sources such as the World Wide Web Consortium. One large (but not terribly well organized) collection is known as sgml-lib.
To enable OpenSP, simply add the following commands to the linkscan.sys file, adjusting the file system pathnames as appropriate:
Checkerpath = C:/LinkScan10/OpenSP/onsgmls.exe
Checkeroptions = onsgmls -s -c C:/LinkScan10/SGML/catalog
Checkerformat = ^.*?:(\d+):\d+:(?:E:)?\s*(.*)
Checkerpath = /usr/local/bin/onsgmls
Checkeroptions = -s; -c; /usr/local/SGML/catalog
Checkerformat = ^.*?:(\d+):\d+:(?:E:)?\s*(.*)
Note: the Checkeroptions directive may also be overridden on a per-Project basis by inserting a command in the Project linkscan.cfg file. This enables users to use different options and SGML catalogs with different LinkScan Projects.
The Checkerformat command should not normally be changed. It is used to control the parsing of the checker program output. The Perl Regular Expression places line numbers into $1 and the error message into $2.
We also found the following references provided valuable primers on some of the applicable SGML/XML concepts, and the organization of a suitable catalog configuration file in particular:
DocBook: The Definitive Guide by Norman Walsh and Leonard Muellner and published by O'Reilly & Associates, Inc. This book may be downloaded:
Some Solaris users have reported difficultly building OpenSP from sources. Jim Clark's SP program will likely prove easier to build. As a pre-cursor to OpenSP, it is largely plug-compatible. However, there is one significant limitation; SP does not support DTDDECL directives in the catalog.
![]()
You may also run LinkScan QuickCheck from the command line in exactly the same manner as the linkscan.cgi program as show below:
web:/usr/www/htdocs/linkscan> perl quick.cgi -help

LinkScan/QuickCheck Version 12.3
Copyright 1997-2012 Electronic Software Publishing Corporation

USAGE: quick.cgi {-help} {-url URL} {-project name}
                 {-repfile file} {-outfile path} {-tty}
                 {-mailto address} {-format n} {-now} {-http}

-help            Displays this message
-url URL         Specify the URL to be scanned
-project name    Specify a Project. Equivalent to -site
-repfile file    Specify a filename with the reporting options
-outfile path    Specify an output filename
-tty             Output to terminal
-mailto address  Send report to email address
-format n        1=Full HTML; 2=HTML; 3=Plain; 4=text
-now             Perform real-time check
-http            Force HTTP Access

Detailed Help [Y/N]:
Example:

perl quick.cgi -project default -url http://www.example.com/index.html -tty
The above example will run QuickCheck against http://www.example.com/index.html, reading the options from linkscan.rep and displaying the results on the terminal.
![]()
The LinkScan™ Recorder is a Windows feature that fully integrates with LinkScan and Microsoft Internet Explorer. [Unix users see below].
The Recorder may be used to capture real web browsing sessions, such as a complex order entry sequence. The captured recording includes all of the data entered into any associated forms. LinkScan may then be configured to replay the recording on demand, validating every link on each form and results page in the sequence.
Hence LinkScan and the LinkScan Recorder provide powerful and convenient capabilities for the rapid and comprehensive regression testing of complex transaction-based systems.
![]()
The principal applications of the LinkScan Recorder are:
To capture user-sequences, such as an on-line shopping or purchase procedure. These are typically complex sequences that are time consuming to test regularly and comprehensively. They are also tend to be some of the most important pages on a website or Intranet application.
Once a sequence has been recorded, you may use the LinkScan Recorder to replay it and display the results in an Internet Explorer Window. More importantly, LinkScan may be configured to automatically replay the same steps and validate every link on each page in the sequence.
To capture cookies and pre-load those values into LinkScan's internal cookie jar at the commencement of a scan. This may be used to achieve user authentication or other effects. Note however, that you may need to capture new values before each scan if the cookies are session-based and/or have some built-in expiration.
To capture special URL's that are used to define the start of a site scan. This is typically required when the site uses a login page and cookie arrangement for access control.
Note: forms-based login procedures are completely different from HTTP authentication schemes. In the first case, users fill out a regular HTML form. In the latter case, the users browser presents an authentication challenge within a pop-up dialog box.
![]()
Access the LinkScan Recorder by selecting the Recorder Tab on the main LinkScan Window. The LinkScan Recorder panel looks like this:
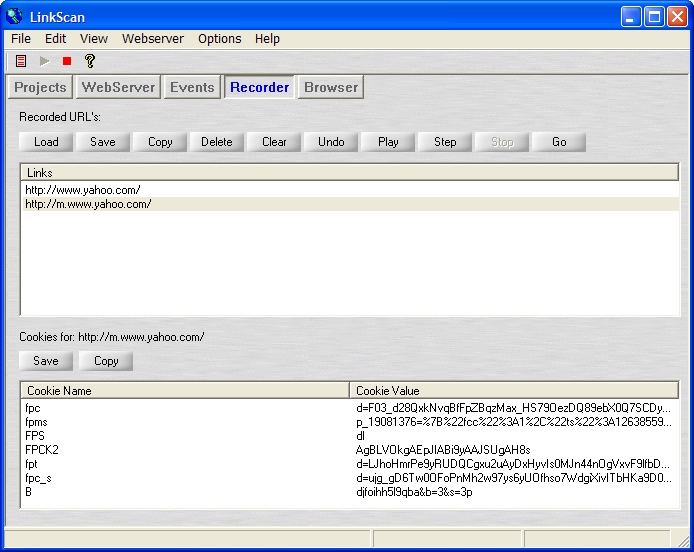
The upper half of the interface displays the links associated with the current recording together with a number of simple command buttons:
Load: Load a previously saved recording into the Recorder.
Save: Save the current recording to your hard drive.
Copy: Copy the current recording to the Windows Clipboard.
Delete: Delete the selected link(s) from the current recording.
Clear: Erase the entire current recording.
Undo: Undo changes. The Undo button cycles back through the last 10 changes to the current recording.
Play: Replay the current recording.
Step: Single-step through the current recording.
Stop: Stop the current playback operation.
Go: Send the internal web browser to the selected link/URL.
The lower half of the interface displays the cookies associated with the current selected link. The following buttons are available:
Save: Save the currently displayed cookies to your hard drive.
Copy: Copy the currently displayed cookies to the Windows Clipboard.
Note also that the LinkScan Browser Panel displays a button to indicate whether the LinkScan recorder is currently active (i.e. recording). Press the button to pause/restart the current recording session.
![]()
Once you have completed a recording, use the Save button to write the recording to disk. The Save (and Load) dialogs offer several options:
Project Login with Sequence: Select this option when you need to save a sequence of links in order to Login to a site. The file will be saved as login.txt with the Project that you select. Note: no cookies will be saved.
Project Login with Cookie: Select this option when you need to save one or more cookie values and pre-load them into LinkScan before the start of a scan. The file will be saved as cookie.txt with the Project that you select.
Project Import File: Select this option when you need to save a sequence of URL's and replay them later using either the Recorder playback feature or conduct a scan of the saved sequence using LinkScan Import Scanning. The file will be saved as import.txt with the Project that you select.
Complete Recording: Select this option when you need to save the entire recording to an arbitrary disk file, for later examination or transfer to some other application or system.
In all cases, the saved data are stored in plain ASCII text and may be edited using Windows Notepad or any other similar program.
![]()
Project Login with Sequence: By default, LinkScan will look for and process this file (login.txt) when you initiate a Scan.
Project Login with Cookie: By default, LinkScan will look for and process this file (cookie.txt) when you initiate a Scan.
You may turn this feature on and off by opening the Project Planning property sheet and selecting the Login Tab.
Project Import File: You may also have LinkScan process a Project Import File. Open the Project Planning Property Sheet and on the Basic Tab select Import Scanning.
Please see the Import Scanning section of the LinkScan Reference Manual for further details on this topic.
![]()
The LinkScan Recorder is a Microsoft Windows application and does not run on Unix systems. A special distribution that permits LinkScan/Unix clients to install the Recorder on a Windows workstation is in preparation but not available at the time of writing. Email <[email protected]> for the latest status and to request a copy when available.
![]()
The following points are worthy of note and consideration:
The data captured by the LinkScan Recorder includes POSTED form values that are normally invisible/hidden. The name-value pairs are represented using the special LinkScan URL convention based on the double question-mark. Hence forms utilizing the GET method are represented in the normal manner, for example:
http://www.example.com/form.cgi?Name=John%20Doe&Country=USA
Whereas, forms utilizing the POST method are represented thus:
http://www.example.com/form.cgi??Name=John%20Doe&Country=USA
![]()
This hyperlink activates the LinkScan TapMap - an interactive and highly dynamic variation of the LinkScan SiteMap. TapMap is an expandable and collapsible SiteMap that allows viewers to tap down through the various levels of a website to easily navigate and explore the website by clicking on a few control icons.
See TapMap Overview and Legend for a brief description of the TapMap control icons.
![]()
The LinkScan WebServer is a small, easy-to-configure, HTTP compliant webserver. It enables interactive query and reporting capabilities from the LinkScan database via a standard web browser interface. The LinkScan WebServer supports a surprisingly large number of features found in more complex products but, with the emphasis on simplicity. Features include:
The LinkScan WebServer operates on Windows Systems only. Unix users should see LinkScan and Various Web Servers.
![]()
The LinkScan WebServer is installed and configured automatically when you install LinkScan on a Windows System.
Additional configuration options are available via the LinkScan System Options Property Sheet.
![]()
LinkScan Pinger is a small self-contained utility that may be used to periodically check a list of URL's and raise e-mail alarms if certain error conditions arise.
On each pass, the LinkScan Pinger will access each of the supplied URL's and log the results to a simple text file. Optionally, it may be configured to send e-mail alarms to one of more addresses if certain error thresholds are exceeded. In addition to generating alarms based on link status, the LinkScan Pinger may also be configured such that the document body for a given URL *must contain* (or must not contain) a specific string/expression.
This means the Pinger may be used to ensure the availability of back-end databases and other services as well as the uptime of the basic network/webserver functions.
In order to use the LinkScan Pinger you must:
Configure LinkScan (linkscan.sys) with a valid License Number and Key.
Configure the file linkscan.cfg (described below).
Configure the LinkScan to Email Interface if you wish the LinkScan Pinger to send Email alarms. See: LinkScan to Email Interface.
We have designed the LinkScan Pinger configuration file to be extremely simple yet flexible. In many cases, it is only necessary to enter a list of URL's to be checked. Optionally, an email address (or comma-separated list of addresses) may be entered if alarm messages are to be generated.
# Pinglog      = Pinger log file
# Pingsecs     = Interval (seconds) between "pings" (perl pinger.pl -repeat)
# Probe        = Diagnostic trace; record HTTP headers in Pinglog
# Followext    = Follow redirections

Pinglog = pinger.log
Pingsecs = 600
Probe = 0
Followext = 0

# Pingmail     = E-mail address (comma-separated list) to receive alarm messages
# Pingsubj     = Subject line for e-mail alarm messages
# Pingsev      = Establish alarm thresholds

Pingmail =
Pingsubj = LinkScan Pinger Alarm
Pingsev = 0,1    # One or more Status Unknown
Pingsev = 1,1    # One or more Errors
Pingsev = 2,1    # One or more Possible Errors
Pingsev = 3,2    # Two or more Warnings
Pingsev = 4,2    # Two or more Advisories

# Url          = Links to be "pinged" on each pass
# Url          = absolute-url [must-contain-expr  must-not-contain-expr]
# URL's may be followed by one or two optional Regular Expressions
# These are matched against the document body. In the following example
# the page returned from http://www.yahoo.com/ must match the string "Yahoo".
# And it must not match the expression "not\sfound"
#
# Url = http://www.yahoo.com/ Yahoo not\sfound
# Url = http://www.google.com/

Url =
To execute the LinkScan Pinger:
perl pinger.pl [-repeat] [-test]

none       Test each configured URL once only

-repeat    Cycle continuously testing each URL every "Pingsecs" seconds.

-test      Single pass, forcing at least one error to generate an e-mail alarm
![]()
weblint 1.020 weblint 1.020NAME
weblint - pick fluff off web pages (HTML)SYNOPSIS
weblint [ -d id ] [ -e id ] [ -f filename ] [ -i ] [ -l ] [ -s ] [ -stderr ] [ -t ] [ -todo ] [ -help ] [ -U ] [ -urlget command ] [ -v ] [ -version ] [ -warnings ] [ -x extension ] file1 .. fileNDESCRIPTION
Weblint is a Perl script which picks fluff off HTML pages. Files to be checked are passed on the command-line: % weblint foobar.html ./dodgy-files/ index.html If any of the arguments are directories weblint will recurse in the directory, and check any HTML files found. If an argument is a URL, then weblint will get the file using a URL retrieval program, and then check the file: % weblint http://www.foobar.com/ By default weblint will use lynx to retrieve URLs, but this can be over-ridden. A filename of `-' specifies that weblint should read from standard input: % lynx -source http://www.foobar.com/ | weblint - Warnings are generated a la lint: home.html(9): unmatched </A> (no matching <A> seen). Weblint includes the following features: + by default checks for HTML 3.2 (Wilbur) + 46 different checks and warnings + Warnings can be enabled/disabled individually, as per your preference + basic structure and syntax checks + warnings for use of unknown elements and ele- ment attributes. + context checks (where a tag must appear within a certain element). + overlapped or illegally nested elements. + do IMG elements have ALT text? + flags obsolete elements. + support for user and site configuration files + stylistic checks + checks for html which is not portable across all browsers + flags markup embedded in comments, since this can confuse some browsers + support for Netscape, and Microsoft HTML exten- sionsOPTIONS
-d warning-identifier Disable the warning associated with the identifier. Multiple identifiers can be specified, with a comma between identifiers. -e warning-identifier Enable the warning associated with the identifier. Multiple identifiers can be specified, with a comma between identifiers. -f config-file Specify a weblint configuration file which should be used in place of the user's default config file, or the site configuration file. -help Show a short usage summary. -i Ignore case of element tags. -l When recursing in directories, ignore any files which are symlinks (also known as soft links). This will also cause files on the command-line to be ignored if they are symlinks, unless only one file is given. -pedantic Turn on all warnings except the case-sensitive and bad-link warnings. -s Generate `short' warning messages, which do not include the filename. -stderr Print warning messages to STDERR rather than STD- OUT. -t Enable terse warning mode, which is mainly useful for the weblint testsuite. -U Same as -help. -urlget command The command which should be used to retrieve HTML pages specified by URL. -v Display the version number. -version Display the version number. -todo This prints out the URL for the online version of the weblint ToDo list. This includes known bugs, and requested/planned features. -warnings List all supported warnings, with warning identi- fier, and whether the warning is enabled. -x extension Include checks for the specified HTML extension; multiple extensions can be specified, separated with a comma. Currently the only extensions sup- ported are Netscape and Microsoft. This can also be set in your weblint configuration file, described below.HTML EXTENSIONS
Unless you specify otherwise, weblint assumes you are using HTML 3.2. Weblint supports the Netscape and Microsoft HTML extensions in addition. For example, weblint will complain that the BLINK element is not known, unless you enable the Netscape extension. The following extensions are currently supported: Netscape The HTML extensions supported by the Netscape browser, version 4. Microsoft The HTML extensions supported by Microsoft Internet Explorer, version 4. To enable an extension, you can either use the -x command- line switch: % weblint -x Netscape foobar.html Or you can use the extension keyword in your .weblintrc: # enable the Microsoft extensions extension MicrosoftCONFIGURATION FILE
Weblint can be configured using a file .weblintrc in your home directory (or a file referenced by the WEBLINTRC environment variable). This file can be used to enable or disable specific warnings, set weblint variables, and include HTML extensions, as described above. Each warning has a short identifier string, used to refer to the warn- ing in config files, and from the command-line. For exam- ple, if you want to enable the check for tags in upper- case, but disable the check for obsolete elements, then you would include the following lines in your .weblintrc: # specify the command used to retrieve URLs (-urlget switch) set url-get = lynx -source # the style of warning message to generate (lint, short, or terse) set message-style = lint # enable warning for tags not in upper-case enable upper-case # disable the warning for obsolete tags disable obsolete # enable the Netscape HTML extensions extension Netscape # when recursing in a directory, # ignore files which are symlinks (also known as soft links) ignore symlinks The keywords can be followed by any number of arguments, separated by spaces or tabs. Anything following a `#' is treated as a comment. A sample configuration file is included in the weblint distribution (as of version 1.004), which mirrors the con- figuration built-in to weblint. Weblint also supports a site configuration file. If a user does not have a personal configuration file, then weblint will check for a local site configuration file. To provide such a file, create a directory such as /usr/local/weblint, and create a file global.weblintrc. You need to edit the weblint script and modify the $SITE_DIR variable, which you will find near the top of the file. For example: $SITE_DIR = '/usr/local/weblint'; At some point in the future there will be configuration support for weblint, so you won't have to modify the script directly yourself. If you have a site configuration file, then users can inherit the site defaults by adding the following line at the top of their .weblintrc file: use global weblintrcWARNINGS
All warnings generated by weblint are listed below, along with the associated identifier, and whether the warning is enabled or disabled by default. tag <...> is not in upper case. Identifier: upper-case Default: disabled tag <...> is not in lower case. Identifier: lower-case Default: disabled foo attribute is required for <...> Identifier: required-attribute Default: enabled expected an attribute for <...> Identifier: expected-attribute Default: enabled unknown element <...> Identifier: unknown-element Default: enabled unknown attribute `...' for element <...>. Identifier: unknown-attribute Default: enabled should not have whitespace between `<' and `...>' Identifier: leading-whitespace Default: enabled bad form to use `here' as an anchor! Identifier: here-anchor Default: enabled no <TITLE> in HEAD element. Identifier: require-head Default: enabled tag <...> should only appear once. I saw one on line XX! Identifier: once-only Default: enabled <BODY> but no <HEAD>. Identifier: body-no-head Default: enabled outer tags should be <HTML> .. </HTML>. Identifier: html-outer Default: enabled <...> can only appear in the HEAD element. Identifier: head-element Default: enabled <...> cannot appear in the HEAD element. Identifier: non-head-element Default: enabled <...> is obsolete. Identifier: obsolete Default: enabled unmatched </...> (no matching <...> seen). Identifier: mis-match Default: enabled IMG does not have ALT text defined. Identifier: img-alt Default: enabled <...> cannot be nested. Identifier: nested-element Default: enabled Did not see <LINK REV=MADE HREF=mailto:...> in HEAD. Identifier: mailto-link Default: disabled </...> on line XX seems to overlap <...>, opened on line YY. Identifier: element-overlap Default: enabled no closing </...> seen for <...> on line XX. Identifier: unclosed-element Default: enabled markup embedded in a comment can confuse some browsers. Identifier: markup-in-comment Default: enabled odd number of quotes in element <...>. Identifier: odd-quotes Default: enabled heading <H?> follows <H?> on line N. Identifier: heading-order Default: enabled target for anchor Identifier: bad-link Default: disabled unexpected < in <...> -- potentially unclosed element. Identifier: unexpected-open Default: enabled illegal context for <...> - must appear in <...> element. Identifier: required-context Default: enabled unclosed comment (comment should be: <!-- ... --> Identifier: unclosed-comment Default: enabled element <...> is not a container -- </...> not legal. Identifier: illegal-closing Default: enabled <...> is physical font markup -- use logical (such as XXX) Identifier: physical-font Default: disabled attribute XYZ is repeated in element <...> Identifier: repeated-attribute Default: enabled empty container element <...> Identifier: empty-container Default: enabled use of ' for attribute value delimiter is not supported by all browsers (attribute XYZ of tag ABC) Identifier: attribute-delimiter Default: enabled closing tag <...> should not have any attributes speci- fied. Identifier: closing-attribute Default: enabled directory DIR does not have an index file (index.html) Identifier: directory-index Default: enabled <...> must immediately follow <...> Identifier: must-follow Default: enabled setting WIDTH and HEIGHT attributes on IMG tag can improve ren- dering performance on some browsers Identifier: img-size Default: disabled leading/trailing whitespace in content of container element ... Identifier: container-whitespace Default: disabled first element was not DOCTYPE specification Identifier: require-doctype Default: disabled `>' should be represented as `>' Identifier: literal-metacharacter Default: enabled malformed heading - open tag is <H?>, but closing is </H?> Identifier: heading-mismatch Default: enabled illegal context, <...>, for text; should be in XXX. Identifier: bad-text-context Default: enabled illegal value for AAA attribute of XXX (...) Identifier: attribute-format Default: enabled <...> is extended markup (use '-x <extension>' to allow this). Identifier: extension-markup Default: enabled attribute `...' for <...> is extended markup (use '-x <exten- sion>' to allow this). Identifier: extension-attribute Default: enabled value for attribute XYZ (xyz-value) of element FOOBAR should be quoted (i.e. XYZ='xyz-value') Identifier: quote-attribute-value Default: enabled you should use '>' in place of '>', even in a PRE ele- ment. Identifier: meta-in-pre Default: enabled <A> should be inside <H?>, not <H?> inside <A>. Identifier: heading-in-anchor Default: enabled The HTML spec. recommends the TITLE be no longer than 64 charac- ters. Identifier: title-length Default: enabledTESTSUITE
A simple regression testsuite is included with weblint, in the Perl script test.pl. You can run the testsuite with either of the following commands: % make test % ./test.pl The results are printed to STDERR, with a more complete report generated in test.log. All tests should pass. If any tests fail, please email test.log to the address given in the AUTHOR section below.ENVIRONMENT VARIABLES
WEBLINTRC If this variable is defined, and references a file, then weblint will read the referenced file for the user's configuration, rather than $HOME/.weblintrc. TMPDIR The directory where weblint will create temporary working files. Defaults to /usr/tmp.FILES
$HOME/.weblintrc The user's configuration file. See the section `CONFIGURATION FILE'.SEE ALSO
perl(1)VERSION
This man page describes weblint 1.020.AVAILABILITY
ftp://ftp.cre.canon.co.uk/pub/weblint/weblint.tar.gz http://www.cre.canon.co.uk/~neilb/weblint/KNOWN BUGS
The list of known bugs can be found on the weblint home page: http://www.cre.canon.co.uk/~neilb/weblint/todo/ Certain versions of Perl have bugs which are triggered by weblint. You shouldn't experience problems if you have 4.036, or 5.002.AUTHOR
Neil Bowers, Canon Research Centre Europe [email protected]CONTRIBUTIONS
Lots of people have contributed to weblint, in the form of suggestions, bug reports, fixes, and contributed code. Please email me if your name should appear in the roll call below. Abigail <[email protected]>; Anthony Thyssen <[email protected]>; Axel Boldt <axel@uni-pader- born.de>; Barry Bakalor <[email protected]>; Bill Arnett <[email protected]>; Bob Friesenhahn <[email protected] las.tx.us>; Mark Gates <[email protected]>; Bruce Speyer <[email protected]>; Chris Siebenmann <cks@hawk- wind.utcs.toronto.edu>; Clay Webster <[email protected]>; Dana Jacobsen <[email protected]>; David Begley <[email protected]>; David J. MacKenzie <[email protected]>; Douglas Brick <[email protected] ton.edu>; Gil Citro; Eric de Mund <[email protected]>; Richard Finegold <[email protected]>; Joerg Heitkoetter <[email protected]>; David Koblas <[email protected]>; John Labovitz <[email protected]>; Eric Maryniak <[email protected]>; John F. Whitehead <[email protected]> Juergen Schoenwaelder <[email protected]>; Frank Steinke <[email protected]>; Larry Virden <[email protected]>; Paul Black <[email protected]>; Doug Grinbergs <[email protected]>; Philip Hallstrom <[email protected]>; Craig Leres <[email protected]>; Richard Lloyd <[email protected]>; Charles F. Randall <cran- [email protected]>; Robert Schmunk <[email protected]>; Jeff Schave <[email protected]>; Jon Thackray <[email protected]>; Jens Thordarson <thor- [email protected]>; Ryan Waldron <[email protected]>; Thomas Leavitt <[email protected]>; Tom Neff <[email protected]>; Victor Parada <[email protected]>; Erick Branderhorst <[email protected]>; Bryan O'Sullivan <bos@serpen- tine.com>; Alan J. Flavell <[email protected]>; Raphael Manfredi <[email protected]>; Keith Iosso <[email protected]>; Chris Lambert <lam- [email protected]>; Tristan Savatier <tristan@cre- ative.net>; Phil Hooper <[email protected]>; Gerald Viers <[email protected]>; Dean Brissinger <briss- [email protected]>; Dave Schmitt <[email protected]>; John Van Essen <[email protected]>; Brandon Bell <[email protected]>; Fumio Moriya and Toshiaki Nomura <[email protected]>; Vincent Lefevre <[email protected]>; Jason Mathews <math- [email protected]>; Lars Balker Rasmussen <lbr@mjol- ner.dk>; Richard L. Hawes <[email protected]>.
![]()
This section define some LinkScan constructs and related terminology with reference to various standards, where appropriate:
LinkScan is able to scan multiple websites. It can also scan the same website multiple times with different configuration options. In each case, LinkScan creates a unique and corresponding LinkScan Database containing the results of the analysis. Together, the configuration files and database constitute a LinkScan Project.
Each LinkScan Project is stored within a subdirectory of the main LinkScan installation directory.
Hence users must always select a Project when scanning a website. Any they must select a Project when viewing the results.
Within each Project, you may also configure multiple LinkScan Owners. Collections of HTML documents and other files are assigned between Owners in a variety of ways:
The LinkScan Owner concept enables individual content developers or workgroups to view results that pertain to their documents or areas of responsibility.
LinkScan incorporates access controls that may be used to limit user access to LinkScan databases and results. These controls are not enabled by default.
When activated, users may be required to login to the LinkScan system used a pre-defined LinkScan Username and associated password. The Username will define the Projects and Owners that an individual user is permitted to access.
A Virtual Host is the Fully Qualified Domain Name (or IP address) of a network host configured on your server. Many servers are configured for a single Virtual Host but others are configured to support multiple Virtual Hosts. You must define at least one LinkScan Project for each Virtual Host that you wish to test.
Pathnames are used to refer to directory structures. They may be Relative or Absolute. Note also that Pathnames are used in the URL context and the File System context. For example:
/usr/www/htdocs/products/widget.html          # Absolute pathname, file system context
C:/www/products/widget.html                   # Absolute pathname, file system context
http://www.example.com/products/widget.html   # Absolute URL
../products/widget.html                       # Relative link, URL or file system context
LinkScan makes extensive use of a normalized representation such that the documents referred to above would be referenced as:
products/widget.html
This offers the advantages of brevity and consistency, since products/widget.html may typically be used to refer to both:
C:/www/products/widget.html and
http://www.example.com/products/widget.html
The normalized format is referred to in this document as relative-path.
Many LinkScan customization features refer to relative-path-expression. That is a Perl Regular Expression matching a relative-path.
The directory on your server that is considered to be the root directory of your HTTP server. Sometimes known as www root.
The directory on your computer where LinkScan is installed.
A subdirectory of the LinkScan Directory containing the configuration and data files associated with a specific Project.
The various Uniform Resource Locator formats are defined in RFC 2396.
Internal Links are defined as links to the current Project.
Examples:

<a href="filename.html">This is an Internal Link</a>

<a href="http://www.elsop.com/index.html">This is an Internal
Link if the current Project is http://www.elsop.com/</a>
External Links are defined as links specified using an Absolute URL to any Project other than the current Project.
Example:

<a href="http://www.otherdomain.com/">This is an External Link</a>
Orphaned Files are defined files present in the Home Directory (or any subdirectory thereof) which cannot be reached via one or more internal links from the Home Page.
The HyperText Markup Language (HTML 3.2) lies at the heart of the World Wide Web.
LinkScan attempts to parse the HTML source code according to the published standards. However, as with all web browsers, the results can be unpredictable when the HTML source code deviates from the specifications. Experience with LinkScan indicates that the following points are worthy of note.
The HyperText Transfer Protocol (HTTP 1.0) has been used for World Wide Web communications since 1990. In January 1997, the first specifications for HTTP 1.1 were published. LinkScan exploits many HTTP features to establish the status of the external links.
In most cases LinkScan is able to definitively establish the status of any given link. However, at any moment in time a small proportion of links (typically around 5%) are temporarily unavailable. In such cases, LinkScan will make two attempts to reach the site before flagging those URL's as "Possible Errors" to be retested at a later time (automatically or manually).
An even smaller percentage of sites are accessible via a web browser but fail to return message headers in accordance with the HTTP specifications. In many cases, LinkScan is still able to establish the status, but a few sites are so grossly non-compliant that LinkScan will return an "Unknown Error" to flag them for manual testing. In tests, only one or two sites per thousand fell into this category.
The File Transfer Protocol (FTP) is a relatively old standard, compared to HTTP. See RFC 640.
Typically, LinkScan accesses the scanned website via the Network and HTTP. This is an appropriate method in most cases.
Optionally, LinkScan may be configured to access part of all of the scanned website by direct access to all of the website files on your computers file system. This offers several advantages and disadvantages:
File System Scanning is extremely fast when you need to scan very large numbers of static HTML documents.
File System Scanning enables the identification of Orphaned Files.
File System Scanning is generally inappropriate for dynamically generated pages.
File System Scanning involves a more complex configuration than HTTP Scanning.
Note that LinkScan may also be configured to scan a site using a combination of both the HTTP and File System Methods. This powerful capability my be used, for example, to enable HTTP Scanning of website content and the comparison of the results with those from File Systems Scanning to reconcile the Orphaned Files.
In addition to HTTP Scanning and File System Scanning, LinkScan supports a third mode of operation; Import Scanning. This is used to validate lists of Documents or Links that are imported from simple text files. The Import Lists may be prepared manually but it is more common for them to be exported from a database management system or other application.
LinkScan incorporates a vast array of customization features many of which exploit the power of Perl Regular Expressions. For a description of Perl Regular Expressions on Unix systems, see man perlre. HTML versions are available at many locations including:
http://perldoc.perl.org/perlre.html
We also recommend the book Mastering Regular Expressions (a.k.a. the Owl Book) by Jeffrey E.F. Friedl, and published by O'Reilly [ISBN: 1-56592-257-3].
When files are served via the Hypertext Transfer Protocol (HTTP) the normal conventions with respect to file extensions do not apply. The content of the file is defined by a HTTP Content-Type header (a.k.a. MIME type). Common examples include:
Content-Type: text/html
Content-Type: image/gif
LinkScan always attempted to store a date/time stamp with each document to indicate when the file was last modified. When scanning via the File System, LinkScan is able to capture this data directly from the operating system. However, when LinkScan does not have direct access to the server File System, it looks for a HTTP Last-Modified header. Most web server supply this when serving static HTML documents (without Server Side Includes). However, it is typically not supplied when serving dynamic pages and the data may not be available. Note however, that LinkScan does have the ability to extract information of this type from META tags when available -- see How to process additional per-document data.
LinkScan calculates the total weight of each document. This calculation is based on the total in-line byte count and takes account of:
LinkScan tracks and stores the depth of each document during the course of the scan. The depth reflects the number of hyperlinks the use must click to reach the target starting from the initial URL. Note that LinkScan uses a deepest-first algorithm to scan a site. In general, the click-count is not incremented when following:
![]()
| Basic | Casesensitive | Homefile | Homeurl | Http |
| Organization | Projectdesc |
| CustomReport | Displaylang | Editdoc | Editlink | Jisencode |
| Reportsdir | Statuscode |
| Database | Tagonce |
| Dispatch | Dispatchsort | Mailalias | Mailhost | Mailnoerr |
| Maxsev | Sendmailpath |
| External | Checkmailto | FTPPass | FTPUser | Fetchext |
| Followext | Hostname | Mailfrom | Masterhist | |
| Maxbadhours | Maxdns | Maxftp | Maxgoodhours | |
| Maxhist | Maxservertries | Nameservers | Noexternal | |
| Retryext |
| File | Alias | Autohttp | Checkorphans | Defaultpages |
| Expandssi | Flashfiles | Homedir | Htmlfiles | |
| Indexoptions | Mapfiles | Maxdirlevels | Noorphan | |
| Noorphans | Onlyorphans | Orphanfile | Pdffiles | |
| Redirect | Textfiles |
| Import | Import | Importfile |
| JavaScript | Scriptdisable | Scriptexclude | Scriptmatch | Scriptnomatch |
| Selecturl |
| Misc | Unsafechar |
| Owner | Defaultowner | Owner | Owneralias | Ownerq |
| Ownertags |
| Scope | Exclude | Excludecookie | Excludehidden | Mask |
| Maxcgi | Maxclicks | Maxdocs | Maxlevels | |
| Nofollow | Onlyfollow | Onlyinclude | Taglimit | |
| Security | Access | Httpauth | Linkscancookie | Mailto |
| Noprojectlist | Nostaticmenu | Notapmapoptions | Winhttp | |
| SiteMap | Mapdefaulttitle | Mapext | Maphide | Mapinclude |
| Mapmove | Maptitle |
![]()
| Access [1] | Syntax: | Access username : password : project-list : owner-list : menu-options |
| Category: Security | Default: | Access * : * : * : * : * |
| Type: Multi-valued | Used by: | linkscan.sys |
| Activates the Access Controls on the LinkScan Reports. Not enabled
by default; see references.
| ||
| Alias [1] | Syntax: | Alias relative-path-expression absolute-path-expression |
| Category: File | Default: | none |
| Type: Multi-valued | Used by: | linkscan.cfg |
| The Alias command maps a URL to a physical file system path.
This is required when, for example, a specific directory does
not reside under the normal webserver root directory.
It is important to ensure that the forward slash symbols are
balanced exactly as shown in the example.
Alias cgi-bin/ /usr/www/cgi-bin/ | ||
| Auth [1] | Syntax: | Auth server-name "realm-name" username password |
| Category: CustomScan | Default: | none |
| Type: Multi-valued | Used by: | linkscan.cfg |
| Configures LinkScan to use HTTP Basic Authentication. Note that
server-name must be specified as a hostname and not as a
URL. The realm-name must be specified and quoted. However,
it may be empty, in which case LinkScan will use the supplied
username/password for any realm-name on server-name.
Auth www.example.com "" guestuser xxxxxx | ||
| Autoencspace [1] | Syntax: | Autoencspace = boolean |
| Category: CustomScan | Default: | Autoencspace = 0 |
| Type: Single-valued | Used by: | linkscan.cfg |
| When Autoencspace = 1 LinkScan will automatically encode
any unencoded space characters in a URL as "%20" thereby mirroring
the behavior of Microsoft Internet Explorer. We do not recommend
the use of this option (since it masks real errors in the HTML
documents) but it has been provided in response to user requests.
| ||
| Autohttp [1] | Syntax: | Autohttp = boolean |
| Category: File | Default: | Autohttp = 0 |
| Type: Single-valued | Used by: | linkscan.cfg |
| When Autohttp = 1 LinkScan will automatically attempt
HTTP access on any link that cannot be found/validated when
using File System Scanning.
| ||
| Casesensitive | Syntax: | Casesensitive = boolean |
| Category: Basic | Default: | Casesensitive = 1 |
| Type: Single-valued | Used by: | linkscan.cfg |
| When Casesensitive = 1 LinkScan assumes that all pathnames
are case-sensitive (normally appropriate when scanning Unix-based
servers). When Casesensitive = 0 LinkScan forces all pathnames
to lower case (normally appropriate when scanning Windows-based
servers).
| ||
| Cgibinurl [1] | Syntax: | Cgibinurl = absolute-url |
| Category: System | Default: | Cgibinurl = Automatically set during installation |
| Type: Single-valued | Used by: | linkscan.sys |
| Sets the URL to the directory in which the LinkScan CGI scripts reside.
Required in order that the LinkScan CGI scripts can link to each other.
| ||
| Checkmailto [1] | Syntax: | Checkmailto = boolean |
| Category: External | Default: | Checkmailto = 0 |
| Type: Single-valued | Used by: | linkscan.cfg |
| When Checkmailto = 1 enable active checking of mailto: links.
Several other items must be configured when using this feature.
See references.
| ||
| Checkorphans [1] | Syntax: | Checkorphans relative-path |
| Category: File | Default: | none |
| Type: Multi-valued | Used by: | linkscan.cfg |
| Forces LinkScan to scan the directory specified by relative-path
for Orphaned Files.
| ||
| Closeatag | Syntax: | Closeatag = boolean |
| Category: CustomScan | Default: | Closeatag = 1 |
| Type: Single-valued | Used by: | linkscan.cfg |
| When Closeatag = 0 do not generate errors for
<A HREF=...> tags without a corresponding </A> tag.
| ||
| Collectmeta | Syntax: | Collectmeta = boolean |
| Category: CustomScan | Default: | Collectmeta = 0 |
| Type: Single-valued | Used by: | linkscan.cfg |
| When Collectmeta = 1 save all document <META> tags
to the file: LinkScan/project_dir/data/linkscan.met
| ||
| Cookie [1] | Syntax: | Cookie server-name cookie-name=cookie-value |
| Category: CustomScan | Default: | none |
| Type: Multi-valued | Used by: | linkscan.cfg |
| Pre-load LinkScan with Cookies. Note that server-name must
be specified as a hostname and not as a URL. Do not enter spaces
around the "=" sign. Prefix the domain name with a period to
create a wildcard, as shown in the example.
Cookie .example.com USERID=1234 | ||
| Defaultowner [1] | Syntax: | Defaultowner = owner-name |
| Category: Owner | Default: | none |
| Type: Single-valued | Used by: | linkscan.cfg |
| Establishes a default Owner.
| ||
| Defaultpages [1] | Syntax: | Defaultpages = filename [, filename]... |
| Category: File | Default: | Defaultpages = index.html, index.shtml, index.htm, home.html, home.shtml, home.htm |
| Type: Single-valued | Used by: | linkscan.cfg |
| When configured to use File System Scanning and LinkScan encounters
a link to a directory without a specific filename, it search for
documents with these filenames (in the order specified).
| ||
| Dispatchsort [1] | Syntax: | Dispatchsort = integer |
| Category: Dispatch | Default: | Dispatchsort = 1 |
| Type: Single-valued | Used by: | linkscan.cfg |
| Defines the sort sequence for LinkScan Dispatch Reports. 1 = By referer; 2 = By status code; 3 = By links alphabetically | ||
| Displaylang | Syntax: | Displaylang = boolean |
| Category: CustomReport | Default: | Displaylang = 1 |
| Type: Single-valued | Used by: | linkscan.cfg |
| Enable when scanning Japanese language websites. The following
META tag will be included in each of the LinkScan reports: <meta http-equiv="Content-Type" content="text/html; charset=EUC-JP"> See also Jisencode. | ||
| Docsurl [1] | Syntax: | Docsurl = absolute-url |
| Category: System | Default: | Docsurl = Automatically set during installation |
| Type: Single-valued | Used by: | linkscan.sys |
| Sets the URL to the directory in which the LinkScan documentation resides.
Required in order that the LinkScan CGI scripts can link to the documentation
and associated images.
| ||
| Editdoc [1] | Syntax: | Editdoc = URL |
| Category: CustomReport | Default: | none |
| Type: Single-valued | Used by: | linkscan.cfg |
| Adds a linking URL to the LinkScan Reports. These may include
the optional tokens !URL, !CAP or !STAT. The tokens are replaced
with %encoded strings containing: The URL of the target resource The Title or Caption (as appropriate) associated with the target resource The Status Code of the target resource. Editdoc = http://foo/bar.cgi?Url=!URL&Cap=!CAP&Status=!STAT | ||
| Editlink [1] | Syntax: | Editlink = URL |
| Category: CustomReport | Default: | none |
| Type: Single-valued | Used by: | linkscan.cfg |
| Adds a linking URL to the LinkScan Reports. These may include
the optional tokens !URL, !CAP or !STAT. The tokens are replaced
with %encoded strings containing: The URL of the target resource The Title or Caption (as appropriate) associated with the target resource The Status Code of the target resource. Editlink = http://foo/bar.cgi?Url=!URL&Cap=!CAP&Status=!STAT | ||
| Errorbody [1] | Syntax: | Errorbody = expression |
| Category: CustomScan | Default: | none |
| Type: Single-valued | Used by: | linkscan.cfg |
| Any document with a body that matches expression is marked
with a 3001 Errorbody Match status code regardless of the
actual server status. Applies to Internal Documents only.
Errorbody (?i)runtime\s+error | ||
| Errorbodyext [1] | Syntax: | Errorbodyext = expression |
| Category: CustomScan | Default: | none |
| Type: Single-valued | Used by: | linkscan.cfg |
| Any document with a body that matches expression is marked
with a 3001 Errorbody Match status code regardless of the
actual server status. Applies to External Links only. Note: Using this option will enable the Fetchext option. There may be significant performance penalties since LinkScan must retreive the document bodies when validating external links. Errorbodyext (?i) | ||
| Errordoc [1] | Syntax: | Errordoc = expression |
| Category: CustomScan | Default: | none |
| Type: Single-valued | Used by: | linkscan.cfg |
| Any URL that is redirected to a location that matches expression
is marked with a 3000 Errordoc Match status code regardless of
the actual server status.
Errordoc special/notfound\.html | ||
| Exclude | Syntax: | Exclude relative-path-expression |
| Category: Scope | Default: | none |
| Type: Multi-valued | Used by: | linkscan.cfg |
| Links matching relative-path-expression are completely
ignored by LinkScan.
Exclude archives/ | ||
| Excludecookie | Syntax: | Excludecookie expression |
| Category: Scope | Default: | none |
| Type: Multi-valued | Used by: | linkscan.cfg |
| Cookies matching expression are completely
ignored by LinkScan. Expression must either match the
cookie name OR the following semi-colon delimited
string of cookie attributes:
"domain;port;path;cookiename;cookievalue;expires;setbypage"
Excludecookie [^;]*;[^;]*;[^;]*;[^;]*;SESSIONID | ||
| Excludehidden | Syntax: | Excludehidden = boolean |
| Category: Scope | Default: | Excludehidden = 0 |
| Type: Single-valued | Used by: | linkscan.cfg |
| Exclude links hidden by a null (empty) anchor.
| ||
| Execute | Syntax: | Execute relative-path-expression |
| Category: CustomScan | Default: | Execute cgi-bin/, Execute (?i).*\.(cgi|asp)$ |
| Type: Multi-valued | Used by: | linkscan.cfg |
| Links matching relative-path-expression are accessed using
Network (HTTP) Scanning.
| ||
| Expandssi [1] | Syntax: | Expandssi = boolean |
| Category: File | Default: | Expandssi = 1 |
| Type: Single-valued | Used by: | linkscan.cfg |
| When Expandssi = 1 and File System Scanning is enabled
LinkScan will process Server Side Includes (SSIs) constructed
using the Apache Include Virtual conventions.
| ||
| Extraheader [1] | Syntax: | Extraheader http-header |
| Category: CustomScan | Default: | Extraheader User-Agent: LinkScan Enterprise/12.3 Windows |
| Type: Multi-valued | Used by: | linkscan.cfg |
| Configures additional HTTP headers that LinkScan will send with every request.
Mainly used to emulate different browser types.
Extraheader User-Agent: Mozilla/4.0 (compatible; MSIE 5.5; Windows NT 5.0) | ||
| Extrahit [1] | Syntax: | Extrahit relative-path |
| Category: CustomScan | Default: | none |
| Type: Multi-valued | Used by: | linkscan.cfg |
| Instructs LinkScan to access the specified URL at the start
of a scan. May be used to submit forms with specified data values.
Note: with Extrahome, LinkScan will access the specified page
*before* the start of a scan *and* a second time during the scan.
With Extrahit, LinkScan will access the specified page only once,
during a scan. See example and references.
Extrahit cgi-bin/postscript.cgi??Name=Malcolm%20Hoar&Password=confidential | ||
| Extrahome [1] | Syntax: | Extrahome relative-path |
| Category: CustomScan | Default: | none |
| Type: Multi-valued | Used by: | linkscan.cfg |
| Instructs LinkScan to access the specified URL at the start
of a scan. May be used to submit forms with specified data values.
Note: with Extrahome, LinkScan will access the specified page
*before* the start of a scan *and* a second time during the scan.
With Extrahit, LinkScan will access the specified page only once,
during a scan. See example and references.
Extrahome cgi-bin/postscript.cgi??Name=Malcolm%20Hoar&Password=secret | ||
| FTPPass [1] | Syntax: | FTPPass = password |
| Category: External | Default: | FTPPass = [email protected] |
| Type: Single-valued | Used by: | linkscan.sys |
| Sets the password to use when validating links to FTP sites.
| ||
| FTPUser [1] | Syntax: | FTPUser = username |
| Category: External | Default: | FTPUser = anonymous |
| Type: Single-valued | Used by: | linkscan.sys |
| Sets the username to use when validating links to FTP sites.
| ||
| Fetchext [1] | Syntax: | Fetchext = boolean |
| Category: External | Default: | Fetchext = 0 |
| Type: Single-valued | Used by: | linkscan.cfg |
| Instructs LinkScan to fetch the document bodies when checking
External links. Normally used in conjunction with the LinkScan
Profiler.
| ||
| Flashfiles [1] | Syntax: | Flashfiles = file-extension [, file-extension]... |
| Category: File | Default: | Flashfiles = swf |
| Type: Single-valued | Used by: | linkscan.cfg |
| When using File System Scanning, any file with this extension is
interpreted using the Flash/Shockwave format. When using Network
(HTTP) Scanning, a non-blank entry causes LinkScan to interpret
any link with a Content-Type: application/x-shockwave-flash
header using the Flash/Shockwave format.
| ||
| Followext [1] | Syntax: | Followext = boolean |
| Category: External | Default: | Followext = 1 |
| Type: Single-valued | Used by: | linkscan.cfg |
| When Followext = 1 LinkScan follows redirections when scanning
External links.
| ||
| Followframes | Syntax: | Followframes = boolean |
| Category: CustomScan | Default: | Followframes = 0 |
| Type: Single-valued | Used by: | linkscan.cfg |
| When Followframes = 1 LinkScan will always follow links
within framesets (regardless of any Nofollow commands).
| ||
| Gsmchangefreq [1] | Syntax: | Gsmchangefreq = string |
| Category: CustomScan | Default: | Gsmchangefreq = weekly |
| Type: Single-valued | Used by: | linkscan.cfg |
| Update frequency for XML Google Sitemap.
| ||
| Gsmlevels [1] | Syntax: | Gsmlevels = integer |
| Category: CustomScan | Default: | Gsmlevels = 0 |
| Type: Single-valued | Used by: | linkscan.cfg |
| Maximum levels to include in XML Google Sitemap.
| ||
| Homedir [1] | Syntax: | Homedir = absolute-path |
| Category: File | Default: | none |
| Type: Single-valued | Used by: | linkscan.cfg |
| Sets the absolute pathname to the directory/folder containing the
root of the target website. Only applicable when File System Scanning
and Orphan File detection are enabled. Note that Homedir must
point at the root of the site and not a sub-directory thereof.
Homedir = C:/www/ | ||
| Homefile [1] | Syntax: | Homefile = relative-url |
| Category: Basic | Default: | none |
| Type: Single-valued | Used by: | linkscan.cfg |
| Sets the initial document for the start of a scan (relative to
Homeurl and Homedir).
Homefile = index.html | ||
| Homeurl [1] | Syntax: | Homeurl = absolute-url |
| Category: Basic | Default: | none |
| Type: Single-valued | Used by: | linkscan.cfg |
| Sets the base-URL for the start of a scan. Do not append
additional directory or file names to the URL (use Homefile instead).
Homedir must point at the root of the target website.
Homeurl = http://www.example.com/ | ||
| Hostalias [1] | Syntax: | Hostalias from-absolute-url to-absolute-url |
| Category: CustomScan | Default: | none |
| Type: Multi-valued | Used by: | linkscan.cfg |
| Establishes synonyms for the same host.
Hostalias http://www2.example.com/ http://www.example.com/ | ||
| Hostname | Syntax: | Hostname = hostname |
| Category: External | Default: | none |
| Type: Single-valued | Used by: | linkscan.cfg |
| Sets the Hostname to use for HELO messages. Only used when
active mailto: checking is enabled.
| ||
| Htmlfiles [1] | Syntax: | Htmlfiles = file-extension [, file-extension]... |
| Category: File | Default: | Htmlfiles = html, shtml, htm |
| Type: Single-valued | Used by: | linkscan.cfg |
| When using File System Scanning, any file with this extension is
interpreted as an HTML document. When using Network (HTTP) Scanning,
any link with a Content-Type: text/html header is interpreted
as indicating HTML format.
| ||
| Http | Syntax: | Http = boolean |
| Category: Basic | Default: | Http = 1 |
| Type: Single-valued | Used by: | linkscan.cfg |
| When Http = 1 LinkScan uses Network (HTTP) Scanning
for the entire target website. Note that this will disable
Orphaned File checking. To enable Orphan checking, you must
set Http = 0 and configure Homedir. Use Execute .*
to force HTTP Scanning with Orphan File checking.
| ||
| Httpauth | Syntax: | Httpauth = env-var |
| Category: Security | Default: | Httpauth = REMOTE_USER |
| Type: Single-valued | Used by: | linkscan.sys |
| Sets the system Environment variable name to use in conjunction with
the LinkScan access controls and HTTP user authentication. Not
required unless you enable LinkScan Access Controls.
| ||
| Httpsproxyport [1] | Syntax: | Httpsproxyport = integer |
| Category: System | Default: | Httpsproxyport = 80 |
| Type: Single-valued | Used by: | linkscan.sys |
| Sets the Port Number associated with Httpsproxyserver.
| ||
| Httpsproxyserver [1] | Syntax: | Httpsproxyserver = hostname |
| Category: System | Default: | none |
| Type: Single-valued | Used by: | linkscan.sys |
| Sets the Hostname or IP address of your HTTPS Proxy Server (if any). Do not
enter a URL address. Not required on Windows systems since LinkScan includes
native support for the Secure Sockets Layer (SSL) and https:// addresses.
| ||
| IPv6Prefs [1] | Syntax: | IPv6Prefs = [0|4|6|46|64] |
| Category: CustomScan | Default: | IPv6Prefs = 0 |
| Type: Single-valued | Used by: | linkscan.cfg |
| Controls IPv6 preferences for the current project. May be configured
to use IPv4 connections only, IPv6 connections only, prefer IPv4
connections, or prefer IPv6 connections. With the default setting
LinkScan will inherit the system preferences.
| ||
| Imgtags | Syntax: | Imgtags = [AHW] |
| Category: CustomScan | Default: | none |
| Type: Single-valued | Used by: | linkscan.cfg |
| Enables additional checking of <IMG SRC=...> tags for
Alt, Height and Width attributes.
| ||
| Import | Syntax: | Import = 0 | 1 | 2 | 3 |
| Category: Import | Default: | none |
| Type: Single-valued | Used by: | linkscan.cfg |
| Instructs LinkScan to use Import Scanning. Import = 1; Import ASCII list of links Import = 2; Import ASCII list of documents Import = 3; Import ASCII list of documents (with de-caching) | ||
| Importfile | Syntax: | Importfile = absolute-path |
| Category: Import | Default: | none |
| Type: Single-valued | Used by: | linkscan.cfg |
| Sets the absolute pathname to the ASCII file to be processed
when Import Scanning is selected.
| ||
| Indexoptions [1] | Syntax: | Indexoptions = boolean |
| Category: File | Default: | Indexoptions = 0 |
| Type: Single-valued | Used by: | linkscan.cfg |
| When Indexoptions = 1 and File System Scanning is enabled,
LinkScan will create directory listing when no Defaultpages
(e.g. index.html) are present.
| ||
| Insertlink [1] | Syntax: | Insertlink Insertlink document-match new-document [-|+|*] |
| Category: CustomScan | Default: | none |
| Type: Multi-valued | Used by: | linkscan.cfg |
| May be used to insert synthetic links into a scanned document.
| ||
| Jisencode | Syntax: | Jisencode = boolean |
| Category: CustomReport | Default: | Jisencode = 0 |
| Type: Single-valued | Used by: | linkscan.cfg |
| Enable when scanning Japanese language websites. Pages containing
JIS, Shift-JIS and/or EUC-JP encoded Japanese characters will be
normalized to EUC-JP. See also Displaylang.
| ||
| Key [1] | Syntax: | Key = special-key |
| Category: System | Default: | none |
| Type: Single-valued | Used by: | linkscan.sys |
| Sets the LinkScan License Key -- supplied by Elsop.
| ||
| LicenseNumber [1] | Syntax: | LicenseNumber = integer (10-digit) |
| Category: System | Default: | none |
| Type: Single-valued | Used by: | linkscan.sys |
| Sets the LinkScan License Number -- supplied by Elsop.
| ||
| Licensee [1] | Syntax: | Licensee = name |
| Category: System | Default: | none |
| Type: Single-valued | Used by: | linkscan.sys |
| Name of your Company or Department.
| ||
| Linespeed [1] | Syntax: | Linespeed = integer |
| Category: System | Default: | Linespeed = 1 |
| Type: Single-valued | Used by: | linkscan.sys |
| Sets a default linespeed for the calculation of document load
times on the Summary/Detail Report.
| ||
| Linkscancookie | Syntax: | Linkscancookie = boolean |
| Category: Security | Default: | Linkscancookie = 0 |
| Type: Single-valued | Used by: | linkscan.sys |
| Define the type of Cookie used by the LinkScan Reporting System
(i.e. linkscan.cgi) for storing user preferences.
0=Permanent cookie; 1=Session cookie; 2=No cookie
| ||
| Linkscandir [1] | Syntax: | Linkscandir = absolute-path |
| Category: System | Default: | Linkscandir = Automatically set during installation |
| Type: Single-valued | Used by: | linkscan.sys |
| Sets the absolute pathname to the directory in which LinkScan is installed.
| ||
| Linkscanurl [1] | Syntax: | Linkscanurl = absolute-url |
| Category: System | Default: | Linkscanurl = Automatically set during installation |
| Type: Single-valued | Used by: | linkscan.sys |
| Sets the URL to the directory in which LinkScan is installed.
| ||
| Longurls | Syntax: | Longurls = boolean |
| Category: System | Default: | Longurls = 0 |
| Type: Single-valued | Used by: | linkscan.sys |
| Force LinkScan CGI's to generate long URL's with the Pref parameter.
| ||
| Mailalias [1] | Syntax: | Mailalias expression address [, address]... |
| Category: Dispatch | Default: | none |
| Type: Multi-valued | Used by: | linkscan.cfg |
| Sets associations between Owners matching expression
and a comma separated list of e-mail addresses.
Mailalias Products [email protected], [email protected] | ||
| Mailfrom [1] | Syntax: | Mailfrom = username |
| Category: External | Default: | none |
| Type: Single-valued | Used by: | linkscan.sys |
| Sets the address to use for FROM messages. Only used when
active mailto: checking is enabled.
| ||
| Mailhost [1] | Syntax: | Mailhost = hostname |
| Category: Dispatch | Default: | none |
| Type: Single-valued | Used by: | linkscan.cfg |
| Sets the default hostname for LinkScan Dispatch reports sent via e-mail.
By default, all reports are mailed to Owner@Mailhost. See
Mailalias if you need more control.
| ||
| Mailnoerr [1] | Syntax: | Mailnoerr = boolean |
| Category: Dispatch | Default: | Mailnoerr = 0 |
| Type: Single-valued | Used by: | linkscan.cfg |
| When Mailnoerr = 1 LinkScan Dispatch will e-mail reports
to their respective Owners even when no broken links were detected.
| ||
| Mailto [1] | Syntax: | Mailto = integer |
| Category: Security | Default: | Mailto = 0 |
| Type: Single-valued | Used by: | linkscan.sys |
| Enable Mailto forms on the LinkScan reports. Setting Mailto=2
will add a comment box to the form. The Mailto option requires
that the LinkScan to Email
Interface be configured.
| ||
| Mapdefaulttitle [1] | Syntax: | Mapdefaulttitle [ string ] [ !PATH | !FILE ] [ string ] |
| Category: SiteMap | Default: | none |
| Type: Multi-valued | Used by: | linkscan.cfg |
| Defines a default Title for SiteMap/TapMap; used when no actually
<title> tags were seen. The special tokens !PATH and
!FILE are replaced with the actual pathnames or filenames,
respectively.
Mapdefaulttitle = No title tags in !PATH | ||
| Mapext [1] | Syntax: | Mapext boolean |
| Category: SiteMap | Default: | none |
| Type: Multi-valued | Used by: | linkscan.cfg |
| Include External Links on the SiteMap.
Mapext = 1 | ||
| Mapfiles [1] | Syntax: | Mapfiles = file-extension [, file-extension]... |
| Category: File | Default: | Mapfiles = map |
| Type: Single-valued | Used by: | linkscan.cfg |
| When using File System Scanning, any file with this extension is
interpreted as a server-side image map file.
| ||
| Maphide [1] | Syntax: | Maphide relative-path-expression |
| Category: SiteMap | Default: | none |
| Type: Multi-valued | Used by: | linkscan.cfg |
| Documents matching relative-path-expression are hidden from
the SiteMap and TapMap.
Maphide .*messages/ | ||
| Mapinclude [1] | Syntax: | Mapinclude relative-path-expression |
| Category: SiteMap | Default: | Mapinclude HTML Documents |
| Type: Multi-valued | Used by: | linkscan.cfg |
| Documents matching relative-path-expression are included
in the SiteMap and TapMap. By default, only HTML documents are
included; links to images and other file types are hidden. You
may include all files by using, for example:
Mapinclude .* | ||
| Mapmove [1] | Syntax: | Mapmove relative-document-path, new-parent-relative-path, position [, new-title] |
| Category: SiteMap | Default: | none |
| Type: Multi-valued | Used by: | linkscan.cfg |
| Used to customize the SiteMap and TapMap by forcing specific
documents to assigned to different positions in the hierarchy.
Mapmove child.html, parent.html, 1 | ||
| Maptitle [1] | Syntax: | Maptitle relative-document-path, string |
| Category: SiteMap | Default: | none |
| Type: Multi-valued | Used by: | linkscan.cfg |
| Replace the actual title of document relative-document-path with string.
| ||
| Mask | Syntax: | Mask = relative-path-expression |
| Category: Scope | Default: | none |
| Type: Single-valued | Used by: | linkscan.cfg |
| Directly equivalent to Onlyinclude except that Mask
is single-valued.
| ||
| Masterhist | Syntax: | Masterhist = boolean |
| Category: External | Default: | Masterhist = 1 |
| Type: Single-valued | Used by: | linkscan.sys |
| When Masterhist = 1 LinkScan maintains the status of external
links in a global history file shared between all Projects.
| ||
| Masterport | Syntax: | Masterport = port# |
| Category: System | Default: | Masterport = 8010 |
| Type: Single-valued | Used by: | linkscan.sys,linkscan.cfg |
| Defines a TCP/IP Port Number on your computer. LinkScan uses this
Port and the following "N" ports for its own interprocess communication.
"N" is defined by the maximum of Slave processes used during the scan.
You will not normally need to change this unless the default Port is
being used by another application.
| ||
| Maxbadhours [1] | Syntax: | Maxbadhours = integer |
| Category: External | Default: | Maxbadhours = 0 |
| Type: Single-valued | Used by: | linkscan.sys |
| Do not check Bad External links more frequently than once every
integer hours.
| ||
| Maxcgi [1] | Syntax: | Maxcgi = integer |
| Category: Scope | Default: | Maxcgi = 100 |
| Type: Single-valued | Used by: | linkscan.cfg |
| Controls the maximum number of times any given base URL
with be tested with different query strings. Avoid the
potential for excessive and potentially infinite iteration
over many query strings. See also the Taglimit option provides
even finer control.
| ||
| Maxclicks [1] | Syntax: | Maxclicks = integer |
| Category: Scope | Default: | Maxclicks = 0 |
| Type: Single-valued | Used by: | linkscan.cfg |
| Limit the scope of a scan to "N" click levels deep.
| ||
| Maxdirlevels [1] | Syntax: | Maxdirlevels = integer |
| Category: File | Default: | Maxdirlevels = 10 |
| Type: Single-valued | Used by: | linkscan.cfg |
| Do not scan the File System more than integer directory
levels deep when scanning for Orphaned Files. Avoids recursion
issues with Symlinks on Unix systems.
| ||
| Maxdns [1] | Syntax: | Maxdns = integer |
| Category: External | Default: | Maxdns = 3 |
| Type: Single-valued | Used by: | linkscan.cfg |
| Defines the maximum number of HTTP redirections to be followed
when fetching a given URL (detect/protect potential loops).
| ||
| Maxdocbytes [1] | Syntax: | Maxdocbytes = integer |
| Category: CustomScan | Default: | Maxdocbytes = none |
| Type: Single-valued | Used by: | linkscan.cfg |
| Defines the maximum size of a document body that will be fetched
when scanning a remote server. Typically used to prevent excessive
delays while LinkScan fetches very large PDF documents.
| ||
| Maxdocs | Syntax: | Maxdocs = integer |
| Category: Scope | Default: | Maxdocs = 0 |
| Type: Single-valued | Used by: | linkscan.cfg |
| Forces LinkScan to check (completely) the first Maxdocs pages only.
Useful for quickly checking the first "N" pages of a website.
| ||
| Maxftp [1] | Syntax: | Maxftp = integer |
| Category: External | Default: | Maxftp = 25 |
| Type: Single-valued | Used by: | linkscan.cfg |
| Do not test more than integer links to any one FTP server.
This prevents excessive/inappropriate loads on the remote server.
The FTP protocol carries significantly more overhead than HTTP.
| ||
| Maxgoodhours [1] | Syntax: | Maxgoodhours = integer |
| Category: External | Default: | Maxgoodhours = 4 |
| Type: Single-valued | Used by: | linkscan.sys |
| Do not check Good External links more frequently than once every
integer hours.
| ||
| Maxhist | Syntax: | Maxhist = integer |
| Category: External | Default: | Maxhist = 10 |
| Type: Single-valued | Used by: | linkscan.sys |
| For External links, store the last integer results in the
History file.
| ||
| Maxlevels | Syntax: | Maxlevels = integer |
| Category: Scope | Default: | Maxlevels = 0 |
| Type: Single-valued | Used by: | linkscan.cfg |
| Limit the scope of a scan to "N" directory levels.
| ||
| Maxredir | Syntax: | Maxredir = integer |
| Category: CustomScan | Default: | Maxredir = 5 |
| Type: Single-valued | Used by: | linkscan.cfg |
| Defines the maximum number of HTTP redirections to be followed
when fetching a given URL (detect/protect potential loops).
| ||
| Maxservertries [1] | Syntax: | Maxservertries = integer |
| Category: External | Default: | Maxservertries = 25 |
| Type: Single-valued | Used by: | linkscan.cfg |
| When validating External links, abort testing of all links to
a host that has already recorded more than integer errors.
This prevents LinkScan from attempting to check many links to
a host that may be temporarily unavailable (and hence multiple
timeout delays).
| ||
| Maxsev [1] | Syntax: | Maxsev = severity |
| Category: Dispatch | Default: | Maxsev = 3 |
| Type: Single-valued | Used by: | linkscan.cfg |
| Defines the maximum severity level to be included in the LinkScan
Dispatch Reports.
| ||
| Mimetypes | Syntax: | Mimetypes Mimetypes mime-type [D|H|J|S|T] |
| Category: CustomScan | Default: | none |
| Type: Multi-valued | Used by: | linkscan.cfg |
| Enables the scanning (via HTTP) of additional document types based
on their MIME (Content-type) header. Analogous to the File System
Scanning equivalents: Htmlfiles, Mapfiles, Pdffiles, Flashfiles and
Textfiles. Documents are interpreted as follows: D=PDF, H=HTML,
J=JavaScript, S=Shockwave/Flash, T=Text.
Mimetypes application/x-javascript J | ||
| Mirrorurl [1] | Syntax: | Mirrorurl = absolute-url |
| Category: CustomScan | Default: | none |
| Type: Single-valued | Used by: | linkscan.cfg |
| Instructs LinkScan to send all HTTP requests to the Mirrorurl
address even though, logically, it behaves as if it is scanning a
different host.
Mirrorurl = http://staging.example.com/ | ||
| Msiis [1] | Syntax: | Msiis = boolean |
| Category: System | Default: | Msiis = 0 |
| Type: Single-valued | Used by: | linkscan.sys |
| Set Msiis = 1 when you are using LinkScan in conjunction
with a Microsoft IIS/PWS installation running on your
computer. This enables a workaround to an IIS bug.
| ||
| Nameservers [1] | Syntax: | Nameservers = ipaddress [, ipaddress]... |
| Category: External | Default: | none |
| Type: Single-valued | Used by: | linkscan.sys |
| Sets default name servers. Only used when active mailto: checking
is enabled. See references.
| ||
| Noexternal | Syntax: | Noexternal = boolean |
| Category: External | Default: | Noexternal = 0 |
| Type: Single-valued | Used by: | linkscan.cfg |
| When Noexternal = 1 disable validation of all External links.
| ||
| Nofollow [1] | Syntax: | Nofollow relative-path-expression |
| Category: Scope | Default: | none |
| Type: Multi-valued | Used by: | linkscan.cfg |
| Do not analyze documents matching relative-path-expression.
LinkScan will validate links to pages matching this pattern
but it will ignore all links flowing out of pages matching
this pattern.
| ||
| Noforms [1] | Syntax: | Noforms = boolean |
| Category: CustomScan | Default: | Noforms = 0 |
| Type: Single-valued | Used by: | linkscan.cfg |
| When Noforms = 1 do not validate links found within
<FORM ACTION=...> tags.
| ||
| Noindex [1] | Syntax: | Noindex = boolean |
| Category: CustomScan | Default: | Noindex = 0 |
| Type: Single-valued | Used by: | linkscan.cfg |
| Ignore links contained within <NOINDEX></NOINDEX>
code blocks unless they are unique (i.e. new and not
already seen during the current scan.
| ||
| Noorphan [1] | Syntax: | Noorphan = boolean |
| Category: File | Default: | none |
| Type: Single-valued | Used by: | linkscan.cfg |
| Do not scan for Orphaned Files (equiv. -noorphans).
| ||
| Noorphans [1] | Syntax: | Noorphans relative-path-expression |
| Category: File | Default: | none |
| Type: Multi-valued | Used by: | linkscan.cfg |
| Do not scan directories matching relative-path-expression
for Orphaned Files.
| ||
| Noprojectlist | Syntax: | Noprojectlist = boolean |
| Category: Security | Default: | Noprojectlist = 0 |
| Type: Single-valued | Used by: | linkscan.sys |
| Noprojectlist = Prompt for Project versus displaying drop-down list
| ||
| Noproxy [1] | Syntax: | Noproxy = hostname-expression [, hostname-expression]... |
| Category: System | Default: | none |
| Type: Single-valued | Used by: | linkscan.sys |
| Bypass any configured Proxy Server and use direct Network (HTTP)
access to any hosts matching hostname-expression.
| ||
| Nostaticmenu | Syntax: | Nostaticmenu = boolean |
| Category: Security | Default: | Nostaticmenu = 0 |
| Type: Single-valued | Used by: | linkscan.sys |
| When Nostaticmenu = 1 disable the LinkScan Toolbar on command-line generated reports.
| ||
| Notapmapoptions | Syntax: | Notapmapoptions = boolean |
| Category: Security | Default: | Notapmapoptions = 0 |
| Type: Single-valued | Used by: | linkscan.sys |
| When Notapmapoptions = 1 disable the Options Menu on LinkScan/TapMap.
| ||
| Onlyfollow | Syntax: | Onlyfollow relative-path-expression |
| Category: Scope | Default: | none |
| Type: Multi-valued | Used by: | linkscan.cfg |
| Only scan areas of the website matching relative-path-expression.
Validate but do not follow all other Internal links.
| ||
| Onlyinclude | Syntax: | Onlyinclude relative-path-expression |
| Category: Scope | Default: | none |
| Type: Multi-valued | Used by: | linkscan.cfg |
| Only scan areas of the website matching relative-path-expression.
Completely ignore all other Internal links.
| ||
| Onlyorphans [1] | Syntax: | Onlyorphans relative-path-expression |
| Category: File | Default: | none |
| Type: Multi-valued | Used by: | linkscan.cfg |
| Only scan directories matching relative-path-expression
for Orphaned Files. Include the trailing slash on directory
references.
| ||
| Organization | Syntax: | Organization = string |
| Category: Basic | Default: | none |
| Type: Single-valued | Used by: | linkscan.cfg |
| Name of the organization/department associated with this Project
(will appear on the subsequent reports).
| ||
| Orphanfile [1] | Syntax: | Orphanfile = absolute-path |
| Category: File | Default: | none |
| Type: Single-valued | Used by: | linkscan.cfg |
| Specifies the absolute pathname to a file containing data regarding
orphaned files, created by the lsfind utility. See references.
| ||
| Owner [1] | Syntax: | Owner relative-path-expression owner-name |
| Category: Owner | Default: | Owner *1 |
| Type: Multi-valued | Used by: | linkscan.cfg |
| Set document ownership. Documents with pathnames matching
relative-path-expression are assigned to owner-name.
Owner mydirectory/ ownedbyme | ||
| Owneralias [1] | Syntax: | Owneralias expression owner-name |
| Category: Owner | Default: | none |
| Type: Multi-valued | Used by: | linkscan.cfg |
| Used to manipulate Ownernames. Normally used in conjunction with
Ownertags. See references.
| ||
| Ownerq [1] | Syntax: | Ownerq relative-path-expression owner-name |
| Category: Owner | Default: | Ownerq *1 |
| Type: Multi-valued | Used by: | linkscan.cfg |
| Set document ownership. Documents with pathnames matching
relative-path-expression are assigned to owner-name.
Unlike the Owner command which operates on the pathname portion
of the URL, Ownerq operates on the full URL including any query
string.
Ownerq somescript\?.*SomeOwnerParam=([^&]+) $1 | ||
| Ownertags [1] | Syntax: | Ownertags = expression |
| Category: Owner | Default: | none |
| Type: Single-valued | Used by: | linkscan.cfg |
| Used to assign document Ownership based on META tags. See references.
| ||
| Pdffiles [1] | Syntax: | Pdffiles = file-extension [, file-extension]... |
| Category: File | Default: | none |
| Type: Single-valued | Used by: | linkscan.cfg |
| When using File System Scanning, any file with this extension is
interpreted using the PDF Document format. When using Network
(HTTP) Scanning, a non-blank entry causes LinkScan to interpret
any link with a Content-Type: application/pdf header
using the PDF Document format.
| ||
| Perlpath [1] | Syntax: | Perlpath = absolute-path |
| Category: System | Default: | Perlpath = Automatically set during installation |
| Type: Single-valued | Used by: | linkscan.sys |
| Absolute pathname to the Perl executable on your computer.
| ||
| Probe [1] | Syntax: | Probe = integer |
| Category: CustomScan | Default: | Probe = 4 |
| Type: Single-valued | Used by: | linkscan.cfg |
| Enable LinkScan diagnostic trace -- written to .../project-name/data/linkscan.red.
The following bit-wise switches may be logically OR'ed:
1 = Trace full HTTP Headers
2 = Trace full HTTP Headers and (HTML) Document Bodies
4 = Trace all Cookies, Auth Requests and Sessionmatch operations
8 = Reserved for LinkScan Technical Support
128 = Disable all buffering on linkscan.red
| ||
| Profiler [1] | Syntax: | Profiler = integer |
| Category: CustomScan | Default: | Profiler = 0 |
| Type: Single-valued | Used by: | linkscan.cfg |
| Enables the LinkScan Profiler.
Profiler = 1 # Profile internal links | ||
| Profilerlog [1] | Syntax: | Profilerlog = integer |
| Category: CustomScan | Default: | Profilerlog = 0 |
| Type: Single-valued | Used by: | linkscan.cfg |
| Enables a detailed trace of the LinkScan Profiler results.
The log is written to: .../LinkScan/Projectname/data/linkscan.red
| ||
| Profilermax [1] | Syntax: | Profilermax = integer |
| Category: CustomScan | Default: | Profilermax = 200 |
| Type: Single-valued | Used by: | linkscan.cfg |
| Sets the trigger level threshold for the LinkScan Profiler.
| ||
| Projectdesc | Syntax: | Projectdesc = string |
| Category: Basic | Default: | none |
| Type: Single-valued | Used by: | linkscan.cfg |
| A description for this Project (will appear on the subsequent reports).
| ||
| Proxyauth [1] | Syntax: | Proxyauth = "username:password" |
| Category: System | Default: | none |
| Type: Single-valued | Used by: | linkscan.sys |
| Sets the username and password to use in conjunction with a Proxy Server
that requires authentication (if any).
Proxyauth = "mylogin:mysecretpass" | ||
| Proxymatch [1] | Syntax: | Proxymatch [http|https|*] [host:port|direct] ["user:pass"] host1, host2... |
| Category: System | Default: | none |
| Type: Multi-valued | Used by: | linkscan.sys |
| The Proxymatch command may be used to configure complex
proxy rules that are not handled by the (simpler)
Proxyserver/Proxyport commands. Multiple Proxymatch
commands are evaluated in the order specified with
the last match assuming precedence.
| ||
| Proxyport [1] | Syntax: | Proxyport = integer |
| Category: System | Default: | Proxyport = 80 |
| Type: Single-valued | Used by: | linkscan.sys |
| Sets the Port number to use in conjunction with your Proxy Server (if any).
| ||
| Proxyserver [1] | Syntax: | Proxyserver = hostname |
| Category: System | Default: | none |
| Type: Single-valued | Used by: | linkscan.sys |
| Sets the Hostname or IP address of your HTTP Proxy Server (if any). Do not
enter a URL address.
| ||
| Redirect | Syntax: | Redirect relative-path-expression absolute-url-expression |
| Category: File | Default: | none |
| Type: Multi-valued | Used by: | linkscan.cfg |
| Used to simulate a webserver configured redirection when using
File System Scanning.
Redirect documents/oldpage.html http://www.example.com/html/newpage.html | ||
| Relaxanchor | Syntax: | Relaxanchor = boolean |
| Category: CustomScan | Default: | Relaxanchor = 0 |
| Type: Single-valued | Used by: | linkscan.cfg |
| Enable relaxed anchor checking. Anchor checks are made case insensitive.
Superflous '#' characters at the beginning of the NAME attribute are ignored.
| ||
| Reportsdir [1] | Syntax: | Reportsdir = absolute-path |
| Category: CustomReport | Default: | Reportsdir = Automatically set during installation |
| Type: Single-valued | Used by: | linkscan.sys |
| Sets the path to the directory in which the LinkScan reports are created.
Only used when generating reports from the command-line.
| ||
| Retryext [1] | Syntax: | Retryext = boolean |
| Category: External | Default: | Retryext = 0 |
| Type: Single-valued | Used by: | linkscan.cfg |
| When Retryext=1, LinkScan will track all External links that appear to
fail due to network related errors (e.g. DNS, connect and timeout errors).
These links will be retested at the end of the scan. This tends to reduce
the number of transient errors reported but the scan may require a little
more time to complete.
| ||
| Scriptdisable | Syntax: | Scriptdisable = boolean |
| Category: JavaScript | Default: | Scriptdisable = 0 |
| Type: Single-valued | Used by: | linkscan.cfg |
| Disable checking of links embedded within JavaScript. Equivalent to:
Scriptexclude .*
| ||
| Scriptexclude [1] | Syntax: | Scriptexclude expression |
| Category: JavaScript | Default: | none |
| Type: Multi-valued | Used by: | linkscan.cfg |
| JavaScript code blocks matching expression are discarded
and not scanned for links.
| ||
| Scriptmatch [1] | Syntax: | Scriptmatch expression |
| Category: JavaScript | Default: | Scriptmatch (\w+://\S+|\S+/$|\S+\?\S+|\S+\.([a-z]{2,3}|[js]?html?|Z)$) |
| Type: Multi-valued | Used by: | linkscan.cfg |
| Patterns used to control the scanning of JavaScript constructs.
You should not normally need to change these from their defaults.
| ||
| Scriptnomatch [1] | Syntax: | Scriptnomatch expression |
| Category: JavaScript | Default: | Scriptnomatch .*([\(\)\[\]\{\}\']|document\.\S+|\.(src|com)$) |
| Type: Multi-valued | Used by: | linkscan.cfg |
| Patterns used to control the scanning of JavaScript constructs.
You should not normally need to change these from their defaults.
| ||
| Selecturl [1] | Syntax: | Selecturl expression |
| Category: JavaScript | Default: | none |
| Type: Multi-valued | Used by: | linkscan.cfg |
| The contents of select tags (drop-down lists) with name
attributed matching expression are processed as links versus
arbitrary data.
| ||
| Sendmailpath [1] [2] | Syntax: | Sendmailpath = absolute-path |
| Category: Dispatch | Default: | none |
| Type: Single-valued | Used by: | linkscan.sys |
| Sets the absolute pathname to the sendmail executable on your computer.
| ||
| Sessionmatch [1] | Syntax: | Sessionmatch = expression |
| Category: CustomScan | Default: | none |
| Type: Single-valued | Used by: | linkscan.cfg |
| Used to capture, save, manipulate items such as session numbers.
See references.
| ||
| Showredirectext | Syntax: | Showredirectext = boolean |
| Category: CustomScan | Default: | Showredirectext = 0 |
| Type: Single-valued | Used by: | linkscan.cfg |
| When checking External links, LinkScan will report any redirections
and report the status of the final (redirected) link.
| ||
| Slaves1 | Syntax: | Slaves1 = integer |
| Category: System | Default: | Slaves1 = 3 |
| Type: Single-valued | Used by: | linkscan.sys,linkscan.cfg |
| Sets the number of simultaneous HTTP connections to be used
when scanning the Internal links.
| ||
| Slaves2 | Syntax: | Slaves2 = integer |
| Category: System | Default: | Slaves2 = 3 |
| Type: Single-valued | Used by: | linkscan.sys,linkscan.cfg |
| Sets the number of simultaneous HTTP connections to be used
when scanning the External links.
| ||
| Slavesfast1 | Syntax: | Slavesfast1 = integer |
| Category: System | Default: | Slavesfast1 = 5 |
| Type: Single-valued | Used by: | linkscan.sys,linkscan.cfg |
| Sets the number of simultaneous HTTP connections to be used
when scanning the Internal links with the -fast
option.
| ||
| Slavesfast2 | Syntax: | Slavesfast2 = integer |
| Category: System | Default: | Slavesfast2 = 12 |
| Type: Single-valued | Used by: | linkscan.sys,linkscan.cfg |
| Sets the number of simultaneous HTTP connections to be used
when scanning the External links with the -fast
option.
| ||
| Smtphost [1] | Syntax: | Smtphost = hostname |
| Category: System | Default: | Smtphost = 12 |
| Type: Single-valued | Used by: | linkscan.sys |
| Sets the SMTP hostname used for the distribution of emailed
reports (Windows systems only).
| ||
| Statuscode [1] | Syntax: | Statuscode statuscode, severity |
| Category: CustomReport | Default: | none |
| Type: Multi-valued | Used by: | linkscan.cfg |
| Modifies the severity associated with statuscode. 1=Error; 2=Possible Error; 3=Warning; 4=Advisory; 5=Good. Statuscode = 301,3 # 301 (Moved Permanently) from Error to Warning | ||
| Substitute [1] | Syntax: | Substitute relative-path-expression expression |
| Category: CustomScan | Default: | none |
| Type: Multi-valued | Used by: | linkscan.cfg |
| Manipulate links on-the-fly. See references.
| ||
| Substituteraw [1] | Syntax: | Substituteraw relative-path-expression expression |
| Category: CustomScan | Default: | none |
| Type: Multi-valued | Used by: | linkscan.cfg |
| Manipulate links on-the-fly. See references.
| ||
| Substitutescript [1] | Syntax: | Substitutescript relative-path-expression expression |
| Category: CustomScan | Default: | none |
| Type: Multi-valued | Used by: | linkscan.cfg |
| Manipulate links on-the-fly. See references.
| ||
| Taglimit [1] | Syntax: | Taglimit relative-path-expression integer |
| Category: Scope | Default: | none |
| Type: Multi-valued | Used by: | linkscan.cfg |
| When integer links matching relative-path-expression
have been scanned, LinkScan ignores all subsequent matching links.
| ||
| Tagonce [1] | Syntax: | Tagonce relative-path-expression |
| Category: Database | Default: | none |
| Type: Multi-valued | Used by: | linkscan.cfg |
| Links matching relative-path-expression are stored only
once, regardless of how many references are seen. Typically used
to prevent thousands of references to "blank/filler" images
from adding excessive bulk to the LinkScan database.
Tagonce .*blank\.gif$ | ||
| Textfiles [1] | Syntax: | Textfiles = file-extension [, file-extension]... |
| Category: File | Default: | Textfiles = txt |
| Type: Single-valued | Used by: | linkscan.cfg |
| When using File System Scanning, any file with this extension is
interpreted as a plaintext document. When using Network (HTTP) Scanning,
any link with a Content-Type: text/plain header is interpreted
as indicating plaintext format.
| ||
| Timeout1 | Syntax: | Timeout1 = integer |
| Category: System | Default: | Timeout1 = 20 |
| Type: Single-valued | Used by: | linkscan.sys,linkscan.cfg |
| Timeout (in seconds) for first attempt to contact site.
| ||
| Timeout2 | Syntax: | Timeout2 = integer |
| Category: System | Default: | Timeout2 = 40 |
| Type: Single-valued | Used by: | linkscan.sys,linkscan.cfg |
| Timeout (in seconds) for second attempt to contact site.
| ||
| Unsafechar [1] | Syntax: | Unsafechar = string |
| Category: Misc | Default: | Unsafechar = <>`" |
| Type: Single-valued | Used by: | linkscan.cfg |
| Unsafe characters. Do not escape these.
| ||
| Usecookiefile | Syntax: | Usecookiefile = boolean |
| Category: CustomScan | Default: | Usecookiefile = 1 |
| Type: Single-valued | Used by: | linkscan.cfg |
| If enabled, LinkScan will pre-load its cookie-jar from the file
cookies.txt in the current Project directory.
| ||
| Useloginfile | Syntax: | Useloginfile = boolean |
| Category: CustomScan | Default: | Useloginfile = 1 |
| Type: Single-valued | Used by: | linkscan.cfg |
| If enabled, LinkScan will process any links contained within the
file login.txt in the current Project directory, prior to the
start of the scan.
| ||
| Userdata | Syntax: | Userdata [123] match-expression expression |
| Category: CustomScan | Default: | none |
| Type: Multi-valued | Used by: | linkscan.cfg |
| Extract user specified data from document (e.g. from META tags).
Userdata 1 (?i)<meta[^>]*emp-badge-no\s*=\s*"(\d+) $1 | ||
| Userdatafmt | Syntax: | Userdatafmt [123] [DHLTX] integer[LRC] caption |
| Category: CustomScan | Default: | none |
| Type: Multi-valued | Used by: | linkscan.cfg |
| Format user specified data.
D=date; H=hot links; L=link; T=truncate to format; X=normal 20R=20 chars right adjusted; 40L=40 chars left adjusted Userdatafmt 1 X 10R Badge Number | ||
| Userdatasub | Syntax: | Userdatasub [123] expression expression |
| Category: CustomScan | Default: | none |
| Type: Multi-valued | Used by: | linkscan.cfg |
| Perform RegExp manipulations on user data fields.
| ||
| Weblintoptions [1] [2] | Syntax: | Weblintoptions = string |
| Category: System | Default: | Weblintoptions = -d extension-markup,extension-attribute |
| Type: Single-valued | Used by: | linkscan.sys |
| Sets command-line options that are automatically passed to weblint.
| ||
| Weblintpath [1] [2] | Syntax: | Weblintpath = absolute-path |
| Category: System | Default: | Weblintpath = C:/LinkScan/weblint/weblint |
| Type: Single-valued | Used by: | linkscan.sys |
| Sets the full pathname to the weblint executable.
| ||
| Wildtlds [1] | Syntax: | Wildtlds = comma separated list of TLD's |
| Category: System | Default: | Wildtlds = com,net |
| Type: Single-valued | Used by: | linkscan.sys |
| Enable checks for wildcard records in the listed Top Level Domains (TLD's).
Prevents false negatives on DNS lookups caused by TLD wildcard records.
| ||
| Winhttp | Syntax: | Winhttp = boolean |
| Category: Security | Default: | Winhttp = 0 |
| Type: Single-valued | Used by: | linkscan.cfg |
| Use the native Microsoft Windows implementation of HTTP.
Useful when "NTLM" authentication required.
| ||
| Xmeta | Syntax: | Xmeta = expression |
| Category: CustomScan | Default: | Xmeta = 0 |
| Type: Single-valued | Used by: | linkscan.cfg |
| Extract an extra meta tag (matching expression) from each HTML
document. Only effective in conjunction with Collectmeta.
| ||
| Xmlmatch | Syntax: | Xmlmatch expression |
| Category: CustomScan | Default: | Xmlmatch 0 |
| Type: Multi-valued | Used by: | linkscan.cfg |
| Define patterns for link extraction from XML documents.
| ||
| Xmlnomatch | Syntax: | Xmlnomatch expression |
| Category: CustomScan | Default: | Xmlnomatch 0 |
| Type: Multi-valued | Used by: | linkscan.cfg |
| Define exclusion patterns for link extraction from XML documents.
| ||
![]()
This section discusses the use of LinkScan in conjunction with various web servers and the associated security implications:
![]()
When LinkScan is used to scan a website, the results are stored in the LinkScan database. Reports are created by executing queries against that database with several CGI programs that are supplied with LinkScan.
Hence, LinkScan will normally require that web server software be installed, configured and running on the installation computer. Note that LinkScan doesn't require access to a local web server in order to scan a web site. But a local web server is usually required to view the results of that scan.
On Unix Systems the LinkScan installation procedure assumes the availability of an existing web server, often the Apache system. See LinkScan Installation and Startup Guide for Unix Systems.
The remainder of this section describes the use of LinkScan with various web servers and discusses the associated security considerations.
![]()
When using LinkScan with Apache (and most other web servers) two sets of considerations must be addressed:
Apache normally requires that several conditions be satisfied before it will execute the LinkScan CGI programs -- or any other CGI program, for that matter:
Unless all of the above are satisfied, Apache will refuse to execute the CGI program and you will likely receive a 500 Server Error or 403 Forbidden response.
LinkScan imposes certain additional (minimal) requirements:
Be sure to include the leading and trailing forward-slash characters and make the file world readable (chmod 644 .linkscan).
Although the above guidelines are presented in the specific context of the Apache web server, the basic principals are quite generic and may easily be adapted to almost web server. Note also that LinkScan provides considerable flexibility; you may install the LinkScan CGI programs in one directory, the documentation in another and the main LinkScan system including the databases in a third. Indeed, LinkScan may easily be configured to run in chroot and other similar environments.
![]()
LinkScan includes some basic Access Controls that may be configured using the Access command in the configuration file linkscan.sys in the LinkScan directory. These access controls apply to CGI access only. It is assumed that standard operating system features will be used to control access by shell (command line) users.
Access username : password : project-list : owner-list : menu-options
x = Project Summary Report
e = Problem Documents Report
s = Document Detail Report
k = Critical Errors Report
d = Detailed Errors Report
b = Changed Documents Report
u = Search Documents Report
v = Search Links Report
m = SiteMap Report
y = Summary of All Projects
c = Selected Status Codes Report
a = All Pages Linking To ... Report
o = Orphaned Files Report
h = External History Report
r = Redirections Report
p = System Configuration Report
q = LinkScan/QuickCheck
t = LinkScan/TapMap
An asterisk character may be used as a wildcard for any or all of the above parameters.
Indeed, a default LinkScan installation will create the following entry in linkscan.sys file providing unrestricted access:
Access = * : * : * : * : *
Facilities are also provided to integrate with HTTP Authentication Schemes. LinkScan will check for the Environment Variable specified by the Httpauth parameter in linkscan.sys (normally REMOTE_USER). If this variable is present, it will be used to set the current Username. LinkScan will assume that the user has already authenticated with the HTTP server and it will not check the password field in linkscan.sys.
Example: In the following example, we have configured two users with different passwords. User 'admin' has unrestricted access, but user 'webmaster' may only access the two Projects specified. Also the "Site History" and "System Configuration" Reports are not available to 'webmaster'.
Access = admin : root : * : * : *
Access = webmaster : html : www.example.com,devel.example.com : * : sxdcmoaqt
![]()
LinkScan incorporates some simple access controls on the various Reporting options and selections when run as CGI scripts. No LinkScan-specific access controls are applied when accessing LinkScan via a shell (command line) interface; it is assumed that normal operating system access controls apply. The LinkScan access controls are subject to the many and varied limitations inherent within the CGI protocol (see the WWW CGI Security FAQ and other sources for further discussion). In summary, if your HTTP server can access any specific file, then, any user with HTTP access to your server may be able to access that file. The LinkScan security features are provided as a convenience but they are no substitute for other more robust system-level security controls such as:
We highly recommend that you configure HTTP Authentication of the LinkScan directory. Other measures you may wish to consider include:
![]()
The following notes describe the format of many of
the LinkScan database files stored in:

...LinkScan/ProjectName/data/
...LinkScan/ProjectName/hist/

Each file is created in (mainly) ASCII format,
with one Record per Line. Each Record contains
a number of Fields, delimited with <Control-G>
characters (Octal: 007). The Fields associated
with each Record type are outlined below.

idx.dat
=======
Establishes the mapping between an "idx" number and each
unique Document/Link/URL examined by LinkScan.

 0 = idx
 1 = URL
 2 = Document Title


doc.dat
=======
Contains the attributes and characteristics for each unique
Document/Link/URL examined by LinkScan.

 0 = idx (see idx.dat)
 1 = URL
 2 = Owner Code (see linkscan.own)
 3 = Clicks
 4 = Link Type (see below)
 5 = Content-Type (MIME)
 6 = Link Status Code (see codes.txt)
 7 = Extended Status (normally blank)
 8 = Location for Redirect (see idx.dat)
 9 = Original Status Code (pre-redirect)
10 = Content-Length (size in bytes)
11 = Last-Modified (date/time)
12 = Reserved
13 = File System Pathname
14 = Document Title
15 = In-line bytes (page weight)
16 = Number of Errors in this document
17 = Number of Warnings in this document


orp.dat
=======
Contains information concerning all Orphaned Files.

 0 = URL
 1 = File System Pathname
 2 = Symlink (0=No; 1=Followed symlink; 2=Is symlink)
 3 = File Size
 4 = Date/Time last modified
 5 = Owner Code (see linkscan.own)
 6 = Link Type (see below)
 7 = Link Status Code (see codes.txt)


mad.dat and map.dat
===================
Contain the LinkScan SiteMap Data
mad.dat -- directory order
map.dat -- link order

 0 = Level in Map
 1 = Dot-Decimal Notation
 2 = Document URL
 3 = Document Title
 4 = Owner Code (see linkscan.own)
 5 = Content-Length (size in bytes)
 6 = Last-Modified (date/time)
 7 = Total # of child documents for this node


lnk.dat
=======
Contains the attributes of every link considered by LinkScan.

 0 = Owner Code (see linkscan.own)
 1 = From URL (see idx.dat)
 2 = Line Number (times 10)
 3 = To URL (see idx.dat)
 4 = Link Type Code (see below)
 5 = Link Status Code (see codes.txt)
 6 = Extended Status (normally blank)
 7 = cnt
 8 = Link Caption/Description
 9 = File Size (in-line images only)
10 = Redirect location (see idx.dat)


err.dat
=======
Subset of lnk.dat file, excluding records relating to all
good links.


linkscan.own
============
Establishes the mapping between the Owner Code and Owner Name.

0 = Owner Name
1 = Owner Code


linkscan.sum
============
Summary Statistics Data (Note this file is TAB delimited)

 0 = Version
 1 = Date and time of scan
 2 = Total Documents
 3 = Missing Documents
 4 = Documents Containing Errors
 5 = Total Other Files
 6 = Missing Other Files
 7 = Total Anchors
 8 = Missing Anchors
 9 = Total External Links
10 = External Links Tested This Scan
11 = External Links with Errors
12 = External Links with Possible Errors
13 = External Links with Warnings
14 = Total Orphans


linkscan.tim
============
HTTP Transaction Times (Note this file is TAB delimited)

0   URL fetched
1   HTTP status code (200, 404 etc)
2   Document size (bytes)
3   Document Body flag (0=not available; 1=available but not fetched;
                        2=available and fetched)
4   Transaction time (milliseconds)
5   Redirect location

Notes:
* Transaction Time includes time to follow any redirects.
* Time includes time to fetch document body on HTML
  and similar MIME types only.
* On other file types (images for example) the transaction
  time does NOT include the body download. But it does
  measure the time and network/server latency for the
  exchange of full request and response headers. The
  additional time could be computed from the file size
  and a knowledge of the available connection bandwidth.
  It's likely to be quite accurate given that the HTTP
  server has only to push the data from an already found
  file down an already open socket, to the client. Since
  most image file formats incorporate compression, you're
  unlikely to see any further savings even if the
  connection type supported such a scheme.
* Timing will be impacted by # of processes used for
  the scan and also, to some extent, the relative
  performance of the target server and the LinkScan
  machine.


hist/xxxxxx/dat
===============

History Data -- New File Created for Each Scan

 0 = Document URL
 1 = Owner Name
 2 = Document Type Code (see below)
 3 = Clicks
 4 = Content-Type (MIME)
 5 = Document Status Code (see codes.txt)
 6 = Content-Length (size in bytes)
 7 = Last-Modified (date/time)
 8 = Document Title


Document Type Codes
===================

 H = HTML Document
 D = PDF Document
 J = JavaScript Document
 M = Image Map
 S = Flash Document
 T = Text Document
 Y = Reserved
 Z = Import Document

 F = Other File Type
 I = In-line image
 N = Document with Nofollow rule
 O = Orphaned Document
 P = Orphaned File

 A = Anchor
 R = Redirection (internal)

 U = External link
 V = Redirection (external)
 X = Reserved (typically mailto: or invalid characters)
![]()
![]()
LinkScan incorporates several functions that relate to electronic mail. These include:
Some or all of the following parameters must be configured in order to use these functions:
Sendmailpath = perl utils/sendmail.pl
Smtphost = smtp.example.com
Hostname = www.example.com
Mailfrom = [email protected]
Nameservers =
[...]
Mailto = 1
Sendmailpath: The pathname to the sendmail.pl utility that is installed in the LinkScan utils/ folder.
Smtphost: The full hostname of a SMTP mail server that you are authorized to use.
Hostname: The full hostname of the computer on which LinkScan is installed. This is used for the SMTP HELO. For sending LinkScan reports via email a hostname of localhost may work, depending on your SMTP server. For Active Mailto Checking an accurate hostname (matching the reverse DNS) is required.
Mailfrom: The From: address, used for sending LinkScan reports and Active Mailto Checking.
Nameservers: Leave blank unless running with Active Mailto Checking enabled and LinkScan reports nameserver errors.
Mailto: When enabled, all LinkScan Reports include an option to mail to the current report to a selected address.
Sendmailpath = /usr/lib/sendmail -t
Smtphost =
Hostname = www.example.com
Mailfrom = [email protected]
Nameservers =
[...]
Mailto = 1
Sendmailpath: The absolute pathname to the sendmail executable on your server. The -t switch is required.
Smtphost: This parameter is ignored on Unix systems.
Hostname: The full hostname of the computer on which LinkScan is installed. This is used for the SMTP HELO. For Active Mailto checking an accurate hostname (matching the reverse DNS) is required.
Mailfrom: The From: address, used for sending LinkScan reports and Active Mailto Checking.
Nameservers: Leave blank unless running with Active Mailto Checking enabled and LinkScan reports nameserver errors.
Mailto: When enabled, all LinkScan reports include an option to mail to the current report to a selected address.
For completeness, we address two related settings in the linkscan.cfg file:
Mailhost = example.com
Checkmailto = 0
Mailhost: This setting is used exclusively for sending e-mail reports from LinkScan Dispatch. By default, e-mail reports are sent to Owner@Mailhost.
Checkmailto: This parameter enables Active Mailto Checking. It is disabled by default. Note that this feature requires the Perl Module Net::DNS be installed on your computer. The Net::DNS Module is available from http://www.net-dns.org/.
![]()
LinkScan includes support for the Wireless Application Protocol (WAP) and Wireless Markup Language (WML). This allows LinkScan to validate wireless sites via an HTTP gateway. Typically, you will need to add the following configuration commands to linkscan.cfg:
Extraheader User-Agent: Nokia7110/1.0 (04.80)
Mimetypes text/vnd.wap.wml H
This will cause LinkScan to send an appropriate User-Agent header with each request and to parse/follow documents with a MIME/Content-Type of text/vnd.wap.wml.
![]()
LinkScan may be configured to test websites hosted on secure servers running the Secure Sockets Layer (SSL). i.e. sites with URL's of the form https://www.example.com/.
On the Microsoft Windows platforms, you need only specify the URL of the site to be scanned. LinkScan includes native support for the Secure Sockets Layer.
On Unix systems, you will need to install additional software to handle the SSL encryption. The required packages are:
OpenSSL available from http://www.openssl.org/
Perl Module Net::SSLeay available from http://search.cpan.org/search?module=Net::SSLeay
At the time of writing LinkScan has been tested with OpenSSL version 0.9.6 and Net::SSLeay version 1.05.
Installation of both packages is very straightforward if you have root access:
cd $HOME/openssl-0.9.6
./config
make
make test
make install   # See Note 1

cd $HOME/Net_SSLeay.pm-1.05
perl Makefile.PL
make
make test      # See Note 2
make install   # See Note 1
Note 1: The make install steps may fail if you do not have root access. You may install and run these packages from a user directory if you do not have root access by using something like this:
cd $HOME/openssl-0.9.6
./config --openssldir=$HOME/myopenssl
make
make test
make install

cd $HOME/Net_SSLeay.pm-1.05
perl Makefile.PL $HOME/myopenssl
make
make test
mv ./blib/lib/Net/ /usr/www/linkscan/
mv ./blib/lib/auto/ /usr/www/linkscan/
Note 2: The make test on Net::SSLeay will produce a number of errors. In general, you can safely ignore them.
Once the module Net::SSLeay has been successfully installed, LinkScan will be able to scan https://... sites without any additional configuration changes.
Each of the above referenced programs (with the exception of LinkScan) is maintained by parties other than Electronic Software Publishing Corporation. You are solely responsible for your use of those products and your compliance with any applicable software license agreements. Several of the referenced products contain encryption algorithms, the distribution and use of which may be subject to various laws and regulations. You are solely responsible for compliance.
![]()
When scanning sites that contain (in whole or in part) Japanese pages, include the following directives in the Project configuration file (on Windows systems, via the Advanced Tab of the Project Planning Property Sheet):
Jisencode = 1
Displaylang = EUC-JP
Pages containing JIS, Shift-JIS and/or EUC-JP encoded Japanese characters will be normalized to EUC-JP. This means, for example, that the TITLE tags extracted from different documents may be combined in a single summary document (e.g. the LinkScan SiteMap) even though the original pages were constructed with different encodings.
The encoding type of each document is stored in the LinkScan database together with the MIME type (Content-Type). The Search Documents Report may be used to search/display this data and help enforce consistent encoding standards across mixed language sites.
![]()
LinkScan automatically creates a XML Sitemap file in a format suitable for submission to Google Sitemaps. For more background, see Google Webmaster Help Center.
The XML Sitemap file is created automatically. The file name is sitemap.xml and it resides in the Project subdirectory of the LinkScan installation directory. e.g.
The file is formatted in compliance with the Google Sitemaps Protocol. However, Google recommend that the file be compressed using gzip. The gzip utility is standard on most UNIX systems. Windows users may download a free command line implementation of gzip from http://www.gzip.org/.
LinkScan produces the sitemap.xml file with the following Google-defined fields for each web page listed:
changefreq Valid options are "always", "hourly", "daily", "weekly", "monthly", "yearly" or "never". LinkScan sets the changefreq to "weekly" by default. This may be changed by adding a Gsmchangefreq command to the Project linkscan.cfg file [Windows users: add this command via the Advanced Tab of the Project Planning Property Sheet].
lastmod LinkScan uses the data/time last modified data it collects. With File System scanning this is taken from the servers file system attributes. With HTTP scanning this is taken from the Last-Modified HTTP header (if present). If no specific date/time stamp is available, LinkScan supplies the date/time of the last scan.
priority This is assigned automatically by LinkScan, based on the document level within the LinkScan Link Order SiteMap. In summary, it means that pages which are one or two clicks from the home page (start of scan) are assigned a high priority. Pages that are many clicks from the starting page are assigned a lower priority.
In addition, LinkScan will optionally limit the scope of the Google Sitemap to the first "N" levels (as defined by the LinkScan Link Order SiteMap). This may be defined by adding a Gsmlevels command to the Project linkscan.cfg file [Windows users: add this command via the Advanced Tab of the Project Planning Property Sheet].
![]()
At version 11.6, LinkScan is able to parse and extract links from the following document types:
The following paragraphs describe how to use LinkScan to scan XML (or other similarly formatted) documents. Activating and configuring the XML parser involves two basic steps.
First, LinkScan must be told to route documents of
the appropriate type to the XML parser for analysis.
On UNIX systems this may be done with the Mimetypes
and Filetypes directives in the linkscan.cfg file.
Mimetypes text/xml X

Filetypes xml X
On Windows systems, these options may be set via the Mimes and Files Tabs of the Project Planning Property Sheet.
The former is used with HTTP Scanning and it will route all documents with Content-Type: text/xml header to the XML parser. The latter is used with File System Scanning and it will route all files with a .xml file extension to the new XML parser.
Second, LinkScan must be told how to extract links from the XML document. This is done via Regular Expressions and is best illustrated by example. Suppose we have an XML document organized like this:
<?xml version="1.0" encoding="ISO-8859-15"?>
<link>
  <linkUrl>http://www.elsop.com/</linkUrl>
  <linkText>LinkScan</linkText>
  <linkTarget>_blank</linkTarget>
  <linkRef>000012345678</linkRef>
</link>
We construct an Xmlmatch directive and add it to the linkscan.cfg file:
Xmlmatch = <linkUrl>([^<]+)</linkUrl>.*?<linkText>([^<]+)</linkText> $1 $2
LinkScan will now extract the link (http://www.elsop.com/) and the associated caption (LinkScan) from that XML file.
The new parser means that LinkScan can now be used to quickly and accurately extract links from XML and similarly formatted data files.
![]()
At version 12.3 LinkScan provides full support for IPv6. The IPv6 standard was designed to dramatically increase the number of Internet addresses available following the exhaustion of the entire IPv4 address pool. An overview of IPv6 is available at Wikipedia.
Using LinkScan with IPv6 on UNIX systems requires:
Using LinkScan with IPv6 on Windows systems requires:
A new setting, IPv6Prefs, provides user control over LinkScan's affinity for IPv6 versus IPv4 connections. At version 12.3, this setting applies to LinkScan on UNIX systems only. Valid values are:
IPv6Prefs=4      Use only IPv4 connections
IPv6Prefs=6      Use only IPv6 connections
IPv6Prefs=46     Use IPv4 connections if available and IPv6 if not
IPv6Prefs=64     Use IPv6 connections if available and IPv4 if not
IPv6Prefs=0      Inherit the system preferences
or blank
![]()
![]()
LinkScan 12.3 is a significant enhancement release.
We have removed all references to a deprecated Perl library (flush.pl).
We have added full support for IPv6.
We have incorporated a number of other minor enhancements, bug fixes and performance improvements.
![]()
LinkScan 12.2 is a consolidation of several minor bug fixes and enhancements.
We have corrected some compiler issues with the Windows GUI.
We have improved link extraction from text files.
We have addressed a cross site scripting vulnerability.
We have addressed expiration issues with a LinkScan cookie.
We have fixed a bug in TapMap.
We have improved link extraction from PDF files.
![]()
LinkScan 12.1 is a significant maintenance release that corrects several small errors and refines a number of existing features.
LinkScan 12.1 has been fully tested on Microsoft Windows 7, including Windows 7 64-bit.
We have provided a brand new installer for Windows systems that is faster, cleaner, and more efficient.
We have fixed several minor problems with the HTML and JavaScript parser and implemented several other improvements as well.
We have incorporated a number of other minor enhancements, bug fixes and performance improvements.
![]()
LinkScan 12.0 is a significant maintenance release that corrects several small errors and refines a number of existing features.
We have provided the option to use an external link extractor on FLash (SWF) files. To use this you must first obtain a copy of the Adobe Search Engine SDK via http://www.adobe.com/licensing/developer/search/faq/.
Simply copy the Adobe "swf2html" executable to the LinkScan installation folder.
Link extraction from from Flash files represents a significant challenge. The "swf2html.exe" program created by Macromedia/Adobe probably represents the very best option available anywhere. Once installed, LinkScan will route all Flash files to this program and then process all of the hyperlinks that it is able to identify.
We have made several improvements to the JavaScript link extraction.
We have added several improvements to the handing of encoded characters including UTF-8.
We have improved the accurancy of the page weight computations.
We have fixed a compatibility problem with Net::SSLeay that arises on some UNIX systems.
We have incorporated a number of other minor enhancements, bug fixes and performance improvements.
![]()
We have introduced a new licensing option: LinkScan Unlimited. This is a license to scan an unlimited number of unique web pages (documents) on any number of physical computers that are owned or leased by you. See Ordering Information.
We have made several significant improvements to the PDF file parser (link extractor). Customers who scan significant numbers of PDF documents are strongly encouraged to install this new release.
We have enhanced the RelaxAnchor command to make the checking of named anchors a little more relaxed, consistent with the latest browsers.
We have enhanced the Excludehidden option to ignore <link ...> tags. The was done by popular demand because several common authoring tools including Microsoft Office tend to insert invalid, albeit harmless, link tags in the documents they create.
We have enhanced LinkScan to handle <image...> tags exactly like <img...> tags.
We have tested LinkScan 11.7 with Windows Vista.
We have incorporated a number of other minor enhancements, bug fixes and performance improvements.
![]()
We have added an option to exclude (ignore) "hidden" links. That is, links with an empty anchor such as:
<A HREF="link.html"></A>
On UNIX systems this may be activated by adding the Excludehidden directive to the linkscan.cfg file.
On Windows systems this may be activated via a checkbox on the Scope Tab of the Project Planning Property Sheet.
This avoids false errors with links that have been temporarily hidden with null anchors.
We have added to option that enables users to scan only the first "N" pages of a website.
On UNIX systems this may be activated by adding the Maxdocs directive to the linkscan.cfg file.
On Windows systems this may be activated via the Max Docs control on the Scope Tab of the Project Planning Property Sheet.
This option helps LinkScan users to more quickly debug or fine tune new LinkScan configurations and test scanarios.
We have enhanced LinkScan with a powerful new parser or link extractor. Previously, LinkScan was able to extract links from documents of the following types:
The new parser will allow link extraction from additional file types although it has been designed and implemented principally for XML files.
The new parser means that LinkScan can now be used to quickly and accurately extract links from XML and similarly formatted data files. See XML Documents.
An existing LinkScan feature (Collectmeta) will cause all HTML META tags to be saved to an ASCII file for subsequent analysis by the user. The new command:
Xmeta <metadata[^>]*>(.*)</metadata>
will cause the contents of any METADATA tag to be included in that file.
We have made other small improvements and enhancements to SSL Proxy support, PDF document parsing, LinkScan SiteMaps, LinkScan Dispatch, and the Google SiteMap feature.
We have incorporated a number of other minor enhancements, bug fixes and performance improvements.
![]()
We have enhanced LinkScan to automatically create a XML Sitemap file in a format suitable for submission to Google Sitemaps. For more background, see Google Webmaster Help Center.
More details of this new feature are described in the Google Sitemaps Application Note.
We have added a percent completion display to the title bar of the Windows interface when a scan is in progress. When the window is minimized, the percentage is shown in the Windows Task Bar.
We have implemented some improvements to the handling of bad characters in URL's.
We have made an addition to the Diagnostic Trace. When a URL is dissected and the hostname resolved, the IP address is logged. This has proven useful in investigating problems associated with round-robin DNS environments.
We have enhanced the LinkScan Pinger with several new options including the ability to send more succinct e-mail notifications (especially useful for sending text message alarms to cellphones).
We have enhanced the LinkScan checking of Fragments and Anchors. First, <DIV ID="string"> tags are recognized exactly like <a name="S30string"> tags. Second, a new option (Relaxanchor = 1) will make the anchor checks less strict. Although this in not in accordance with the HTML standards, it is consistent with most modern browsers. Specifically, with Relaxanchor enabled, the Fragment/Anchor check is made case insensitive, and superflous '#' characters are ignored.
We have fixed a (rare) problem with the LinkScan Profiler.
We have made several small fixes and enhancements to LinkScan Dispatch.
We have incorporated a number of other minor enhancements, bug fixes and performance improvements.
![]()
We have made several improvements to the processing of JavaScript constructs in complex documents. This results in improved test coverage and accuracy on websites that make extensive use of JavaScript.
We have added the Substitutescript command which allows users to perform complex transformations on certain JavaScript and Dynamic HTML constructs. These transformations may be used by more advanced users to more effectively test functions invoked by complex JavaScript/DHTML function calls.
We have added the new Ownerq command. This new option gives users even more flexibility and control over the ability to assign specific areas of web site content to specific Owners (content developers).
We have improved some error checking and reporting functions to better detect and explain certain configuration or environmental errors and anomalies.
We have added a new Autoencspace option. This will cause LinkScan to automatically compensate for certain HTML/HTTP errors that result when content developers fail to properly encode certain characters in a URL. More commonly this arises when authors fail to write space characters as "%20".
By default, LinkScan reports a 911 Unsafe Character Error when it encounters links containing improperly encoded characters. With the Autoencspace option, LinkScan will automatically perform the encoding for you, mirroring the behavior of Microsoft Internet Explorer. We do not recommend the use of this option (since it masks real errors in the HTML documents) but it has been provided in response to user requests.
We have incorporated a number of other minor enhancements, bug fixes and performance improvements.
![]()
We have improved several reports, especially the Search Links Report and the sort options on same.
We have made several small enhancements to the LinkScan Orphaned File detection.
We have made several enhancements to the LinkScan SiteMap.
We have improved the handling/reporting of certain (rare) link redirection scenarios.
We have improved the speed and accuracy with which LinkScan validates FTP links.
We have improved the processing of JavaScript code to maximize link extraction and minimize false matching on complex structures.
We have incorporated a number of other minor enhancements, bug fixes and performance improvements.
![]()
On September 15 and 16, 2003, changes were made to the Internet Domain Name Service (DNS) by VeriSign, Inc. VeriSign is the company responsible for managing all .com and .net addressing.
In short, VeriSign created wildcard records such that DNS lookups on a host within an invalid .com or .net domain will resolve to the IP address of a VeriSign operated server. Hence an invalid URL can direct web browsers to a valid web page published by VeriSign.
In the past, LinkScan would typically report a Possible Error on such links: 900 No DNS Entry. As a result of these changes LinkScan will see a valid web page and report no error at all. Users should be aware that other link checkers (and products that perform similar tasks) may also be impacted by VeriSign's actions.
Elsop urges all users to install LinkScan Version 11.2a immediately. This version incorporates enhancements which will detect URL's that would otherwise trigger the wildcard records so that LinkScan will once again correctly report an error.
No configuration changes are required; the new wildcard detection logic is enabled automatically for all URL's within the .com and .net Top Level Domains (TLD's).
However, users may optionally enable wildcard detection on other TLD's such as cc. Simply add a directive to linkscan.sys such as:
Wildtlds = com, net, cc
Users that wish to disable this logic (e.g. in the event that VeriSign withdraw the wildcard records) may add this directive to linkscan.sys.
Wildtlds = 0
![]()
We have made significant enhancements to the LinkScan user interface on Windows systems. The sorted order of the main Project List is now saved when exiting LinkScan and restored the next time the program is launched.
We have improved the integrated LinkScan web browser on Windows systems. The loading and rendering of pages and updating of the Address Bar operates more smoothly. JavaScript error dialogs are suppressed (where possible). New options have been added to the menus including Open, Save As, Print, Page Setup, Copy, Paste, Find In Page, Increase/Decrease Font Size, View Source and Internet Options. In addition, Control-C and Control-V keyboard accelerators may be used within web pages and forms. Support for the Internet Favorites has also been enhanced.
We have made numerous enhancements to the low-level link checking methodologies. These include improved timeout-retry algorithms, additional status codes, more detailed information concerning DNS lookup, timeout, connect and other networking errors as well as improvements to the reporting of multiple redirection problems.
We have added support for Multi-Part Form Submissions using the POST method. This mechanism is typically used when uploading data files from a client to a server. See How To Submit Forms.
The maximum length of a normal URL remains at 4096 bytes (or thereabouts, due to encoding effects). However, we have eliminated all arbitrary size restrictions on special URLs using the "??" and "???" conventions indicating FORM submissions using the POST method.
We have enhanced the LinkScan SiteMap and TapMap Reports. Each node of the Map includes a counter indicating the total number of child nodes below the current node.
We have added a new Maxdocbyte option to control the maximum size of document body that will be downloaded. This can save considerable time when checking large numbers of PDF documents over relatively slow network connections.
We have adjusted the algorithm used to extract TITLE tags from a document. It now triggers on the first set of tags versus the last. This is more consistent with the majority of common web browsers.
We have reorganized the Search Links Report and included significant performance enhancements.
We have improved the options for adding custom headers and footers to the LinkScan reports.
We have added more Orphaned File information to the Project Summary Reports.
We have improved some of the internal diagnostic tools in order that Elsop's engineers may better support users.
We have incorporated a number of other minor enhancements, bug fixes and performance improvements.
![]()
We have introduced the LinkScan Pinger: a small self-contained utility that may be used to periodically check a list of URL's and raise e-mail alarms if certain error conditions arise. See: LinkScan Pinger.
We have enhanced and improved the layout of the directory-order SiteMap to improve the visualization of the website structure.
We have made several adjustments to the LinkScan general purpose Text File Parser. In general LinkScan will extract more hyperlinks from text files, Microsoft Office documents and similar file types with fewer false matches.
We have enhanced LinkScan with the ability to record the timing for each HTTP transaction. This means LinkScan may be used in performance related studies. The transaction times are logged to a simple tab-delimited ASCII file which may easily be imported directly into Microsoft Excel (or other tools) for further analysis.
It is very simple to move this into Excel with:
Data | Get External Data | Import Text File
See description of linkscan.tim in LinkScan File Formats.
We have added support for the Real Time Streaming Protocol (RTSP). The software will:
Users upgrading from LinkScan 11.0 or earlier should add the following directive to their linkscan.cfg file:
Mimetypes audio/x-pn-realaudio T # Default at 11.1
We have added support for <NOINDEX> tags.
If the Project configuration contains the directive Noindex = 1 then any links contained within an HTML <NOINDEX></NOINDEX> block are ignored, unless the link refers to a new URL (i.e. one that has not thus far been "seen" by LinkScan).
The <NOINDEX> tag is supported by various search engines and is typically used to prevent the indexing of document fragments that are used repeatedly (e.g. site navigation menus/tools). Excluding these regions from LinkScan and search engine indexes helps users and authors focus their attention on the most critical content.
We have significantly improved support for Japanese character sets. When scanning sites that contain (in whole or in part) Japanese pages, include the following directives in the Project configuration file (on Windows systems, via the Advanced Tab of the Project Planning Property Sheet):
Jisencode = 1
Displaylang = EUC-JP
Pages containing JIS, Shift-JIS and/or EUC-JP encoded Japanese characters will be normalized to EUC-JP. This means, for example, that the TITLE tags extracted from different documents may be combined in a single summary document (e.g. the LinkScan SiteMap) even though the original pages were constructed with different encodings.
The encoding type of each document is stored in the LinkScan database together with the MIME type (Content-Type). The Search Documents Report may be used to search/display this data and help enforce consistent encoding standards across mixed language sites.
We have added an option that will permit LinkScan to test web servers that require proprietary Microsoft NTLM Authentication.
LinkScan includes native support for HTTP Basic Authentication. However, some Intranet environments utilize the proprietary and undocumented Microsoft NTLM protocol to authenticate users. We have added the ability to scan such sites.
Note: This may result in other minor artifacts in the results of the scan since LinkScan will use the Microsoft Windows implementation of the HTTP protocol versus the (stricter) native LinkScan implementation.
We have made significant performance improvements to the LinkScan Profiler. As well as running generally much faster we have eliminated some pathologically poor performance on certain (rare) types of documents.
We have incorporated workarounds to some platform-specific Perl problems that (rarely) lead to fatal errors:
We have improved the formatting of the System Configuration Report, Cookie Log/Diagnostic Trace to improve usability.
LinkScan 11.0™ is a major new release built upon a new internal database engine. This results in dramatically faster reports, especially on larger websites.
In comparative tests, the time required to select, sort and display most of the commonly used reports is significantly reduced. On small websites (say 500 documents) the reports are displayed in approximately half the time. On large websites (say 40,000 documents) the reports are displayed approximately 10 times faster.
Despite the use of some new binary indexing files, all of the raw data is still available to other applications via simple ASCII text files. See LinkScan File Formats. We have also conducted tests to ensure it is a simple matter to load some of these tables into Relational Database Management Systems such as MySQL and SQL Server.
We have incorporated new options for HTML Syntax Checking. LinkScan/QuickCheck continues to offer seamless integration with the Weblint program. But now integration with other programs is also possible. In particular, QuickCheck integrates with OpenSP or Jim Clark's SP program and this means users may perform a full SGML validation against a specific Document Type Definition (DTD). The LinkScan distribution includes a small sample of the most common DTD's and, on Windows systems, a copy of the OpenSP program. Unix users will need to download the OpenSP sources and compile them but this is extremely simple and straightforward. See LinkScan QuickCheck.
We have enhanced the Search Documents Report with the ability to display documents that use (or do not use) specific tag types (e.g. APPLET, FORM, META, SCRIPT, etc).
The default Owner *1 for automatically assigning documents to Owners based on the top-level directory name has been generalized to operate on multiple levels if required. For example, Owner *2 will cause the link http://www.example.com/first/second/third/index.html to be assigned to Owner first_second. On Windows systems, this may be selected via a spin button on the Owners Tab of the Project Planning Property Sheet.
An existing feature provides for the optional display of a form at the foot of each report. This form permits users to e-mail a copy of the current report to a specific address. We have added an optional Comments box so than annotations may be included in the header of the e-mail message. To enable the comments box, set Mailto=2 in linkscan.sys.
We have discovered that tags of the form:
<A HREF="?Something">
Tend to cause wildly erratic results. Different web browsers resolve such links relative to different bases. In our view, the use of such constructs is extremely unsafe. Hence tags of this form (with a leading query character) are flagged with a 911 Unsafe Character Error.
We have included a new Maxredir command which enables users to control the maximum number of HTTP redirections LinkScan will follow when fetching a given URL. The default value of 5 is unchanged and appropriate for the vast majority of users. But those that need to customize that behavior will now have that option.
We have added a new Retry External option. When enabled, LinkScan will track all External links that appear to fail due to network related errors (e.g. DNS, connect and timeout errors). These links will be retested at the end of the scan. This tends to reduce the number of transient errors reported but the scan may require a little more time to complete. The feature may be activated via the Other Tab of the Project Planning Property Sheet on Windows systems, or by setting Retryext=1 in linkscan.cfg.
The behavior of the Reload/Refresh button on the integrated Web Browser has been improved to ensure that locally cached copies of the page are not used.
We have incorporated a number of other minor enhancements, bug fixes and performance improvements.
LinkScan 10.0™ comes equipped with a brand new and highly functional Graphical User Interface on Windows systems. See Screenshot.
We have increased the maximum length of a URL from 1024 to 4096 characters.
We have enhanced LinkScan with support for additional file types. In addition to the existing interpreters (HTML, JavaScript, PDF and Shockwave/Flash) we have added a new, general purpose TEXT interpreter. This will seek to extract plain text URL's (without any HTML markup) from simple ASCII files. However, it is also highly effective for finding and validating hyperlinks in many other file types including Microsoft Office documents (.doc, .xls, .ppt files) and .url files as used in the Microsoft Internet Explorer Favorites folder.
Use the Textfiles command to specify which file types should be routed through the TEXT parser when scanning via the File System. Use the Mimetypes command to route documents to the TEXT parser when using HTTP scanning. For example:
Textfiles txt, doc, xsl, ppt, url

Mimetypes application/msword T
On Windows systems these features are available via the Mimes and Files tabs of the Project Planning Property Sheet.
The Critical Errors, Detailed Errors and Selected Errors Reports have all been enhanced with a new First Reference Only option. When selected, LinkScan will only display one example reference to each broken/suspect link.
We have enhanced the System Parameters Report with an option to display the contents of the linkscan.red file. This file contains an audit trail of each cookie encountered during the course of the scan. Optionally, it may contain a full diagnostic trace of all the HTTP request and response headers (enabled with Probe = 1).
The LinkScan Profiler has been enhanced with a new $nearish. The original $near operators looks for a proximity match with no more than two "tokens". The new $nearish operator is more general, looking for a proximity of no more than five "tokens". In general, a "token" approximates to a single word but the actual implementation is rather more complex since the matching algorithms seek to discount a certain amount of intervening HTML markup.
We have added the Qhttp and Qnow settings to linkscan.sys. These will force LinkScan QuickCheck to use HTTP Access (versus file system access) and Realtime link checking (versus database).
We have added support for the Wireless Application Protocol (WAP) and Wireless Markup Language (WML). This allows LinkScan to validate wireless sites via an HTTP gateway. Typically, you will need to add some configuration commands to linkscan.cfg. For example:
Extraheader User-Agent: Nokia7110/1.0 (04.80)
Mimetypes text/vnd.wap.wml H
This will cause LinkScan to send an appropriate User-Agent header with each request and to parse/follow documents with a MIME/Content-Type of text/vnd.wap.wml.
We have added a new method for controlling the depth of a scan. The new Maxclicks command complements the existing Maxlevels command.
Whereas Maxlevels controls the depth of the scan based on an examination of the URL and the number of directory levels within it, the new Maxclicks command controls the depth of the scan based on the number of clicks required to reach the link from the starting (home) page.
The click level is normally incremented each time LinkScan follows a link. However, in order to more closely resemble real-world scenarios, the click level is not incremented when following links of this type:
Hence you may control the depth of a scan based on Maxclicks, Maxlevels or a combination of both.
A number of webmasters have told us about a new and increasing problem with their external links. Users are finding that working (200 OK) links are suddenly pointing at pages with "inappropriate" (e.g. adult) content. This has become quite an issue with large numbers of domains changing hands or, in some cases, being hijacked through exploits in the Internet Domain Name System (DNS). We have experienced the problem ourselves.
We have, therefore, implemented a range of special profiling techniques that may be used to automate the detection of these situations without the need to manually inspect each link on a periodic basis. The profiling options include user written profiles, pre-configured profiles available on request, and integration with third party content filtering products and services such as firewalls and proxies. See the LinkScan Profiler for details. [Not available in LinkScan Workstation]
We have incorporated a new Problem Documents Report. This report provides a summary of documents which:
We have greatly enhanced LinkScan Dispatch which now includes options to create and/or e-mail a range of different reports. LinkScan Dispatch supports a completely new series of command-line switches. However, for existing users, backwards compatibility with the pre-9.0 options has been preserved. See LinkScan Dispatch.
To improve ease of use, we have renamed and reorganized some reports and provided more context-sensitive help.
We have made numerous other small changes and enhancements to the LinkScan reports. We highly recommend that existing users who use the command line reporting update their linkscan.rep file(s) based on the new template.
We have enhanced LinkScan to save and store the MIME/Content-Type associated with each internal link. These data are available via the Search Documents and Changed Documents Reports.
We have enhanced the Windows Graphical User Interface to provide more control over the "scope" of a scan based on the Onlyinclude and Onlyfollow commands. See screenshot.
We have added several new Status Codes. Errors generated via the Errordoc (redirect match) command are displayed with the 3000 Status Code to differentiate them from regular 404's. Similarly, errors generated via the Errorbody (body match) command are displayed with the 3001 Status Code.
The 3002 Status Code is used by the new LinkScan Profiler described above.
We have added the Excludecookie command to filter/reject specific cookies.
We have added the Proxymatch command to provide more flexibility for those with complex network environments that require the use of different proxy servers for different hosts/domains.
At LinkScan 8.2 we have consolidated several minor bug fixes and a large number of customer generated suggestions for improvements and enhancements. We thank all of those users who contributed suggestions. Some of the highlights include:
We have added a new Changed Document Report. This allows users to compare the summary data from two different scans of the same website/project. The report displays lists of new documents added, documents removed and documents changed. Document changes are detected based on one or more of the following data items: document size in bytes, document title, document date/time modified (if available) and/or additional user specified data collected from META tags as described below. Benefits include:
We have added an option which, when enabled, will allow users viewing any LinkScan Report to send a copy of that report to a specified e-mail address (in HTML or TEXT format). See Mailing LinkScan reports from a browser. This improves work flow; for example, a supervisor viewing a report of bad link(s) may rapidly mail it to someone else for action.
We have added two new reporting capabilities with forms -- Search Documents and Search Links. These may be used to perform arbitrary ad-hoc queries on the LinkScan Database with a flexible array of sort/select/display options. For example, one might use such a query to produce a report listing every document that contains one or more <FORM> tags.
This reporting capability permits very arbitrary queries on the database. It makes virtually the entire database searchable.
We have added a new control (Maxlevels) that may be used to more easily configure limits on the depth of a scan. This provides a fast and easy way to configure limits on the depth of a scan.
We have added the ability to collect additional user specified data from each document scanned. Typically this is used to extract document attributes from META tags although the feature is not limited to META data. The data may also be manipulated via Perl Regular Expressions prior to storage in the LinkScan database (e.g. to normalize formatting). The collected data may also be post-processed by external programs to carry out more complex transformations. See How to Process Additional per-Document Data.
User data collected could include the name of a person responsible for a document or an expiration date by which a document must be reviewed or updated. This feature enables the user to integrate LinkScan with their work flow tools and procedures.
We have noticed that a significant proportion of web pages include vast amounts of totally redundant, bandwidth-consuming whitespace. In our view, many website operators have an opportunity to improve page load times and reduce their bandwidth cost. We have, therefore, enhanced LinkScan to report a summary of the Whitespace-Bytes versus Total-Bytes consumed during the course of a scan.
We have added an summary of inline image data to the LinkScan QuickCheck reports. This report now displays just about everything that LinkScan knows about a given document.
We have introduced an option (Mapext) to include external links on the LinkScan SiteMap and TapMap.
We have made several small but significant adjustments to the low-level HTTP and HTTPS drivers for improved accuracy and greater performance. In particular, we have incorporated some improved timeout/retry algorithms to enhance accuracy and throughput on slower links. The handling of DNS timeouts has also been improved.
We have incorporated several improvements to the HTML and JavaScript parsers. These should benefit all users but the enhancements are especially significant on sites using IBM/Lotus Domino.
We have rewritten the Portable Document Format (PDF) drivers for improved accuracy and performance and to better handle the latest versions of the PDF file formats.
We have enhanced our MailVet™ technology to improve the speed and accuracy of the LinkScan active mailto: checking.
We have improved the speed at which all of the LinkScan reports are generated.
At LinkScan 8.1 we have consolidated several minor bug fixes and a large number of customer generated suggestions for improvements and enhancements. Although each individual change is relatively minor in scope, the aggregate of them all represents a significant improvement to the product. We thank all of those users who contributed suggestions and urge customers to install this greatly improved release at the earliest opportunity. In total, we have have made approximately 60 changes and enhancements. Some of the highlights include:
Several enhancements to the LinkScan Reports for improved management of user preferences and system security, additional/improved cross-linking between various reports, and a number of improvements to the report layouts.
A number of new error checks and improved error messages.
Various improvements to the LinkScan Webserver.
Numerous improvements to LinkScan Dispatch including:
Various enhancements to our MailVet™ technology to improve the speed and accuracy of the active mailto link checking. See Active Validation of mailto: Links.
Various enhancements to LinkScan Excel -- including an option to import all META tags. Note: To use this feature, a scan must be completed with the Collectmeta option in linkscan.cfg enabled.
CPU times as well as wall clock times are recorded for each scan, in the file linkscan.dbg.
Somewhat simplified configuration of Orphaned Files checking.
Added ability to direct documents with specific MIME (Content-Type) headers to an appropriate interpreter (HTML, PDF, Shockwave/Flash and JavaScript options currently supported). For example, to check the contents of included JavaScript files use:
Mimetypes application/x-javascript J
Added ability to insert synthetic links into selected documents on-the-fly, for controlling test coverage on complex dynamic content. See: How to manipulate URLs on-the-fly for a discussion of the Substitute command and the new Insertlink command.
Various corrections, clarifications and improvements to the LinkScan Documentation.
We have made very substantial internal changes to improve the performance, scalability and reliability of LinkScan. These changes should result in significant storage savings with a (typical) 50 percent reduction in database size. Some of the changes establish new foundations on which other enhancements will be built over the coming months and years.
We have significantly enhanced the Windows Graphical User Interface.
On Unix Systems we have added a direct interface to the OpenSSL package for scanning sites that use the Secure Sockets Layer (SSL) or https://... protocol. See: Testing Secure Servers.
We have substantially restructured and rewritten the LinkScan documentation.
We have enhanced several of the LinkScan Reports.
We have introduced the first release of LinkScan Excel.
We have added several new options/commands that may be used to optimize performance when scanning very large (100,000 and more documents) websites.
We have included the new Noforms command. When enabled, this will prevent LinkScan from testing links found in <FORM ACTION=...> tags. Attempting to test those links without submitting some associated data values may lead to 500 Server Errors on many sites. In general, this indicates inadequate error checking and recovery in the target scripts but we have nevertheless provided an option to avoid to such errors cluttering the reports.
We have included a detailed audit trail of all cookie transactions processed during a scan. The log is maintained in the file .../LinkScan/Projectname/data/linkscan.red.
We have made the list of unsafe characters a user configurable option. This means, for example, that users may control whether or not the use of a backslash character in URLs will or will not generate a 911 Unsafe Character warning. Note that the use of a backslash instead of a forward slash is indeed unsafe but some sites use it anyway.
The LinkScan™ Recorder is a Windows application that interfaces with Microsoft Internet Explorer. It may be used to capture real web browsing sessions, such as a complex order entry sequence. The captured recording includes all of the data entered into any associated forms. LinkScan may then be configured to replay the recording on demand, validating every link on each form and results page in the sequence. See LinkScan Recorder.
We have greatly enhanced the LinkScan Import feature which now includes two separate functions:
Import Links: May be used to validate a simple list of URL's that is derived from some external source such as an SQL database or spreadsheet export.
Import Documents: May be used to validate a list of documents, including all of the links within each document. Such sequences may be generated with the LinkScan Recorder or derived from some other source. See Import Scanning
.We have enhanced LinkScan to parse, and extract any hyperlinks embedded in Shockwave/Flash files.
We have enhanced LinkScan with the ability to add customized hyperlinks at various points throughout the reports. This provides a flexible means to integrate the LinkScan Reports with other applications. For example, these links may be configured to activate functions within a content management or other database management system.
Some web servers are configured in a manner that may mask serious errors from end users and link checkers alike. This typically arises when the server responds to an invalid request by delivering a user-friendly error page with a 200 OK status code rather than a 404 Not Found. In some cases, the server will issue a redirect to a custom error document such as:
http://www.example.com/notfound.html
In other cases, server-side application code will simply deliver a valid document that contains a description of the error or exception.
We have enhanced LinkScan with directives that may be used to force a 404 Not Found Error in either of these situations. For example:
In the former case, any links that result in a redirection to the URL "/notfound.html" will be reported as 404.
In the latter case, any links that return a document body with content matching the specified expression will be reported as 404.
We have enhanced the link status information displayed on the LinkScan Reports. The LinkScan database now includes an additional extended status information field which is used to display supplementary information about certain link types.
We have incorporated additional locking protections such that multiple Projects may safely be scanned simultaneously. Note that any attempt to scan a Project that is currently being scanned by another user/process, will be refused.
However, we do urge some caution. Scanning multiple Projects in parallel may consume significant processor, memory and/or network resources. If the available system resources are saturated, the overall impact on LinkScan's throughput may prove negative. Users should be prepared to monitor system resources using the available tools applicable to the operating system and make adjustments if necessary.
We have enhanced LinkScan for Windows (not Unix) to automatically and transparently support the Secure Sockets Layer (SSL). That is, URL's that start with https://.... Note the you must have Microsoft Internet Explorer 5.0 or later installed on your computer. On Unix systems, you must configure a suitable proxy server -- see: Testing Secure Servers with LinkScan.
We have enhanced the various LinkScan Menus and Reports with a completely new "look and feel". Major improvements include a new Critical Errors Report, a more comprehensive Summary Statistics Report, context-sensitive help, and more convenient preferences/options. All reports are available in Rich, Standard or Text formats. The Rich format makes extensive use of HTML tables which produce an easy to use layout. However, all major browsers tend to encounter memory problems when rendering very large tables with many thousands of cells. If a selected report is likely to exceed 1000 rows, LinkScan will automatically use Standard format to avoid these problems.
We have completely eliminated the dependency on the operating system sort utility.
We have improved still further LinkScan's analysis of JavaScript and ASP constructs and incorporated several significant performance enhancements.
We have added a new check and Status Code for <A HREF=...> tags with no corresponding </A> tag. This may be enabled or disabled with the Closeatag option in linkscan.cfg.
We have added a new Followext option to linkscan.cfg. If enabled, LinkScan will attempt to follow redirections when testing external links (versus simply noting the redirection).
We have added a new Errordoc option to linkscan.cfg. This feature is useful when scanning servers that automatically redirect bad requests to a Custom Error Document. If such a page is served with a 200 OK Status, serious errors may be masked. A command such as:
Errordoc notfound\.html$
will force LinkScan to report a 404 Not Found error for any URL that is redirected to a URL that matches the pattern specified with the Errordoc parameter.
We have enhanced the Substitute command. This command is used to manipulate URL's as they are processed by LinkScan. We now support separate Substituteraw and Substitute commands. The former operates on URL's as they are extracted from the raw HTML tags. The latter operates on URL's after they have been normalized relative to the then current base URL.
We have enhanced the Substitute command only with the special token !U. For example:
Substitute (.*) !U$1
This will cause LinkScan to decode any %-encoding within the URL. For example:
Substitute cgi-bin/redirect\?.*?&Link=([^&]+).* XX$2
Substitute XX(.*) !U$1
Hence a link to:
cgi-bin/redirect?Type=1&Link=http%3A%2F%2Fwww%2Eexample%2Ecom%2F
will be translated to:
XXhttp%3A%2F%2Fwww%2Eexample%2Ecom%2F
and then to:
http://www.example.com/
We have added a new Tagonce command to linkscan.cfg. If enabled, LinkScan will only process one time any link that matches the specified pattern. All subsequent references to that link will be completely ignored. This option may be used to eliminate excessive storage associated with tracking thousands of references to the same frequently used URL. For example links associated with toolbars and other navigation aids that are included in every document on a large website.
We have incorporated the ability to check for Orphaned Files on remote servers without the requirement to use NFS or a local mirror copy of the target website. We supply a script which may be executed on the remote machine to collect a recursive file listing that may subsequently be imported into LinkScan in lieu of direct file system access. See File System Scanning.
We have enhanced LinkScan Enterprise so that two or more hosts may be scanned within a single Project. For details see LinkScan Enterprise Extensions. This capability is not available in LinkScan Workstation, Server or ServerPro.
We have simplified the testing of password protected sites and links. The Auth command may be configured with a blank Realm. LinkScan will use the specified username and password for any Realm on the specified server. You do not need to specify a Realm unless you need LinkScan to use multiple username and password combinations for different Realms on the same server. For example:
Auth www.example.com "" username password
We have enhanced support for Cookies. LinkScan accepts all cookies received during a scan and tracks them in a cookie jar. The cookie jar may be initialized with additional cookies by using the existing Cookie command in linkscan.cfg.
We have enhanced LinkScan to optionally check all <IMG SRC> tags for ALT, HEIGHT and/or WIDTH attributes. To enable this feature, add the following command to the linkscan.cfg file:
Imgtags = AHW # Flag all IMG SRC tags without Alt, Height, Width
We have implemented additional controls which may be used to prevent unnecessary scanning of very large sites, especially those using dynamic content. The new Taglimit command may be used to limit the number of documents scanned that match a specified pattern. For example, the following command may be added to linkscan.cfg:
Taglimit scripts/DatabaseLookup.asp 20
This will limit the number of times that LinkScan will probe the DatabaseLookup.asp script with different query parameters. In this case, LinkScan will probe only the first 20 references to this script. Note that the Taglimit and Maxcgi are both checked for each document.
We have further refined the default JavaScript pattern matching algorithms to improve coverage and reduce false matches.
We have made several enhancements to some of the LinkScan Reports including a complete rewrite of the Selected Status Codes Report.
We have enhanced the Summary Detail Report with a completely new Slowest Pages First option to help webmasters examine page load times especially over slow (i.e. dial-up) connections.
We have improved the algorithms for the identification of JavaScript embedded hyperlinks to increase the percentage of links found and reduce false positives.
We have made several other small improvements especially relating to reliability under Windows 95/98.
LinkScan users with Unix systems may now scan remote systems via HTTP. Please see the LinkScan End-User License Agreement for permitted use. The following command will initiate such a scan:
perl linkscan.pl -remote http://www.example.com/ -project example
We have enhanced LinkScan with support for JavaScript. Links may be extracted from JavaScript code using (customizable) pattern matching techniques.
We have added the capability to specify additional URL's that must be scanned, whether or not LinkScan encounters links to those URL's in other documents. This includes the ability for LinkScan to submit specific forms with specified data values. Forms may be submitted using either the GET or POST methods. See How to Submit Forms.
We have included our MailVet™ technology that can verify, with a high degree of accuracy, whether an e-mail address will or will not bounce mail. MailVet™ will probe up to 500 unique "mailto" tags without actually sending any mail. See Active validation of mailto: links.
We have provided additional controls to specify document ownership. In particular, owner names may be extracted document META tags and subsequently manipulated via Regular Expressions.
We have added limited support for ldap://... links. LinkScan will attempt to establish a connection to Port 389 of the specified server. It does not currently validate the query and the status will be reported as an Advisory; "LDAP Server Connected - Query Not Checked".
We have added additional support for SSL (https://) secure server proxies.
We have provided powerful facilities to manipulate specific links via Regular Expressions. This feature may, for example, be used to remove or manipulate SESSIONID's that are added dynamically by your HTTP server. It can also be helpful in controlling test conditions for sites that use mainly dynamic content.
We have enhanced LinkScan with the ability to import a simple list of links for validation. This feature may be used to validate large numbers of links that have, for example, been exported from a database management system or other application program.
We have simplified the flexible (but confusing) array of options associated with LinkScan/QuickCheck. QuickCheck will now always attempt to retrieve the page status information from an existing Linkscan database (very fast). If this fails, QuickCheck will fetch the document via HTTP and validate the links in real-time (slower). When the results are based on the database, an option is provided to perform a new real-time check. In addition, QuickCheck will warn the user if the date-time-modified stamp on the source file is later than the data-time-modified stamp on the database. This alerts the user to the fact that the database status may be out of date.
We have enhanced LinkScan/QuickCheck to display the HTTP Request and Response Headers associated with document retrieval.
We have improved the performance of DNS lookups associated with all HTTP requests. This may cause problems on a very small number of installations (as far as we have been able to tell, systems running certain older Linux distributions). This problem normally presents as a series of 900 (DNS), 903 (Timeout) or 999 (Unknown) errors. Or rarely a core dump. In the unlikely event that you experience these symptoms, simply add the following entry to linkscan.sys:
Nodnsalarm = 1
We have greatly improved the support for validating hyperlinks embedded in Adobe Portable Document Format (PDF) documents. To enable this feature, you must set the following parameter in linkscan.cfg:
Pdffiles = pdf
We have enhanced LinkScan to recognize and validate links of the form:
<script src="foo">
We have added support for the special NULL token in the Htmlfiles parameter. This may be used to tell LinkScan to process files with no file extension as if they were HTML documents.
We have changed LinkScan so that it now assumes there is an implied <a name="S30top"></a> in each HTML document. This means that all references to <a href = "#top"> are considered valid, consistent with all common web browsers.
We have improved LinkScan's processing of references containing %encoded characters.
We have enhanced LinkScan with a new Extraheader command. Adding this command to linkscan.cfg will force LinkScan to send the additional header with each HTTP request. For example, to set a preferred language, use:
Extraheader = Accept-Language: en
We have enhanced LinkScan to prevent simple HTML errors resulting in the creation of databases for phantom Owners. For example, a hyperlink with a missing "http://" such as:
<a href="www.example.com">
will no longer result in the creation of a "www.example.com" Owner.
We have enhanced Linkscan so that the following linkscan.sys parameters may be overridden with the per-Project linkscan.cfg files:
LinkScan 6.0 includes some significant changes to the scanning modules. For Windows users:
These changes eliminate prior restrictions due to limitations of the Perl implementation for Windows and can greatly improve performance.
For Unix users:
The Graphical User Interface supplied with LinkScan for Windows incorporates numerous enhancements to simplify installation and configuration.
LinkScan for Windows includes a basic HTTP server, the LinkScan WebServer. Users may install the LinkScan WebServer automatically or elect to integrate LinkScan with an existing HTTP server such as Apache or Microsoft IIS.
Existing LinkScan users should note that the configuration file formats have changed significantly at LinkScan 5.5 to simplify system administration and maintenance. We have supplied a tool to automate the conversion of your existing configuration.
The configuration file format changes are summarized below:
The file linkscan.mas has been simplified. This file now contains a simple list of configured Project directories. Project Descriptions are now stored in the corresponding linkscan.cfg file.
The file linkscan.usr has been eliminated. These options, used to provide access controls to the LinkScan CGI scripts, have been integrated into linkscan.sys.
The file linkscan.ign has been eliminated. The LinkScan customization commands are now stored in the file linkscan.cfg.
The file linkscan.alt has been eliminated. The SiteMap customization commands are now stored in the file linkscan.cfg.
The linkscan.cfg templates have been "normalized". A global linkscan.cfg is always required in the main LinkScan directory. The settings in this file establish defaults for all configured Projects. The project-specific linkscan.cfg files in the individual project directories have been greatly simplified with far fewer items to configure. However, any default setting in the global linkscan.cfg file may be overridden by pasting the appropriate command into the linkscan.cfg file for an individual Project.
We have found that these changes greatly simplify system configuration and administration in complex multi-Project scenarios. The automatic conversion script will attempt to normalize the global and project-specific linkscan.cfg files. However, users may find they can achieve further simplification with a few minutes of manual inspection and editing.
LinkScan 5.4 is primarily a maintenance release that consolidates several minor bug fixes and enhancements. It includes changes for the new LinkScan Server and LinkScan Workstation products as well as infrastructure to support new upcoming enhancements.
At LinkScan 5.3 we have improved the processing of Server Side Include (SSI) tags when using File System navigation. SSI Include tags are fully expanded by LinkScan provided that Expandssi is enabled in linkscan.cfg. SSI tags that require scripts to be executed (CGI/EXEC) are not processed. When using HTTP Navigation, all SSI's (including executables) are processed by the HTTP server.
At LinkScan 5.3 you may optionally tell LinkScan to check your HTTP server access logs and include the per-document page impressions on the SiteMap reports. To enable this feature, be sure to set the Httpdlogfile parameter in linkscan.cfg.
At LinkScan 5.3, we have incorporated an audit trail of site scans. Each execution of linkscan.pl will append a record to the file .../linkscan/project_name/data/linkscan.sum. This tab delimited file may be imported into spreadsheets and other applications for management reports.
At LinkScan 5.3, when scanning via HTTP, LinkScan can submit an arbitrary cookie to your server. This makes it easier to validate those sites that use Cookie based user authentication schemes.
We have added support for the Onlyorphans command in linkscan.cfg to provide finer control over which directories on your server should and should not be checked for orphaned files.
We have made several cosmetic improvements to the SiteMap and TapMap reports.
We have made several small improvements to the treatment of pathnames containing non-standard (e.g. %encoded) characters.
We have inserted code to detect/correct several common configuration errors.
At LinkScan 5.2 we have improved HTTP navigation (the Execute command) for validating dynamic content (CGI scripts, Server Side Includes etc.), enhanced several of the LinkScan Reports and added some completely new reporting options. Some of the specific enhancements include:
The LinkScan Reports no longer require the use of Cookies for storing individual user preferences. The system will use cookies if available - otherwise it will maintain current settings by passing them via the URL. This avoids random problems that some users have reported with certain browser installations.
The Summary/Detail Report has been enhanced with an option to display all documents older than "N" days.
The Summary/Detail Report has been enhanced with an option to sort the documents by the number of "Inline Bytes". The Byte Count includes the document itself, any inline images (<img src> but not <img lowsrc> tags), background images and image buttons. Each unique image is only counted once - we assume that the client will cache multiple references to the same image within the same document. In-line image references to remote servers are also counted (assuming LinkScan can reach them via HTTP and that the server will return a size header without having to download the entire file).
The Summary Statistics Report displays separate tables for Internal and External links.
The Summary Statistics Report error counts are hyperlinked to the corresponding Detailed Report.
The All Pages Linking Report displays separate tables for Links To: and Links From:.
We have added the new Redirections Report to summarize all local redirections including the missing "/" on directory references, <META HTTP-EQUIV REFRESH> tags and actual HTTP redirects.
Several Reports provide for Include and Exclude expressions that may be matched on Referer or Target. Include/Exclude expressions may now be matched on Referer, Target or either.
When scanning for Orphaned Files user may control the depth of the scan in terms of directory levels with the new Maxdirlevels configuration option in linkscan.cfg.
We have added the Noorphans command option to linkscan.cfg. This will Exclude all files matching the specified expression from the Orphans Report without effecting any other Reports.
We have added the new Autohttp configuration command to linkscan.cfg. When navigating the Website via File System navigation, LinkScan can automatically attempt HTTP access when file system access fails to locate a specific file. This may be used to eliminate the requirement to configure server aliases and redirections but with some loss of performance. Note: file system access is typically 5 to 10 times faster than HTTP access.
We have improved the detection of, and recovery from, several rare exception conditions. Additional diagnostic capabilities have been incorporated to facilitate problem investigation and resolution in conjunction with Elsop's Technical Support personnel.
LinkScan 5.0 was a major new release. At LinkScan 5.1 we have consolidated several minor bug fixes and a number of improvements designed to further simplify LinkScan administration. The following items are worthy of note:
We have improved the default placement of output files from command-line generated reports (linkscan.cgi and dispatch.pl). Users must define the pathname to the default directory in the file linkscan.sys with the Reportsdir setting.
Some servers require that the LinkScan CGI scripts be installed a special directory (often cgi-bin). In these situations the scripts need to know where to find the remainder of the LinkScan files. In the past, this was achieved by setting a special variable ($LS::Lsdir) in the header of each script. At LinkScan 5.1, we have eliminated that special variable and the full pathname to the LinkScan directory must be defined in the hidden file called .linkscan. We have updated the LinkScan Configurator accordingly to make this change transparent to users installing LinkScan via that method.
We have enhanced the SiteMap customization features to make it easier to include or exclude different files from the LinkScan SiteMap and TapMap.
We have enhanced LinkScan to validate URL's contained within drop-down lists.
We have improved the error detection and recovery logic associated with various system interfaces to ensure that any configuration errors or exceptions are more clearly detected and reported.
We have significantly reduced LinkScan's virtual memory usage on large web sites. Virtual memory usage will depend to some extent on the Operating System, Perl version, malloc() implementation and the nature of the site being scanned. However, in studies, we have found that 1 MByte of virtual memory per 1,000 HTML documents is a reasonable rule-of-thumb. (This compares with 5-10 MBytes per 1,000 documents at LinkScan 3.x/4.x).
We have made many other changes to the internal code and data structures to improve performance, reliability and maintainability as well as providing a platform for future enhancements.
The previous implementation of multiple Projects has been changed. The new model introduces several new concepts which are defined below:
A Project is defined as a distinct LinkScan configuration. In general, you will only need to create one such configuration for each domain or virtual host on your server. You may, optionally create multiple configurations for a single domain or virtual host. Only LinkScan Enterprise includes the ability to scan multiple hosts within a single Project.
Within a given Project you may define multiple Owners. Each file within the Project may be assigned to one of an arbitrary list of Owners by any or all of the following means:
LinkScan creates (mainly) separate databases for each Owner. This facilitates user-selective queries and greatly improves performance. By default, LinkScan also creates an All Owners database for each Project.
Usernames are used to:
By default, LinkScan will set the default Owner selection to the current Username.
We have enhanced the LinkScan SiteMap and TapMap. SiteMaps and TapMaps based on Link Ordering are provided for each Project. In addition, SiteMaps and TapMaps based on Directory Structure are provided for each Project and each Owner within that Project.
Orphaned File listings have been removed from all of the previous reports and we have added a new Orphaned Files Report to the Main Menu.
We have enhanced the All Pages Linking To ... Report. In previous versions you could only view the first "N" referring pages where "N" was limited to the Maxgoodint setting in linkscan.cfg. From the Summary/Detail Overview you may now select a complete list of referring pages.
We have enhanced many other reports with new and more consistent options including:
We have also improved the formatting options. Reports may be created in any of the following formats:
We have similarly enhanced the command line reporting options. The linkscan.rep file format has been extended and you may now define specific default parameters for each report type.
We have updated and improved all of the LinkScan documentation and added the LinkScan Quick Reference Card.
We have provided the capability to relocate the LinkScan documentation and images directory to any URL on your server. You may also control what files the [Help] and [Status Code] hyperlinks on the reports will link to so that you can integrate local site-specific documentation more easily.
We have made several small error corrections and numerous other minor enhancements in response to customer feedback.
At LinkScan 4.2, we have focused on enhancements to the various reporting modules with both new and more consistent options.
We made the new Summary --> Detail Report the default selection with options to sort the report (ascending or descending) on the Number of Errors in the document, Document URL, or Document Age. It includes hyperlinks to LinkScan/QuickCheck which may be used to display all of the potential problems with a selected document.
We improved LinkScan/QuickCheck with many new features including Simple and Advanced Options Menus and the ability to configure default options for it in linkscan.sys.
QuickCheck "remembers" individual user preferences by setting a Cookie in the users browser.
We have also added Source Code Line Numbers to the LinkScan reports where it will be useful in diagnosing and correcting errors in a document.
In addition, QuickCheck integrates with Weblint. Weblint performs rigorous HTML syntax checking of the source document. This optional feature may be used to show all of the HTML syntax errors and broken links in a single report together with the HTML source code.
The menus for the various LinkScan CGI scripts may be customized by creating the files linkhead.txt and linkfoot.txt in the LinkScan directory.
When using custom headers and footers with SiteMap and TapMap, LinkScan displays a discrete version stamp and copyright notice at the bottom of each page.
The LinkScan documentation has been restructured and supplemented with a new LinkScan User Guide. This new guide is directed at the needs of Content Managers and Developers. The LinkScan Reference Manual (this document) is directed at the needs of Systems Administration personnel.
We added significant performance and accuracy enhancements when validating FTP links.
We added greater flexibility when creating and configuring multiple Projects.
We added a "-quiet" option to allow for more succinct progress displays during scanning. LinkScan also displays a total error count on completion of a scan.
We fixed several minor bugs and incorporated numerous other small changes requested by customers.
The following changes and enhancements were incorporated in LinkScan version 4.1:
LinkScan 4.1 is significantly faster at scanning the internal links. In tests, CPU usage was reduced by 30-50 percent
Added LinkScan/QuickCheck
Added the ability to validate FTP links. The FTP protocol is older and less consistently implemented that HTTP. You may, therefore, find that LinkScan produces some false errors when checking links to certain servers.
Added syntax checking of mailto links. LinkScan does not probe or send E-mail to those destinations
Added the "All Pages Linking To ..." Report to the Main Menu of reporting options. This report helps webmasters quickly identify the impact of removing a document or file by listing all of the pages that link to it
Added support for server-side image maps
Added support for the HTTP Proxy-Authenticate feature
Added the additional status code Location Header Not Absolute
Added the additional status code URL Contains Unsafe Character
Numerous enhancements to LinkScan/Dispatch including the addition of the Defaultowner and Mailalias commands to linkscan.cfg, and the Ownertags command to linkscan.cfg. The dispatch.cfg file has been eliminated and those parameters are now defined in linkscan.sys/linkscan.cfg
Numerous enhancements to the LinkScan Configurator
Several minor bug fixes and improvements
The following changes and enhancements were incorporated in LinkScan version 4.0:
Added the LinkScan/Dispatch module
Added the Indexoptions directive and the ability for LinkScan to create virtual pages based on a directory listing if no default page exists in that directory
Added the Statuscode directive and the ability to customize the severity of any or all LinkScan Error and Status Codes
Several minor bug fixes and improvements
The following changes and enhancements were incorporated in LinkScan version 3.2:
The LinkScan Configurator will copy CGI files to a 'cgi-bin' directory and update the '$Lsdir' parameter automatically.
LinkScan automatically creates template for new Projects.
Added new 'Noprojectlist' directive to linkscan.sys file.
Added new 'Hostalias' directive to linkscan.cfg file for use with servers that have multiple identities.
LinkScan database is created in a temporary working directory so that previous reports remain available during scanning
Added new !HOME expression to 'Alias' directive in linkscan.cfg.
Added support for a new Global linkscan.cfg file
Several minor bug fixes and improvements
The following changes and enhancements were incorporated in LinkScan version 3.1:
Added the ability to check links embedded within Adobe PDF files. To enable this capability, simply add the 'pdf' suffix to the list of Pdffiles in linkscan.cfg
LinkScan now checks <a name=...> tags in documents that are defined as 'NoFollow'.
Enhanced TapMap such that users can create hyperlinks from regular documents to a specific TapMap at the appropriate position and level.
Added specific support for the <!--#echo var="DOCUMENT_URI" --> Server Side Include
The LinkScan Configurator automatically updates the "#!/usr/local/bin/perl" headers in all of the LinkScan executable files
Added a case-sensitive search option to the LinkScan History Report
Added new Hidelinkprefix option to linkscan.cfg.
Several minor bug fixes and improvements
The following changes and enhancements were incorporated in LinkScan version 3.0:
Redesigned Multi-site Manager for simplified configuration management.
New reporting option to display full system configuration parameters
Significant performance improvements (CPU time and memory) to the LinkScan Reports - linkscan.cgi
Overview by Web Page Report now includes a hyperlink to an Error Report for each page
Various new controls added to control the frequency with which external links are tested.
Randomized the order with which external links are testing to avoid load peaks on remote servers
Added controls to automatically purge/expire the History file, linkscan.hst
The file linkscan.red now includes a listing of the URL's for all pages on your site for easy submission to search engines. Infoseek will accept an E-mail submission containing all the links on your website. In a test submission of 313 pages for one of our websites, Infoseek indexed about 280 of them in about 10 days.
The Noproxy option was changed to work with a partial (versus exact) match.
Improved the Multi-Site Manager and provided for the definition of a default configuration.
<img src=...> tags within <input....> tags are now tested correctly
Added option to disable the TapMap options.
Various minor improvements to the SiteMap/TapMap HTML tags including additional optimization for the Lynx browser family
Several minor bug fixes
The following changes and enhancements were incorporated at LinkScan version 2.1:
Added the ability to emulate server aliases and redirections.
Added the ability to selectively execute CGI scripts and Server Side Includes, parse their output and validate any links that are generated.
Redesigned the capability for validating links to pages that require authentication. Username/password combinations are defined on the basis of server and "realm" rather than specific URL.
Added option to disable orphan checking.
Improved the TapMap navigation tools
Various other minor enhancements and bug fixes
The following changes and enhancements were incorporated at LinkScan version 2.0:
Major restructuring to increase performance and reduce virtual memory utilization especially when scanning large websites with thousands of documents.
Improved Multi-Site Manager to simplify the testing of partial websites and/or sub-sites.
Added "Noproxy" option to selectively disable proxy access on specified servers.
Modified definition of Internal and External links for greater flexibility.
Extended to Hide command to accept Regular Expressions.
Restructured the LinkScan Reference Manual
Various other minor enhancements and bug fixes
The following changes and enhancements were incorporated at LinkScan version 1.2:
Numerous enhancements to the HTML parser
Additional SiteMap and TapMap options. In particular, the incorporation of a Target option to simplify the creation of SiteMaps and TapMaps for use on websites that make use of "frames"
Various other minor enhancements and bug fixes
The following changes and enhancements were incorporated at LinkScan version 1.1:
Addition of the LinkScan Configurator and LinkScan Startup Guide
Initial Release of TapMap
Various other minor enhancements and bug fixes
![]()
This license agreement is proof of license. Please treat it as valuable property.
IMPORTANT - READ CAREFULLY: This End-User License Agreement ("Agreement") is a legal agreement between you (hereinafter "Licensee" or "you") and Electronic Software Publishing Corporation (hereinafter "Licensor") for the Licensor's software products identified above, and any upgrades which may be acquired by you for the identified products from time to time, which may include associated software components, media, printed materials, and "online" or electronic documentation (hereinafter "Product"). By downloading, installing, copying, or otherwise using the Product, you agree to be bound by the terms of this Agreement. If you do not agree to the terms of this Agreement, do not download, install or use the Product.
1. GRANT OF LICENSE.
Subject to payment of applicable license fee(s), Electronic Software Publishing Corporation hereby grants to you a non-exclusive non-sublicensable, non-transferable license to use its Product or grants you a license to use the Product free of charge for purposes of evaluating the Product for an evaluation period that is limited to a single one-time trial period of fifteen (15) days. You may use the Product only in the manner described herein. If you initially acquired a copy of the Product without purchasing a license and you wish to purchase a license you may do so by contacting the Licensor via the Internet at http://www.elsop.com/linkscan/ or [email protected].
If Licensor discovers and/or determines that a Licensee has used the Product on more than a single computer or has scanned more than the number of computers licensed for scanning or in an unauthorized manner, Licensor has the right to demand immediate payment of any amounts that the Licensee should have paid and did not previously pay or to terminate the License. Termination of the License may include, but not be limited to, disabling the licensed Product. Upon termination of license, Licensee shall destroy all copies of the Product in its possession. Licensee is liable for all legal and other expenses associated with the collection of these payments.
2. SCOPE OF GRANT.
Licensee may install and use a single copy of the Product on a single computer at a secure Location owned or leased by the Licensee. Licensee may maintain another copy of the Product for archival purposes, provided any copy must contain all of the original Product's proprietary notices.
LinkScan is offered as four different products: LinkScan Workstation, LinkScan Server, LinkScan ServerPro, and LinkScan Enterprise. The terms: "LinkScan Workstation", "LinkScan Server", "LinkScan ServerPro", and "LinkScan Enterprise" when used in reference to our Product as in "LinkScan Server" do not mean a physical or virtual server, but simply reference different products. The permitted uses of each product are described below.
The term Location is used in the following text and it is defined as the Licensee's premises (one company or institution) in the same building or campus with a contiguous boundary at the same physical postal address. A Location does not include branch locations or affiliated organizations. This is also the definition of a Location Block (LocBlock).
The terms "web pages" or documents are pages that are located on your server that you are scanning. The limits on documents described in this agreement refers to the total number of documents that can be scanned with your use of our product. A document may contain numerous links to images and other HTML pages. You may scan an unlimited number of links with all our products.
A. LinkScan Workstation - You are licensed to scan up to 500 unique web pages on a single physical computer that is owned or leased by you at one Location. The web pages may be on the computer on which the Product is installed or it may be a remote physical computer, but not both. You must buy additional licenses for each additional computer you scan even though you are using only one copy of the Product to scan the multiple computers. If you wish to scan more than 500 unique web pages or other computers, you must obtain additional license(s) or upgrade to another product.
B. LinkScan Server - You are licensed to scan up to 5,000 unique web pages on a single physical computer that is owned or leased by you at one Location. The web pages may be on the computer on which the Product is installed or it may be a remote physical computer, but not both. You must buy additional licenses for each additional computer you scan even though you are using only one copy of the Product to scan the multiple computers. If you wish to scan more than 5,000 unique web pages or other computers, you must obtain additional license(s) or upgrade to another product.
C. LinkScan ServerPro - You are licensed to scan up to 15,000 unique web pages on a single physical computer that is owned or leased by you at one Location. The web pages may be on the computer on which the Product is installed or it may be a remote physical computer, but not both. You must buy additional licenses for each additional computer you scan even though you are using only one copy of the Product to scan the multiple computers. If you wish to scan more than 15,000 unique web pages or other computers, you must obtain additional license(s) or upgrade to another product.
D. LinkScan Enterprise - You are licensed to scan up to 50,000 unique web pages (documents) on up to ten (10) physical computers that are owned or leased by you at one Location. If you wish to scan more than 10 computers, you will have to purchase one or more additional LinkScan Enterprise Licenses.
D.1. If you wish to scan more than 50,000 unique documents with a copy of LinkScan Enterprise, you must purchase additional Document Blocks (DocBlocks) each of which allows you to scan and additional 50,000 unique documents.
D.2. If you wish to scan computers at more than one location, you must purchase new LinkScan Enterprise licenses for those locations or if you want to scan more locations using one copy of LinkScan Enterprise, you may purchase additional Location Blocks (LocBlocks).
E. LinkScan Unlimited - You are licensed to scan an unlimited number of unique web pages (documents) on any number of physical computers that are owned or leased by you.
3. USE RESTRICTIONS.
Licensor shall issue to Licensee a Registration Key and Password which may only be installed on the single computer designated in the registration process. The Licensee may transfer the Product to another designated computer owned or leased by the Licensee and re-register the Product for that computer provided the original copy of the Product on the original designated computer is destroyed after the move of the Product has been accomplished. You also agree to not transfer to any other party the Registration Key and Password issued for the original computer. Licensor has the explicit right to monitor the use of the Product by the Licensee in order to enforce the provisions of this agreement.
Licensee agrees that it will not use or permit the Product to be used in any manner, whether directly or indirectly, that would enable Licensee's customers or any other person or entity to use the Product. However, Licensee may publish copies of SiteMaps and/or TapMaps produced by the Product for public consumption.
Licensee agrees that the Product is based on and includes trade secrets and proprietary know-how belonging to Licensor and is being made available to Licensee in confidence and solely on the basis of a confidential relationship with Licensor.
Licensee may not: permit other individuals to use the Product except under the terms listed above; modify, translate, reverse engineer, decompile, disassemble (except to the extent applicable laws specifically prohibit such restriction), or create derivative works based on the Product (including the Product's screen displays); copy the Product (except as specified above); or remove any proprietary notices or labels on the Product. If the licensee does any of the aforementioned activities in this paragraph and has not purchased a license then licensee agrees to immediately pay Licensor the License fee and to comply with all of its terms.
Licensee may not use the Product to provide timesharing, service bureau, or similar services to any other party. Licensees who are Internet Service Providers are explicitly prohibited from providing the Product or use of the Product to their customers or any other parties.
Licensee may not allow other parties to use the Product or the Registration Key or Password associated with the Product. Licensee may not allow any other person to do anything that is prohibited by this Agreement.
Licensee shall not make any portion of the Product available to a third party, rent, lease, sell, sublicense, assign, or otherwise transfer the Product, any portion thereof, or any output generated by the Product to a third party, and shall not convey for commercial purposes any information arising from the use of the product to any third person, or use the Product for a purpose other than that for which it is intended (as evidenced by the documentation). Recipient further agrees to treat the Product with at least the same degree of care as that with which it treats its own confidential or proprietary information.
4. COPYRIGHT.
The Product (including any images, applets, animations, and text incorporated into the Product) is owned by Licensor and is protected by copyright laws and international copyright treaties, as well as other intellectual property laws and treaties. The Product is licensed, not sold. All title, including but not limited to copyrights, in and to the Product and any copies thereof are owned by Licensor. You must treat the Product and any printed materials that may accompany the Product like any other copyrighted material. You may not copy the Product or any printed material that may accompany the Product. Licensor reserves all rights not expressly granted.
5. SOURCE AND BINARY CODE.
This is PROPRIETARY SOURCE AND BINARY CODE of Licensor; the contents of this file may not be disclosed to third parties, copied or duplicated in any form, in whole or in part, without the prior written permission of Licensor.
Permission is hereby granted solely to the licensee for use of this source code in its unaltered state. This source code may not be modified by Licensee except under direction of Licensor. Neither may this source code be given under any circumstances to other parties in any form, including source or binary. Licensee shall not reverse engineer, decompile or disassemble any portion of the Product's code. Modification of this source code by Licensee shall automatically terminate this License as per Section 11. Divulging the exact or paraphrased contents of this source code to unlicensed parties either directly or indirectly constitutes violation of federal and international copyright and trade secret laws, and will be duly prosecuted to the fullest extent permitted under law.
6. DELIVERABLES.
Licensee may acquire the Product in machine readable form by downloading it electronically from the Licensor's computer (website server) to his computer. The Product will not be delivered in any other form or manner. The Licensor shall deliver to the Licensee by Electronic Mail within a reasonable time after the Licensee has paid for the Product a Registration Key and Password which enables the Product to operate. Reasonable within this context means within three business days of receipt of payment.
7. DISCLAIMER OF WARRANTY AND LIMITED WARRANTY.
THE PRODUCT IS DEEMED ACCEPTED BY LICENSEE, AND IS PROVIDED "AS IS" WITHOUT WARRANTY OF ANY KIND. TO THE MAXIMUM EXTENT PERMITTED BY APPLICABLE LAW, LICENSOR FURTHER DISCLAIMS ALL WARRANTIES, EITHER EXPRESSED OR IMPLIED, INCLUDING, BUT NOT LIMITED TO, THE IMPLIED WARRANTIES OF MERCHANTABILITY, FITNESS FOR A PARTICULAR PURPOSE, AND NONINFRINGEMENT. LICENSOR DOES NOT WARRANT, GUARANTEE, OR MAKE ANY REPRESENTATIONS REGARDING THE PERFORMANCE, USE OR RESULTS OF THE USE OF THE PRODUCT IN TERMS OF CORRECTNESS, ACCURACY, RELIABILITY, CURRENTNESS, OR OTHERWISE. IN NO EVENT SHALL LICENSOR OR ITS SUPPLIERS BE LIABLE FOR ANY CONSEQUENTIAL, INCIDENTAL, DIRECT, SPECIAL, PUNITIVE, OR OTHER DAMAGES WHATSOEVER (INCLUDING WITHOUT LIMITATION, DAMAGES FOR LOSS OF BUSINESS PROFITS, BUSINESS INTERRUPTION, LOSS OF BUSINESS INFORMATION, OR OTHER PECUNIARY LOSS) ARISING OUT OF THIS AGREEMENT OR THE USE OF OR INABILITY TO USE THE PRODUCT, EVEN IF LICENSOR HAS BEEN ADVISED OF THE POSSIBILITY OF SUCH DAMAGES. YOU ASSUME THE ENTIRE RISK AS TO RESULTS AND PERFORMANCE OF THE PRODUCT. IF THE PRODUCT IS DEFECTIVE, YOU, AND NOT LICENSOR OR ITS DEALERS, DISTRIBUTORS, AGENTS, SUPPLIERS, OR EMPLOYEES, ASSUME THE ENTIRE COST OF ALL NECESSARY SERVICING, REPAIR OR CORRECTION.
THE ABOVE IS THE ONLY WARRANTY OF ANY KIND, EITHER EXPRESSED OR IMPLIED, THAT IS MADE BY LICENSOR REGARDING THE PRODUCT, NO ORAL OR WRITTEN INFORMATION OR ADVICE GIVEN BY LICENSOR, ITS DEALERS, DISTRIBUTORS, AGENTS, SUPPLIERS, OR EMPLOYEES SHALL CREATE A WARRANTY, OR BIND LICENSOR, AND YOU MAY NOT RELY ON ANY SUCH INFORMATION OR ADVICE. THIS WARRANTY GIVES YOU SPECIFIC LEGAL RIGHTS. YOU MAY HAVE OTHER RIGHTS WHICH VARY FROM STATE TO STATE. NO LICENSOR DEALER, AGENT, SUPPLIER, OR EMPLOYEE IS AUTHORIZED TO MAKE ANY MODIFICATIONS, EXTENSIONS, OR ADDITIONS TO THIS WARRANTY. IF ANY MODIFICATIONS ARE MADE TO THE PRODUCT BY YOU OR IF YOU VIOLATE THE TERMS OF THIS AGREEMENT, THEN THIS WARRANTY SHALL IMMEDIATELY BE TERMINATED. THIS WARRANTY SHALL NOT APPLY IF THE PRODUCT IS USED ON OR IN CONJUNCTION WITH HARDWARE OR PRODUCT OTHER THAN THE UNMODIFIED VERSION OF HARDWARE AND PRODUCT WITH WHICH THE PRODUCT WAS DESIGNED TO BE USED AS DESCRIBED IN THE DOCUMENTATION.
8. TITLE.
Title, ownership rights, and intellectual property rights in the Product shall remain in Licensor and/or its suppliers. You understand that the Product is licensed and not sold to you. The Product is protected by the copyright laws and treaties. Title and related rights in the content accessed through the Product is the property of the applicable content owner and may be protected by applicable law. This License gives you no rights to such content.
9. SUPPORT AND MAINTENANCE.
Licensor offers no support (including technical support) or maintenance of this Product. Licensee, at its option, may negotiate for Support and Maintenance from Licensor and/or its suppliers through a separate agreement. Licensor may, at its option, publish on its website a list of Frequently Asked Questions (FAQ) concerning the Product without obligation to continue doing so or to maintain said list. Licensor may, at its option, offer and/or provide technical support or assistance for the Product without obligation to continue doing so.
10. LIMITATIONS ON LICENSOR'S OBLIGATIONS.
Licensee understands and agrees that Licensor may develop and market new or different computer programs which use part or all of the Product and which performs all of the functions performed by the Product. Nothing contained in this Agreement gives Licensee any rights with respect to such new or different computer programs.
11. TERMINATION.
The license will terminate automatically if you fail to comply with the limitations and restrictions described herein or if you are delinquent in making any payments for the Product of any sum due under this Agreement. On termination, you must destroy all copies of the Product. Licensor may also terminate this Agreement if you violate it. You must destroy all copies of the Product in your possession or control promptly upon termination. Upon Licensor's request, you must certify in writing that you have complied with your obligations under this Section and otherwise under this Agreement. Termination by Licensor will not limit any of its other rights or remedies under this Agreement or at law or in equity. Any provision of this Agreement that by its sense and context is intended to survive termination of this Agreement will survive termination.
12. LIMITATIONS ON LICENSOR'S LIABILITY AND UPON TIME TO SUE.
UNDER NO CIRCUMSTANCES AND UNDER NO LEGAL THEORY, TORT, CONTRACT, OR OTHERWISE, SHALL LICENSOR OR ITS SUPPLIERS OR RESELLERS BE LIABLE TO YOU OR ANY OTHER PERSON FOR ANY INDIRECT, SPECIAL, INCIDENTAL, OR CONSEQUENTIAL DAMAGES OF ANY CHARACTER INCLUDING, WITHOUT LIMITATION, DAMAGES FOR LOSS OF GOODWILL, WORK STOPPAGE, COMPUTER FAILURE OR MALFUNCTION, OR ANY AND ALL OTHER COMMERCIAL DAMAGES OR LOSSES. IN NO EVENT WILL LICENSOR BE LIABLE FOR ANY DAMAGES IN EXCESS OF THE PRICE PAID FOR SUCH LICENSE, EVEN IF LICENSOR SHALL HAVE BEEN INFORMED OF THE POSSIBILITY OF SUCH DAMAGES, OR FOR ANY CLAIM BY ANY OTHER PARTY. THIS LIMITATION OF LIABILITY SHALL NOT APPLY TO LIABILITY FOR DEATH OR PERSONAL INJURY TO THE EXTENT APPLICABLE LAW PROHIBITS SUCH LIMITATION. FURTHERMORE, SOME STATES DO NOT ALLOW THE EXCLUSION OR LIMITATION OF INCIDENTAL OR CONSEQUENTIAL DAMAGES, SO THIS LIMITATION AND EXCLUSION MAY NOT APPLY TO YOU. NO ACTION, REGARDLESS OF FORM, ARISING OUT OF ANY OF THE TRANSACTIONS UNDER THIS AGREEMENT MAY BE BROUGHT BY LICENSEE MORE THAN ONE YEAR AFTER SUCH ACTION ACCRUED.
13. TRADEMARKS.
"Electronic Software Publishing Corporation", the Electronic Software Publishing Corporation logo, "Elsop", "LinkScan", the LinkScan logo, "LinkScan QuickCheck", "LinkScan Dispatch", "MailVet", and all other trademarks which identify the Licensed Program or the company are the trademarks, and in some jurisdictions may be registered trademarks, of the Electronic Software Publishing Corporation.
14. EXPORT CONTROLS.
You agree that none of the Product or underlying information or technology will be downloaded or otherwise exported or re-exported (i) into (or to a national or resident of) Cuba, Iraq, Libya, Federal Republic of Yugoslavia (Serbia and Montenegro, U.N. Protected Areas and areas of Republic of Bosnia and Herzegovina under the control of Bosnian Serb forces), North Korea, Iran, Syria or any other country to which the U.S. has embargoed goods; or (ii) to anyone on the U.S. Treasury Department's list of Specially Designated Nationals or the U.S. Commerce Department's Table of Deny Orders. You warrant and represent that neither the U.S.A. Bureau of Export Administration nor any other federal agency has suspended, revoked or denied your export privileges. By downloading or using the Product, you are agreeing to the foregoing and you are representing and warranting that you are not located in, under the control of, or a national or resident of any such country or on any such list.
In addition, if the licensed Product is identified as a not-for-export product (for example, in the registration process or in the installation process), then the following applies: Except for export to Canada for use In Canada by Canadian citizens, the Product and any underlying technology may not be exported outside the United States or to any foreign entity or "foreign person" as defined by U.S. government regulations, Including without limitation, anyone who is not a citizen, national or lawful permanent resident of the United States. By downloading or using the Product, You are agreeing to the foregoing and you are warranting that you are not a "foreign person" or under the control of a foreign person.
15. ENTIRE AGREEMENT.
This Agreement constitutes the entire agreement between the parties in connection with the subject matter hereof and supersedes all prior and contemporaneous agreements, understandings, negotiations and discussions, whether oral or written, of the parties, and there are no warranties, representations and/or agreements between the parties in connection with the subject matter hereof except as specifically set forth or referred to herein.
16. GOVERNING LAW; SEVERABILITY.
This Agreement represents the complete agreement concerning this license and may be amended only by a writing executed by both parties. If any provision of this Agreement is held to be unenforceable, such provision shall be reformed only to the extent necessary to make it enforceable. This Agreement shall be governed by California law, without reference to conflicts of law principles. The application of the United Nations Convention on Contracts for the International Sale of Goods is expressly excluded. THE ACCEPTANCE OF ANY PURCHASE ORDER PLACED BY YOU IS EXPRESSLY MADE CONDITIONAL ON YOUR ASSENT TO THE TERMS SET FORTH HEREIN, AND NOT THOSE IN YOUR PURCHASE ORDER. Any suit to enforce the terms of this Agreement may be brought in either the United States District Court of the Northern District of California or the California Superior Court in and for the County of Santa Clara, as appropriate, and you consent to the jurisdiction and venue of such court. If either party brings any action to enforce any rights arising out of or relating to this Agreement (whether or not suit is filed), the prevailing party shall be entitled to recover its costs and expenses related to such action, including reasonable attorneys' fees except as provided under section 1: Grant of License. All terms of this Agreement which, by their nature, are intended to survive termination of this Agreement shall survive any such termination.
17. COMPLIANCE WITH THE LAW.
Licensee agrees that it will comply with all federal, state and local laws and regulations governing the use of the Product.
18. RETURN AND REFUND POLICY.
The licensor allows no returns and will make no refunds.
19. TAXES.
In addition to all license fees paid by Licensee in acquiring this license, Licensee shall pay or reimburse Licensor for all federal, state, local or other taxes not based on Licensor's net income or net worth, including, but not limited to, sales, use, value-added, privilege and property taxes, or amounts levied in lieu thereof, based on charges payable under this Agreement or based on the Product, its use or any services performed hereunder, whether such taxes are now or hereafter imposed under the authority of any federal, state, local or other taxing jurisdiction.
20. U.S. GOVERNMENT RESTRICTED RIGHTS.
Use, duplication or disclosure by an agency, agent, unit, or instrumentality of the United States Government is subject to restrictions set forth in subparagraphs (a) through (d) of the Commercial Computer-Restricted Rights clause at FAR 52.227-19 when applicable, or in subparagraph (c)(1)(ii) of the Rights in Technical Data and Computer Software clause at DFARS 252.227-7013, and in similar clauses in the NASA FAR Supplement. Contractor/manufacturer is Electronic Software Publishing Corporation, 43793 Cameron Hills Drive, Fremont, CA 94539 USA
License Version 2007-03 Revision Date: March 15, 2007 (c) Copyright 1997-2012 Electronic Software Publishing Corporation (Elsop) LinkScan (TM) and Elsop (TM) are Trademarks of Electronic Software Publishing Corporation
LinkScan for Unix. Single Document Reference Manual
LinkScan Version 12.3
© Copyright 1997-2012
Electronic Software Publishing Corporation (Elsop)
LinkScan™ and Elsop™ are Trademarks of Electronic Software Publishing Corporation
| Help Reference HowTo Card |